Touch Button Operation
When the Digital Piano is turned on, the touch buttons on the panel (left and front) light up. After no operation is performed for 15 seconds, the lights on the panel go off. When the lights are off, the touch buttons will light up again if you touch the panel.
You can change the number of seconds before the lights go off on the panel or set up the lights not to go off.
For more information, see “Switching Panel Light Settings”.
When Touch Buttons Do Not Respond
-
Turn off the power to the Digital Piano.
-
While pressing the C8 key (the rightmost key), press the “P(Power)” button.
-
Do not release the C8 key until the Digital Piano is turned on and the touch buttons start to blink.
You can release the “P(Power)” button.
-
The sensitivity of the touch buttons is set to high.
-
Operation of the Touch Buttons Alone
Touching a button (touching firmly with a fingertip and releasing immediately) will execute the function of that button.
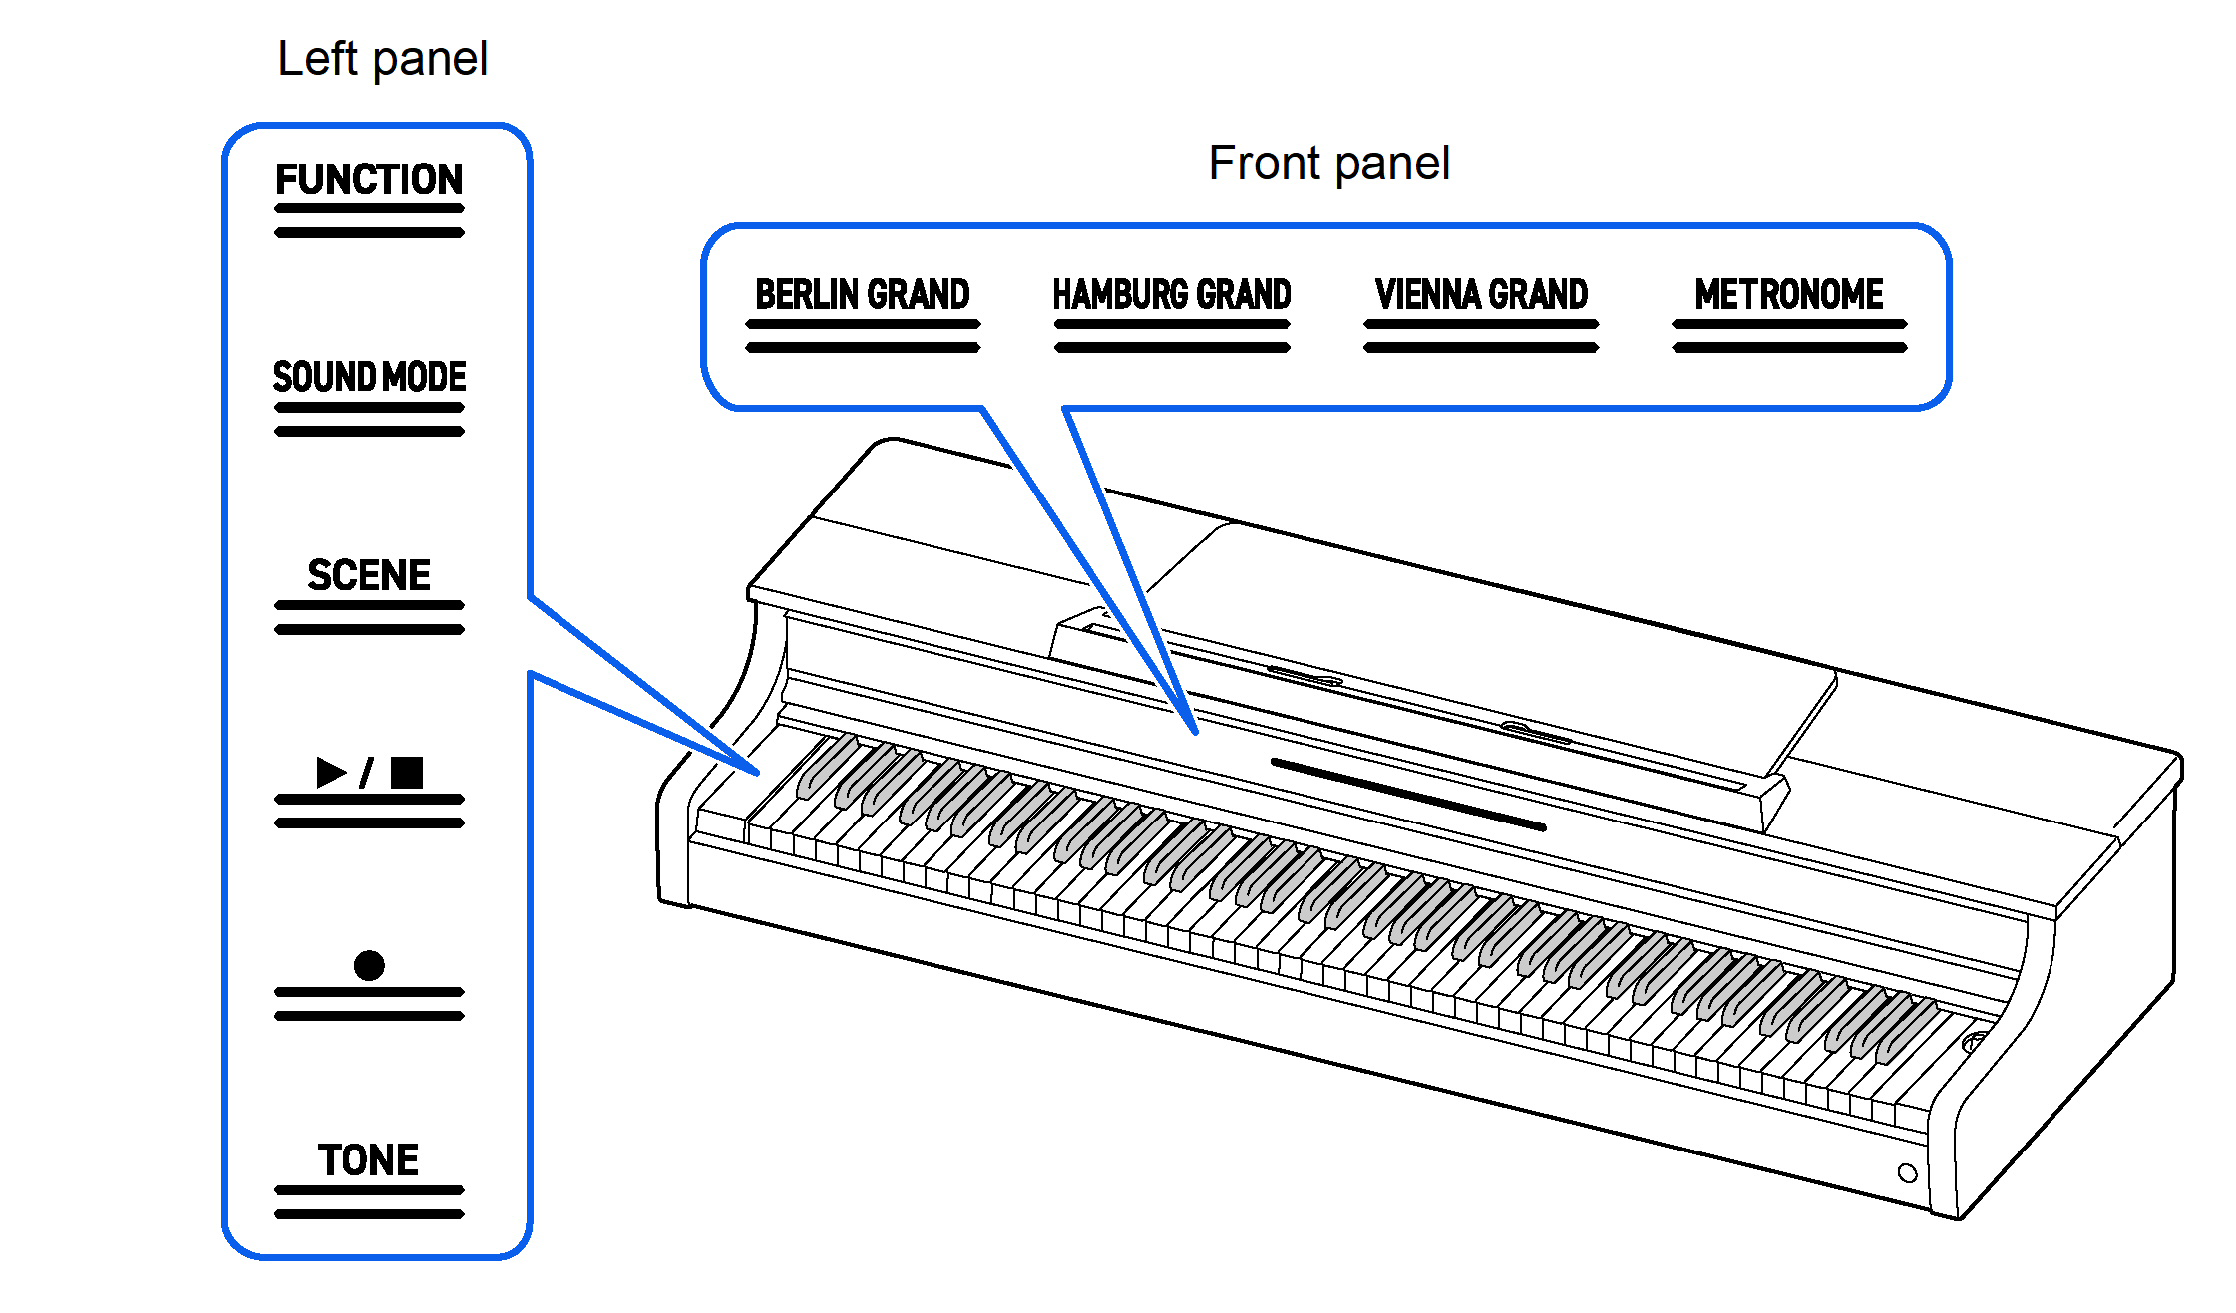
Left panel
|
Button |
Function |
|
SOUND MODE |
Switches between <On> and <Off> for [Hall Simulator/Reverb] and [Surround]. |
|
SCENE |
Recalls the settings for [SCENE] (default setting is <Preset Scene 1>). |
|
a |
Plays/Stops songs and recordings. |
|
0(REC) |
Use to record performances. |
|
TONE |
The last tone selected using the keyboard (BERLIN GRAND by default) is selected. |
-
The “FUNCTION” button only executes a function when used in combination with the keyboard or with the “SOUND MODE” button. The “FUNCTION” button on its own does not execute any function.
Front panel
|
Button |
Function |
|
BERLIN GRAND |
Selects <BERLIN GRAND> tone. |
|
HAMBURG GRAND |
Selects <HAMBURG GRAND> tone. |
|
VIENNA GRAND |
Selects <VIENNA GRAND> tone. |
|
METRONOME |
The metronome starts (or stops). |
Touch Button and Keyboard Combination Operation
By using the touch buttons (except for the “0(REC)” button and the buttons on the front panel) and the keyboard at the same time, you can change various settings.
-
The items to be set vary depending on the touch button pressed.
-
The type of keyboard operation differs depending on the item you are setting.
-
The Visual Information Bar blinks according to the setting value.
-
There are five operation types as set out below:
Selecting a Setting Value Directly (operation type A)
-
Select the setting value assigned to the key.
Example: Selecting a tone
-
While holding down the “TONE” button, press one of the C{3 to E}6 keys (Tone Selection).
-
See “Tone List” for the tones available for each key.

-
The Visual Information Bar will blink at the approximate position of the selected value.

-
Using the +/– Keys to Raise or Lower the Setting Value by 1 (operation type B)
-
Holding down a key changes the setting value continuously in increments.
-
Pressing two keys together will return the value to the initial setting (default value).
Example: Setting the tempo
-
While holding down the “SCENE” button, press the B2 key (tempo –)/ C3 key (tempo +).
-
This raises or lowers the tempo setting by 1.

-
The Visual Information Bar will blink at the approximate position of the selected value. (Leftmost: Minimum value, Rightmost: Maximum value)

-
Inputting Setting Values Using the Keys 0 to 9 (operation type C)
-
For example, to enter the value “2”, press the B0 key (2). To enter the value “20”, press the B0 Key (2) and then the A0 Key (0).
Example: Setting the tempo
-
While holding down the “SCENE” button, press a key from A0 to F{1 (tempo setting).
-
Sets the tempo in the range of 20 to 255 (beats per minute).
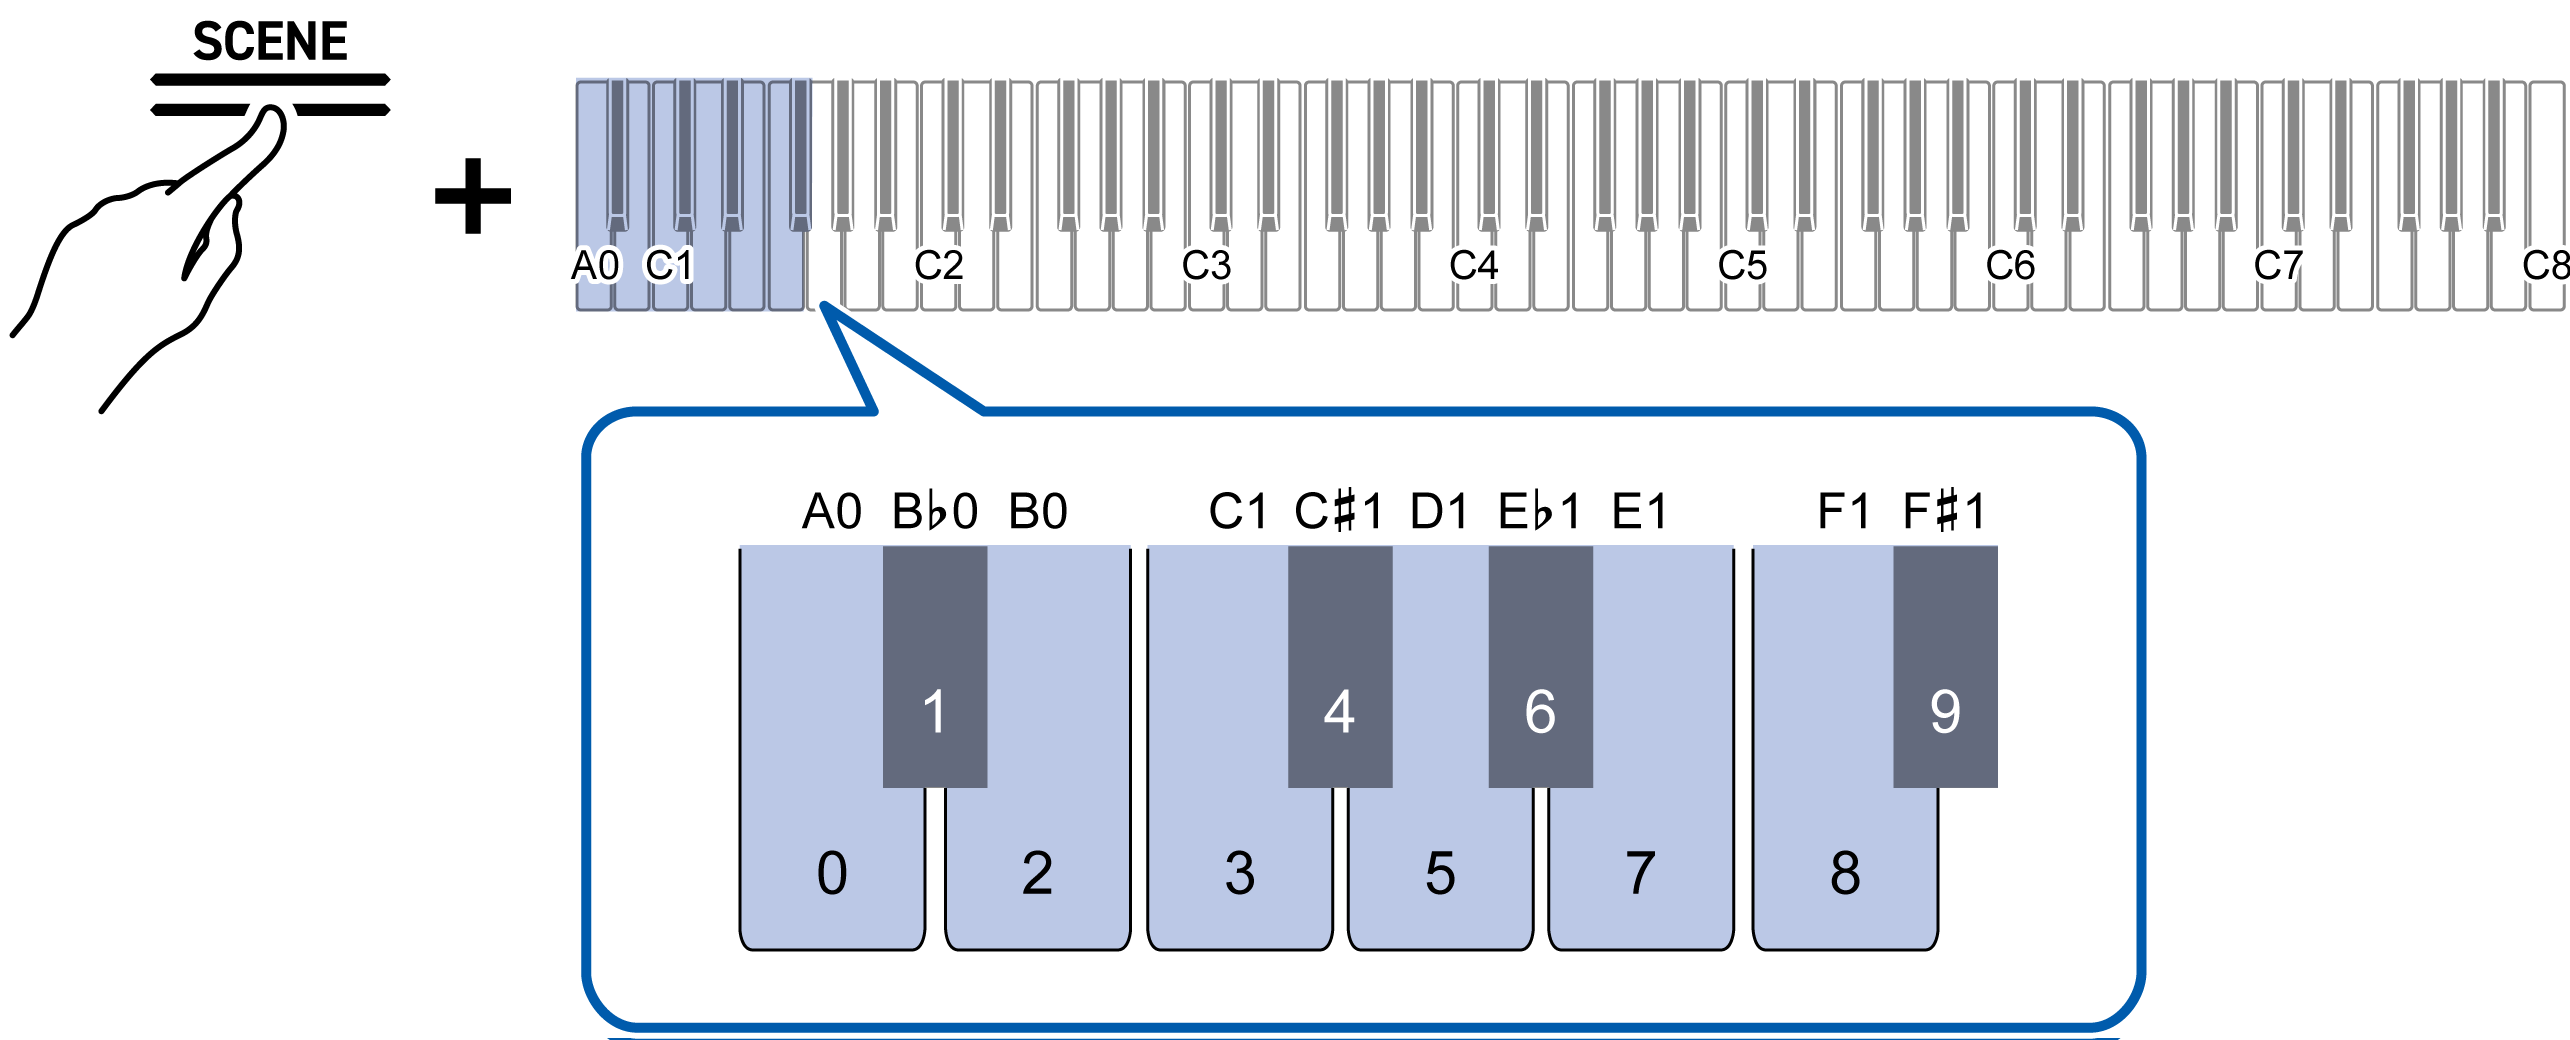
-
The Visual Information Bar will blink at the approximate position of the selected value. (Leftmost: Minimum value, Rightmost: Maximum value)

-
Switching On/Off or Changing Setting Values Using a Single Key (operation type D)
-
Each time the key is pressed, the setting is changed.
-
When the key is pressed, a sound is played according to the set value.
Example: Locking button operations
-
While holding down the “FUNCTION” button, press the C8 key (Panel Lock).

-
The Visual Information Bar blinks in the position of the selected value. (Left: Off, Middle: On, Right: Auto)

-
For more information, see “Panel Lock”.
-
Putting in Standby Mode, and Executing on Next Key Press (operation type E)
Example: Performing a Factory Reset
-
While holding down the “FUNCTION” button, press the A0 key (Factory Reset) to enter standby mode.

-
To execute the process, do not release the touch button, and perform the operation in step 2.
-
If the touch button is released in standby mode, the function will not be executed (the operation will be canceled).
-
-
Hold down the “FUNCTION” button and press the C1 key (Execute) to execute the process.

-
After performing step 2, release the touch button.
-
Processing may take some time. If so, wait until the process is complete.
-