Other Settings
This section explains other watch settings you can configure.
Changing the Watch Face
There are five patterns that you can use for the current time screen. You can select the pattern that suits your current lifestyle.
For details about the five watch faces, see the information below.
-
Display the current time screen.
-
Hold down (A) for at least two seconds.
-
Use (A) and (D) to select [SETTING].
-
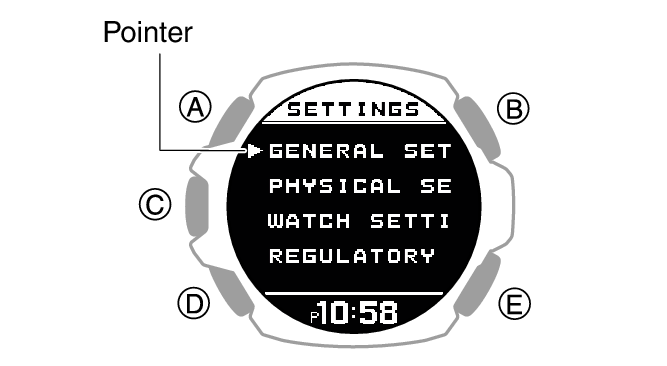
Press (C).
-
Use (A) and (D) to move the pointer to [WATCH SETTINGS].
-
Press (C).
-
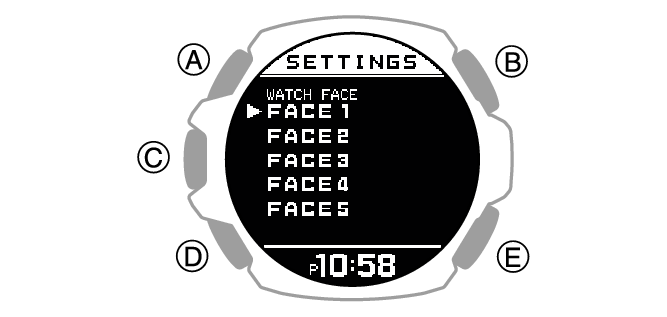
Use (A) and (D) to move the pointer with [WATCH FACE].
-
Press (C).
-
Use (A) and (D) to move the pointer with the watch face you want to select.
-
Press (C) to complete the setting operation.
-
Hold down (E) for at least one second to return to the current time screen.
This enters the Control Mode.
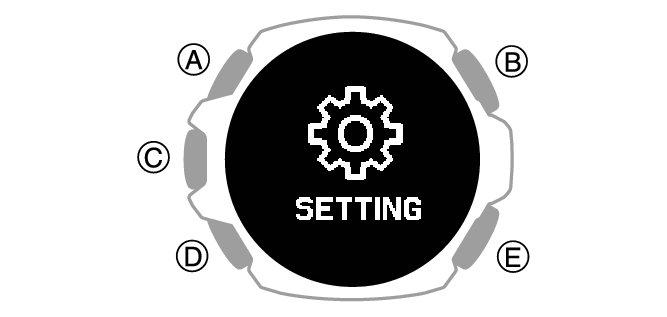
This displays the setting menu screen.
For details about displaying and customizing each watch face, see the information below.
After the setting operation is complete, a check mark appears for a few seconds, and then the watch face setting screen re-appears.
Turning On Silent Mode
While the silent mode is turned on, the watch only vibrates for notifications regardless of the beep and vibration notification settings. Illumination will not turn on while a notification or button operation is in progress.
Note
You may need to update your watch software to use silent mode.
-
Display the current time screen.
-
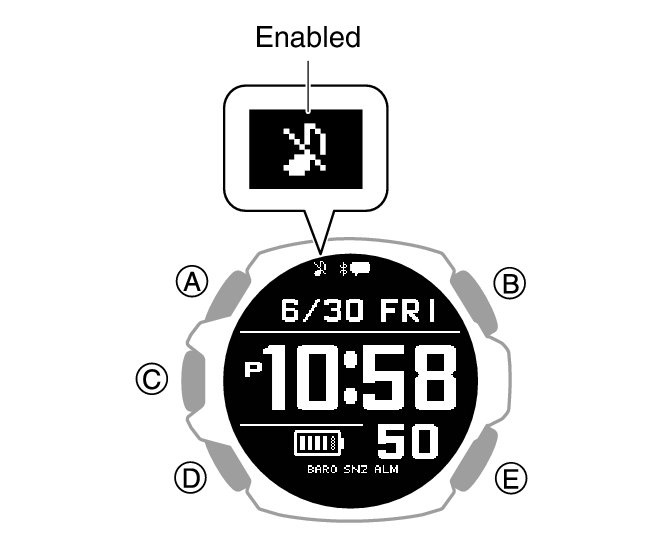
Hold down (E) for at least three seconds to toggle silent mode on or off.
Turning on silent mode causes [ ] to appear on the display.
Note
If the beeper alert and vibration are turned off and silent mode is turned on, beeper, vibration, and light notification operations are not performed.
Enabling Step Reminder
Step Reminder displays an indicator and performs a sound or vibration alert when the watch determines you have not walked enough during a specific period. This is valuable feedback that helps you achieve your exercise goals.
If the watch performs this Step Reminder alert operation, try walking for about five minutes.
-
Display the current time screen.
-
Hold down (A) for at least two seconds.
-
Use (A) and (D) to select [SETTING].
-
Press (C).
-
Use (A) and (D) to move the pointer to [GENERAL SETTINGS].
-
Press (C).
-
Use (A) and (D) to move the pointer to [STEP REMINDER].
-
Press (C).
-
Use (A) and (D) to select the step reminder ON/OFF setting you want.
-
Press (C) to complete the setting operation.
-
Hold down (E) for at least one second to return to the current time screen.
This enters the Control Mode.
This displays the setting menu screen.
This displays the GENERAL SETTINGS screen.
|
[OFF] |
Step reminder function off |
|
[ON] |
Step reminder function on |
After the setting operation is complete, a check mark appears for a few seconds, and then the step reminder function setting screen re-appears.
Note
If you do not perform any operation for two or three minutes while the setting screen is displayed, the watch automatically returns to the current time screen.
Even if step reminder is turned on, the watch will not perform notification if any one of the conditions below exists.
When the watch detects it is not being worn
While the current time is within the period defined by the bedtime and wake-up times you specified
While an activity is in progress
While the battery level indicator is ![]() or lower
or lower
When there is a sensor error
If behavior analysis does not detect walking and running, the watch may notify you that step reminder has determined that your step count is low.
Clearing an Ongoing Notification
Press any button to clear an ongoing step reminder notification.
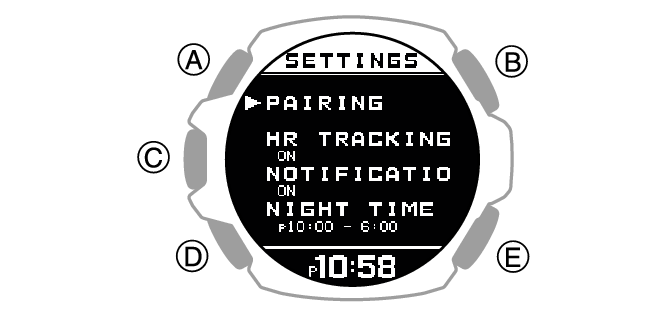
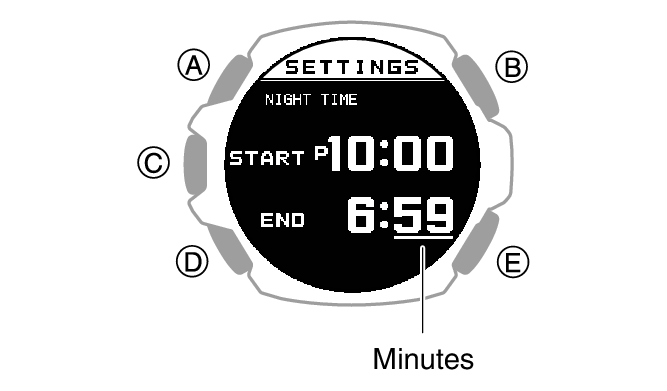
Specifying the Night Time
Specify your night time.
After you specify your night time, you can link notification reception from your phone and your heart rate measurement settings NIGHT TIME.
-
Display the current time screen.
-
Hold down (A) for at least two seconds.
-
Use (A) and (D) to select [SETTING].
-
Press (C).
-
Use (A) and (D) to move the pointer to [GENERAL SETTINGS].
-
Press (C).
-
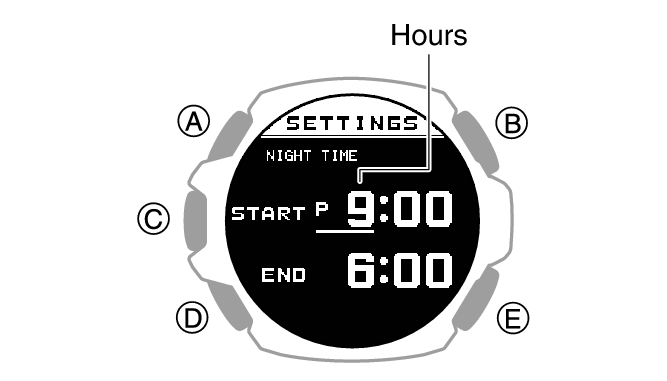
Use (A) and (D) to move the pointer to [NIGHT TIME].
-
Press (C).
-
Use (A) and (D) to change the start time hour setting.
-
Press (C).
-
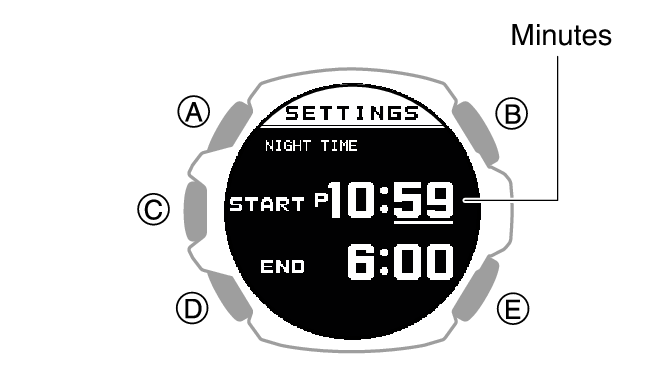
Use (A) and (D) to change the start time minute setting.
-
Press (C).
-
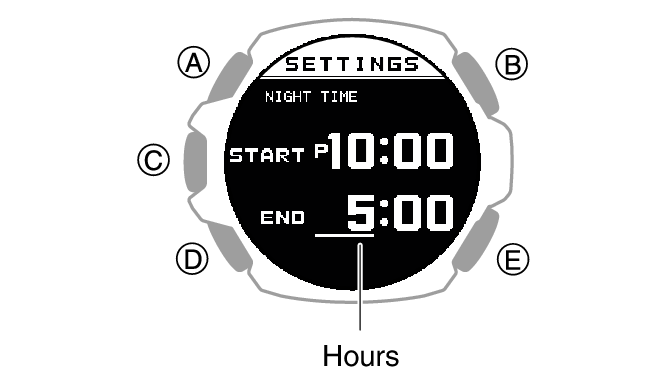
Use (A) and (D) to change the end time hour setting.
-
Press (C).
-
Use (A) and (D) to change the end time minute setting.
-
Press (C) to complete the setting operation.
-
Hold down (E) for at least one second to return to the current time screen.
This enters the Control Mode.
This displays the setting menu screen.
This displays the GENERAL SETTINGS screen.
This causes a cursor to appear at the hour setting of the night time start time.
This causes the cursor to move to the start time minute setting.
This causes the cursor to move to the end time hour setting
This causes the cursor to move to the end time minute setting.
After the setting operation is complete, a check mark appears for a few seconds, and then the night time setting screen re-appears.
Note
The allowable night time setting range is no shorter than six hours and no longer than 12 hours. If you configure a setting outside this range, the end time is automatically corrected, so the setting is within the allowable range.
If you do not perform any operation for two or three minutes while the setting screen is displayed, the watch automatically returns to the current time screen.
If sleep measurement is performed while [ACTIVITY & NIGHT TIME ON] is selected for heart rate measurement, sleep measurement will start from the time set for NIGHT TIME. For the NIGHT TIME time setting, specify your normal sleep time (bedtime and wake-up time).
Configuring Sound and Vibration Settings
In addition to button operation and notification sounds and vibration, your watch also uses sound and vibration for alerts. You can use the procedure below to enable or disable sound and vibration.
Note
The pattern and duration of the sound or vibration cannot be changed.
Regardless of the beeper and vibration alert settings, illumination turns on when you perform a button operation or when an alert operation starts. Illumination that is turned on when a button operation is performed or by a notification operation cannot be turned off.
You may need to update your watch software to use to enable this specification.
Configuring Operation Sound and Vibration Settings
-
Display the current time screen.
-
Hold down (A) for at least two seconds.
-
Use (A) and (D) to select [SETTING].
-
Press (C).
-
Use (A) and (D) to move the pointer to [GENERAL SETTINGS].
-
Press (C).
-
Use (A) and (D) to move the pointer to [BEEP/VIBE].
-
Press (C).
-
Use (A) and (D) to move the pointer to [BUTTON OPERATION].
-
Press (C).
-
Use (A) and (D) to select operation sound and vibration settings.
-
Press (C) to complete the setting operation.
-
Hold down (E) for at least one second to return to the current time screen.
This enters the Control Mode.
This displays the setting menu screen.
This displays the GENERAL SETTINGS screen.
|
|
Operation Tone |
Operation Vibration |
|
[BEEP+VIBE] |
On |
On |
|
[BEEP] |
On |
Off |
|
[VIBE] |
Off |
On |
|
[OFF] |
Off |
Off |
After the setting operation is complete, a check mark appears for a few seconds, and then the sound and vibration setting screen re-appears.
Note
If you do not perform any operation for two or three minutes while the setting screen is displayed, the watch automatically returns to the current time screen.
Configuring Notification Sound and Vibration Settings
-
Display the current time screen.
-
Hold down (A) for at least two seconds.
-
Use (A) and (D) to select [SETTING].
-
Press (C).
-
Use (A) and (D) to move the pointer to [GENERAL SETTINGS].
-
Press (C).
-
Use (A) and (D) to move the pointer to [BEEP/VIBE].
-
Press (C).
-
Use (A) and (D) to move the pointer to [NOTIFICATIONS].
-
Press (C).
-
Use (A) and (D) to select a notification sound and vibration settings.
-
Press (C) to complete the setting operation.
-
Hold down (E) for at least one second to return to the current time screen.
This enters the Control Mode.
This displays the setting menu screen.
This displays the GENERAL SETTINGS screen.
|
|
Notification Tone |
Notification Vibration |
|
[BEEP+VIBE] |
On |
On |
|
[BEEP] |
On |
Off |
|
[VIBE] |
Off |
On |
|
[USER] |
On only for user-specified setting items |
|
|
[OFF] |
Off |
Off |
[USER] setting items can be changed using the CASIO WATCHES phone app.
After the setting operation is complete, a check mark appears for a few seconds, and then the sound and vibration setting screen re-appears.
Note
If you do not perform any operation for two or three minutes while the setting screen is displayed, the watch automatically returns to the current time screen.
Configuring the Auto Light Setting
-
Display the current time screen.
-
Hold down (A) for at least two seconds.
-
Use (A) and (D) to select [SETTING].
-
Press (C).
-
Use (A) and (D) to move the pointer to [GENERAL SETTINGS].
-
Press (C).
-
Use (A) and (D) to move the pointer to [LIGHT].
-
Press (C).
-
Use (A) and (D) to move the pointer to [AUTO LIGHT].
-
Press (C).
-
Use (A) and (D) to move the pointer to [OFF] (disabled) or [ON] (enabled).
-
Press (C) to complete the setting operation.
-
Hold down (E) for at least one second to return to the current time screen.
This enters the Control Mode.
This displays the setting menu screen.
This displays the GENERAL SETTINGS screen.
After the setting operation is complete, a check mark appears for a few seconds, and then the auto light setting screen re-appears.
Specifying the Illumination Duration
You can select either 1.5 seconds or five seconds as the illumination duration.
The illumination duration setting is applied as described below.
Illumination triggered by a button operation
Auto Light illumination
Illumination that is triggered by Auto Lap, a notification, an alarm or some other notification operation
Note
You may need to update your watch software to enable illumination triggered by Auto Lap, a notification, an alarm, or some other notification operation.
-
Display the current time screen.
-
Hold down (A) for at least two seconds.
-
Use (A) and (D) to select [SETTING].
-
Press (C).
-
Use (A) and (D) to move the pointer to [GENERAL SETTINGS].
-
Press (C).
-
Use (A) and (D) to move the pointer to [LIGHT].
-
Press (C).
-
Use (A) and (D) to move the pointer to [DURATION].
-
Press (C).
-
Use (A) and (D) to select an illumination duration.
-
Press (C) to complete the setting operation.
-
Hold down (E) for at least one second to return to the current time screen.
This enters the Control Mode.
This displays the setting menu screen.
This displays the GENERAL SETTINGS screen.
|
[1.5s] |
1.5-second illumination |
|
[5.0s] |
5-second illumination |
After the setting operation is complete, a check mark appears for a few seconds, and then the illumination duration setting screen re-appears.
Note
If you do not perform any operation for two or three minutes while the setting screen is displayed, the watch automatically returns to the current time screen.
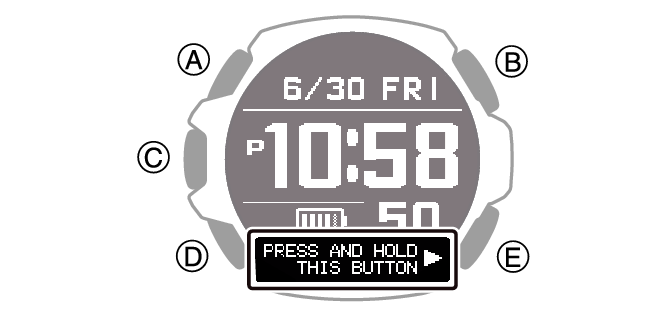
Enabling Power Saving
If you do not plan to use the product for a long time, you can conserve power by switching to power saving mode.
-
Display the current time screen.
-
Hold down (A) for at least two seconds.
-
Use (A) and (D) to select [SETTING].
-
Press (C).
-
Use (A) and (D) to move the pointer to [GENERAL SETTINGS].
-
Press (C).
-
Use (A) and (D) to move the pointer to [POWER SAVING].
-
Press (C).
This enters the Control Mode.
This displays the setting menu screen.
This displays the GENERAL SETTINGS screen.
This enables power saving and displays [PRESS AND HOLD THIS BUTTON] at the bottom of the screen.
Note
If you do not perform any operation for two or three minutes while the setting screen is displayed, the watch automatically returns to the current time screen.
Alarm and hourly time signal notification operations are disabled in Power Saving mode.
Disabling Power Saving
Hold down (E) for at least two seconds to disable power saving.
Disabling power saving causes [PRESS AND HOLD THIS BUTTON] to disappear at the bottom of the screen.
Changing the Length and Weight Units
You can select metric units (km, m, cm, kg) or imperial units (mile, yd, ft, lb) for length (height, distance, altitude) and weight (body weight) values.
Important!
When Tokyo (TOKYO) is the Home City, value units are fixed as metric (km, m, cm, kg) and cannot be changed.
-
Display the current time screen.
-
Hold down (A) for at least two seconds.
-
Use (A) and (D) to select [SETTING].
-
Press (C).
-
Use (A) and (D) to move the pointer to [GENERAL SETTINGS].
-
Press (C).
-
Use (A) and (D) to move the pointer to [UNITS].
-
Press (C).
-
Use (A) and (D) to move the pointer to [LENGTH & WEIGHT].
-
Press (C).
-
Use (A) and (D) to select the length and weight units you want.
-
Press (C) to complete the setting operation.
-
Hold down (E) for at least one second to return to the current time screen.
This enters the Control Mode.
This displays the setting menu screen.
This displays the GENERAL SETTINGS screen.
|
[km/m/cm & kg] |
Metric System |
|
[mile/yd/ft & lb] |
Imperial System |
After the setting operation is complete, a check mark appears for a few seconds, and then the unit setting screen re-appears.
Note
If you do not perform any operation for two or three minutes while the setting screen is displayed, the watch automatically returns to the current time screen.
You can also use the CASIO WATCHES phone app to change the length unit.
Specifying the Calorie Display Unit
You can use the procedure below to select either calories (kcal) or joules (kJ) as the calories burned unit.
Important!
When Tokyo (TOKYO) is the Home City, the calories burned unit is fixed as kilocalories (kcal) and cannot be changed.
-
Display the current time screen.
-
Hold down (A) for at least two seconds.
-
Use (A) and (D) to select [SETTING].
-
Press (C).
-
Use (A) and (D) to move the pointer to [GENERAL SETTINGS].
-
Press (C).
-
Use (A) and (D) to move the pointer to [UNITS].
-
Press (C).
-
Use (A) and (D) to move the pointer to [ENERGY].
-
Press (C).
-
Use (A) and (D) to select the calorie unit you want.
-
Press (C) to complete the setting operation.
-
Hold down (E) for at least one second to return to the current time screen.
This enters the Control Mode.
This displays the setting menu screen.
This displays the GENERAL SETTINGS screen.
|
[kcal] |
Kilocalories |
|
[kJ] |
Kilojoules |
After the setting operation is complete, a check mark appears for a few seconds, and then the unit setting screen re-appears.
Note
If you do not perform any operation for two or three minutes while the setting screen is displayed, the watch automatically returns to the current time screen.
You can also use the CASIO WATCHES phone app to change the calories burned unit.
Specifying the Barometric Pressure Unit
You can specify either hectopascals (hPa) or inches of mercury (inHg) as the display unit for barometric pressure values.
Important!
When Tokyo (TOKYO) is the Home City, the barometric pressure unit is fixed as hectopascals (hPa) and cannot be changed.
-
Display the current time screen.
-
Hold down (A) for at least two seconds.
-
Use (A) and (D) to select [SETTING].
-
Press (C).
-
Use (A) and (D) to move the pointer to [GENERAL SETTINGS].
-
Press (C).
-
Use (A) and (D) to move the pointer to [UNITS].
-
Press (C).
-
Use (A) and (D) to move the pointer to [BAROMETER].
-
Press (C).
-
Use (A) and (D) to select a barometric pressure unit.
-
Press (C) to complete the setting operation.
-
Hold down (E) for at least one second to return to the current time screen.
This enters the Control Mode.
This displays the setting menu screen.
This displays the GENERAL SETTINGS screen.
|
[hPa] |
Hectopascals |
|
[inHg] |
Inches of mercury |
After the setting operation is complete, a check mark appears for a few seconds, and then the unit setting screen re-appears.
Note
If you do not perform any operation for two or three minutes while the setting screen is displayed, the watch automatically returns to the current time screen.
You can also use the CASIO WATCHES phone app to change the barometric pressure unit.
Specifying the Temperature Unit
You can select either Celsius (°C) or Fahrenheit (°F) as the temperature display unit.
Important!
When Tokyo (TOKYO) is the Home City, the temperature unit is fixed as Celsius (°C) and cannot be changed.
-
Display the current time screen.
-
Hold down (A) for at least two seconds.
-
Use (A) and (D) to select [SETTING].
-
Press (C).
-
Use (A) and (D) to move the pointer to [GENERAL SETTINGS].
-
Press (C).
-
Use (A) and (D) to move the pointer to [UNITS].
-
Press (C).
-
Use (A) and (D) to move the pointer to [TEMPERATURE].
-
Press (C).
-
Use (A) and (D) to select a temperature unit.
-
Press (C) to complete the setting operation.
-
Hold down (E) for at least one second to return to the current time screen.
This enters the Control Mode.
This displays the setting menu screen.
This displays the GENERAL SETTINGS screen.
|
[°C] |
Celsius |
|
[°F] |
Fahrenheit |
After the setting operation is complete, a check mark appears for a few seconds, and then the unit setting screen re-appears.
Note
If you do not perform any operation for two or three minutes while the setting screen is displayed, the watch automatically returns to the current time screen.
You can also use the CASIO WATCHES phone app to change the temperature unit.