Activity Measurement Settings
This section explains how to configure settings related to activity measurement.
The setting menu that is displayed depends on the activity.
Activity-specific Setting Menu
|
Activity |
Setting Menu |
|---|---|
|
POOL SWIMMING |
TRAINING ALERT |
|
GYM WORKOUT |
TRAINING ALERT |
|
INTERVAL TIMER |
TRAINING ALERT |
|
RUNNING |
GPS TRACKING |
|
WALKING |
|
|
BIKING |
|
|
TREKKING |
GPS TRACKING |
|
OPEN WATER SWIMMING |
|
|
TRAIL RUNNING |
|
|
OTHER ACTIVITY |
GPS TRACKING |
Note
You may need to update your watch software to use the TREKKING and/or OTHER ACTIVITY.
Enabling Auto Lap Timing
While auto lap timing is enabled, a lap is recorded each time you run the lap distance you specified.
Perform the required operations with the CASIO WATCHES phone app or on the watch to configure auto lap measurement settings.
You can set a lap measurement distance up to 10.0 km, in increments of 0.1 km.
To configure auto lap settings with the CASIO WATCHES phone app
Before using Auto Lap Timing, you need to use the CASIO WATCHES phone app to specify the Auto Lap Timing distance.
Check the connection
Make sure the  symbol is shown on the watch display when you perform the procedure below. If is not displayed, refer to the information at the link below.
-
 Tap the “CASIO WATCHES” icon.
 -
Tap the “My Watch” tab.
-
Select “GBD-H2000” and tap it.
-
Select the setting you want to change and then perform the operation shown on the screen.
To configure auto lap settings with the watch
-
Display the current time screen.
-
Press (C).
-
Use (A) and (D) to select an activity.
-
Press (C).
-
If you selected an activity that receives GPS signals for measurement, press (A) or (D).
-
Hold down (A) for at least two seconds.
-
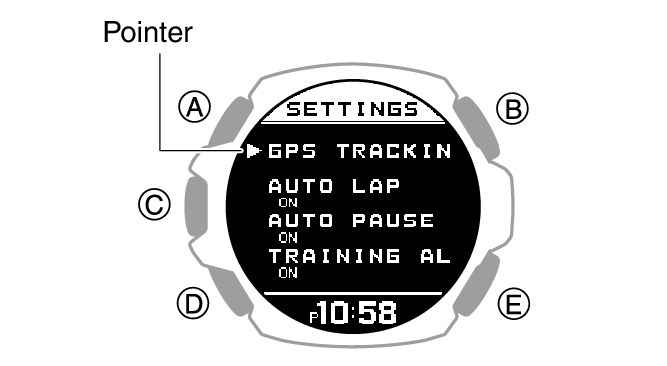
Use (A) and (D) to move the pointer to [AUTO LAP].
-
Press (C).
-
Use (A) and (D) to select [ON].
-
Press (C).
-
Use (A) and (D) to specify the integer part of the distance value.
-
Press (C).
-
Use (A) and (D) to specify the decimal part of the distance value.
-
Press (C) to complete the setting operation.
-
Press (E) to exit the setting screen.
This enters the Activity Mode.
Example:
For activities that can be measured without receiving GPS signals, this operation returns to the measurement operation ready screen. In this case, advance to step 6.
If you selected an activity that receives GPS signals for measurement, this operation starts the GPS signal receive operation.
Refer to the information below to determine whether or not an activity receives GPS signals for measurement.
This displays the measurement operation ready screen.
This displays the activity measurement setting screen.
To disable auto lap measurement, select [OFF].
The currently selected setting is indicated by a check mark (![]() ) to the left.
) to the left.
This causes a cursor to appear, which you can use to set the auto lap measurement distance.
This moves the cursor to the decimal part of the distance value.
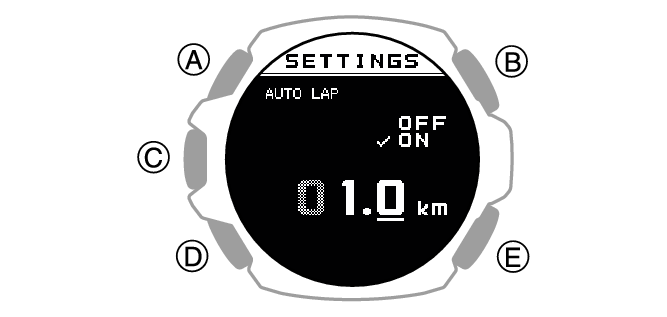
After the setting operation is complete, a check mark appears for a few seconds, and then the activity measurement setting screen re-appears.
Note
If GPS is being used for Auto Lap measurement, the Auto Lap measurement timing may be somewhat different from the distance setting.
While the setting is being configured, the watch will exit the setting operation automatically after about two or three minutes of non-operation.
Setting the Swimming Pool Length
Specifying a pool length helps when measuring lap times.
-
Display the current time screen.
-
Press (C).
-
Use (A) and (D) to select [POOL SWIMMING].
-
Press (C).
-
Hold down (A) for at least two seconds.
-
Use (A) and (D) to move the pointer to [POOL LENGTH].
-
Press (C).
-
Use (A) and (D) to select the pool length you want.
-
Press (C) to complete the setting operation.
This enters the Activity Mode.
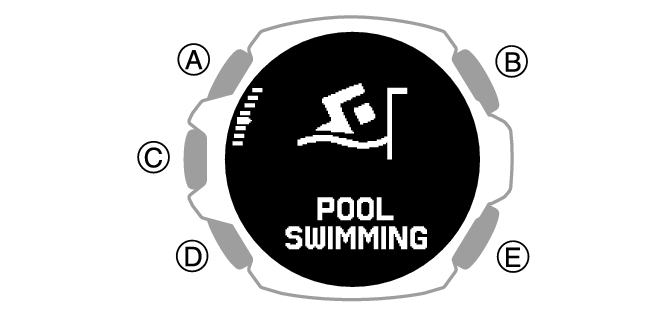
This displays the pool swimming setting screen.
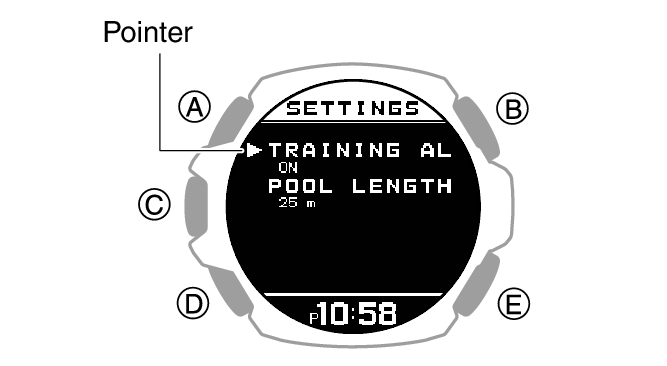
This displays the pool length setting screen.
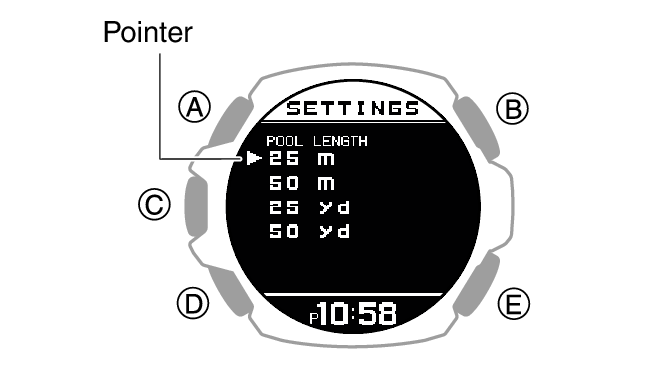
|
[25m] |
25 meters |
|
[50m] |
50 meters |
|
[25yd] |
25 yards |
|
[50yd] |
50 yards |
After the setting operation is complete, a check mark appears for a few seconds, and then the pool swimming setting screen re-appears.
Note
While the setting is being configured, the watch will exit the setting operation automatically after about two or three minutes of non-operation.
Enabling Auto Pause
While Auto Pause is enabled, timing will pause whenever you stop running.
Note
When a measurement operation is restarted from auto pause, the watch display will be delayed from the actual start, but the time and distance being measured are not affected.
For RUNNING and WALKING, Auto Pause becomes difficult to work while the GPS reception interval is [OFF] or if the GPS signal is lost.
For BIKING, Auto Pause does not work while the GPS reception interval is set to [LONG] or [OFF], or if the GPS signal is lost.
If auto pause does not work after it is enabled or if measurement does not resume, pause and resume measurement manually.
-
Display the current time screen.
-
Press (C).
-
Use (A) and (D) to select an activity.
-
Press (C).
-
If you selected an activity that receives GPS signals for measurement, press (A) or (D).
-
Hold down (A) for at least two seconds.
-
Use (A) and (D) to move the pointer to [AUTO PAUSE].
-
Press (C).
-
Use (A) and (D) to move the pointer to [ON] (enabled) or [OFF] (disabled).
-
Press (C) to complete the setting operation.
-
Press (E) to exit the setting screen.
This enters the Activity Mode.
Example:
For activities that can be measured without receiving GPS signals, this operation returns to the measurement operation ready screen. In this case, advance to step 6.
If you selected an activity that receives GPS signals for measurement, this operation starts the GPS signal receive operation.
Refer to the information below to determine whether or not an activity receives GPS signals for measurement.
This displays the measurement operation ready screen.
This displays the activity measurement setting screen.
After the setting operation is complete, a check mark appears for a few seconds, and then the activity measurement setting screen re-appears.
Note
While the setting is being configured, the watch will exit the setting operation automatically after about two or three minutes of non-operation.
You can also use the CASIO WATCHES phone app to enable or disable Auto Pause.
Changing the GPS Receive Interval
Use the procedure below to specify the interval for receiving GPS signals and to acquire location information during activity measurement.
-
Display the current time screen.
-
Press (C).
-
Use (A) and (D) to select an activity.
-
Press (C).
-
Press (A) or (D).
-
Hold down (A) for at least two seconds.
-
Use (A) and (D) to move the pointer to [GPS TRACKING].
-
Press (C).
-
Use (A) and (D) to move the pointer to [GPS].
-
Press (C).
-
Use (A) and (D) to select a GPS receive interval.
-
Press (C) to complete the setting operation.
-
Press (E) twice to exit the setting screen.
This enters the Activity Mode.
Example:
This displays the GPS signal receive start screen.
This displays the measurement operation ready screen.
This displays the activity measurement setting screen.
|
[HIGH] |
Receive interval: Every second |
|
[NORMAL] |
Receive interval: Every second |
|
[LONG] |
Receive interval: Every minute |
|
[OFF] |
GPS not used. |
After the setting operation is complete, a check mark appears for a few seconds, and then the GPS setting screen re-appears.
Note
While the setting is being configured, the watch will exit the setting operation automatically after about two or three minutes of non-operation.
You can also change the GPS receive interval using the CASIO WATCHES phone app.
With BIKING or OPEN WATER SWIMMING, distance traveled is not displayed in the measurement results when the GPS reception interval is [LONG] or [OFF].
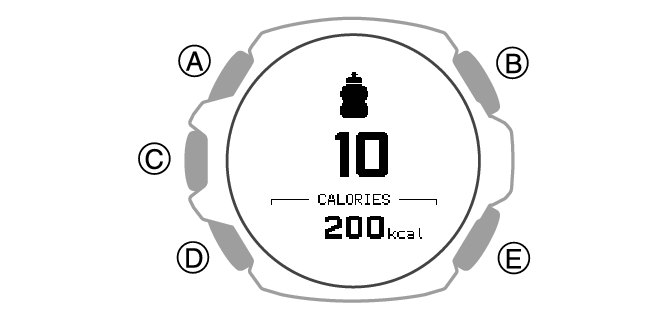
Configuring Training Alert Settings
You can use the CASIO WATCHES phone app to specify target alert intervals to inform you of your calories burned, elapsed time, distance traveled, and altitude climbed during training. Every time an alert target value is reached during activity measurement, a sound or vibration operation is performed, and an alert screen appears to notify you.
You can use a single watch operation to toggle all the alerts you configured with the CASIO WATCHES phone app between on and off.
To specify training alert target values with the CASIO WATCHES phone app
Important!
Note that you cannot specify alert target values using watch operations. Use the CASIO WATCHES phone app to configure settings.
Check the connection
Make sure the symbol is shown on the watch display when you perform the procedure below. If is not displayed, refer to the information at the link below.
-
Tap the “CASIO WATCHES” icon.
-
Tap the “My Watch” tab.
-
Select “GBD-H2000” and tap it.
-
Select the setting you want to change and then perform the operation shown on the screen.
To enable training alert with the watch
-
Display the current time screen.
-
Press (C).
-
Use (A) and (D) to select an activity.
-
Press (C).
-
If you selected an activity that receives GPS signals for measurement, press (A) or (D).
-
Hold down (A) for at least two seconds.
-
Use (A) and (D) to move the pointer to [TRAINING ALERT].
-
Press (C).
-
Use (A) and (D) to move the pointer to [ON].
-
Press (C) to complete the setting operation.
-
Press (E) to exit the setting screen.
This enters the Activity Mode.
Example:
For activities that can be measured without receiving GPS signals, this operation returns to the measurement operation ready screen. In this case, advance to step 6.
If you selected an activity that receives GPS signals for measurement, this operation displays the GPS signal reception start screen.
Refer to the information below to determine whether or not an activity receives GPS signals for measurement.
This displays the measurement operation ready screen.
This displays the activity measurement setting screen.
If you want to disable training alerts, move the pointer to [OFF].
After the setting operation is complete, a check mark appears for a few seconds, and then the activity measurement setting screen re-appears.
Important!
Use the CASIO WATCHES phone app to specify an alert target value for each item. You cannot use watch operations to configure alert target value settings.
Note
While the setting is being configured, the watch will exit the setting operation automatically after about two or three minutes of non-operation.
Training Alert Screen Indicators
A training alert screen appears on the watch when a specified target value is reached during activity measurement.
|
Indicator: |
Meaning: |
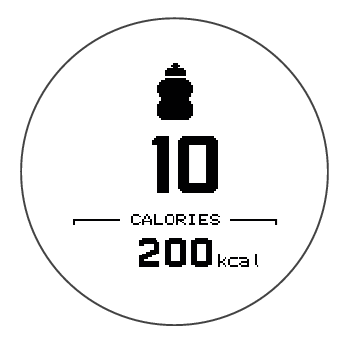 |
Calories burned target value reached. |
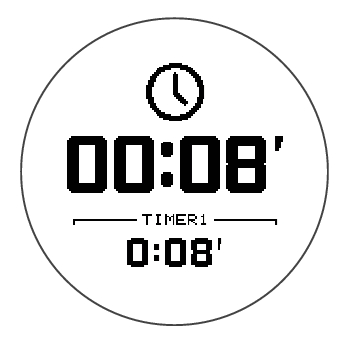 |
Elapsed time target value reached. |
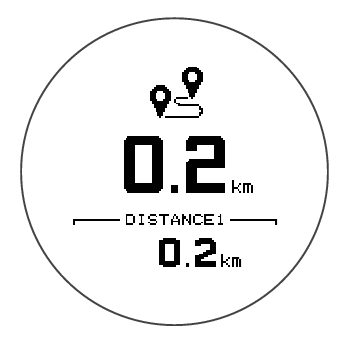 |
Travel distance target value reached. |
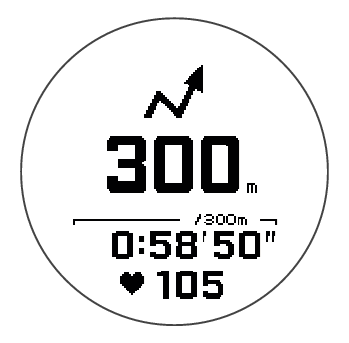 |
Cumulative altitude target value reached. |
Note
Alerts that can be configured depend on the activity.
Alert Screen Switching
A training alert screen appears when a specified target value is reached during activity measurement.
Example:
The watch returns to the running measurement screen if you press (C) or if you do not perform any operation for about nine seconds.
Configuring Distance Measurement Settings
You can select measurement of either linear distance (straight-line distance) or surface distance (actual distance).
Surface distance measurements are calculated by taking horizontal travel as well as vertical movement into consideration.
-
Display the current time screen.
-
Press (C).
-
Use (A) and (D) to select an activity.
-
Press (C).
-
Press (A) or (D).
-
Hold down (A) for at least two seconds.
-
Use (A) and (D) to move the pointer to [GPS TRACKING].
-
Press (C).
-
Use (A) and (D) to move the pointer to [3D DISTANCE].
-
Press (C).
-
Use (A) and (D) to select a setting.
-
Press (C) to complete the setting operation.
-
Press (E) to exit the setting screen.
This enters the Activity Mode.
Example:
This displays the GPS signal receive start screen.
This displays the measurement operation ready screen.
This displays the activity measurement setting screen.
|
[ON] |
Surface distance measurement |
|
[OFF] |
Linear distance measurement |
After the setting operation is complete, a check mark appears for a few seconds, and then the GPS setting screen re-appears.
Note
While the setting is being configured, the watch will exit the setting operation automatically after about two or three minutes of non-operation.
You can also use the CASIO WATCHES phone app to change the distance measurement type.
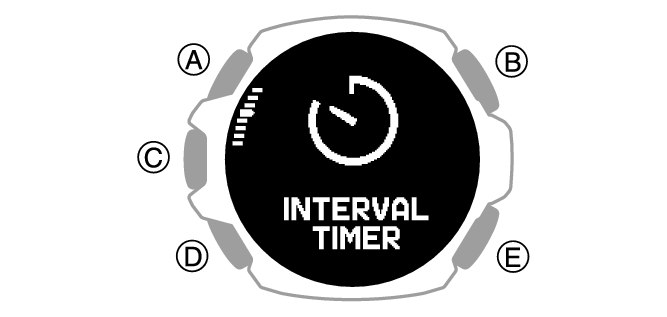
Configuring Interval Timer Settings
To configure interval timer settings with the CASIO WATCHES phone app
You can use the CASIO WATCHES phone app to configure an interval timer that combines multiple types of timers.
For information about interval timers, see the information below.
Check the connection
Make sure the symbol is shown on the watch display when you perform the procedure below. If is not displayed, refer to the information at the link below.
-
Tap the “CASIO WATCHES” icon.
-
Tap the “My Watch” tab.
-
Select “GBD-H2000” and tap it.
-
Select the setting you want to change and then perform the operation shown on the screen.
To configure interval timer settings with the watch
If a timer countdown operation is in progress, reset the timer to its current start time before performing this operation.
-
Display the current time screen.
-
Press (C).
-
Use (A) and (D) to select [INTERVAL TIMER].
-
Press (C).
-
Hold down (A) for at least two seconds.
-
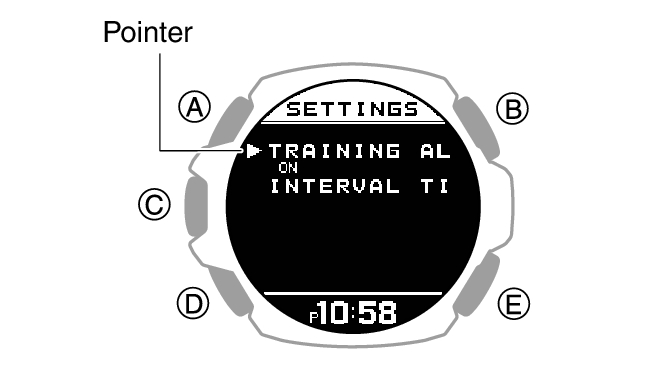
Use (A) and (D) to move the pointer to [INTERVAL TIMER].
-
Press (C).
-
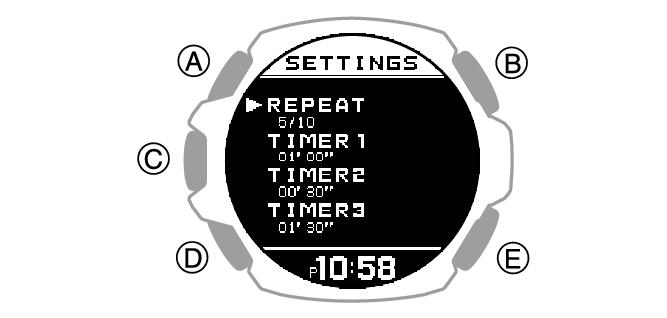
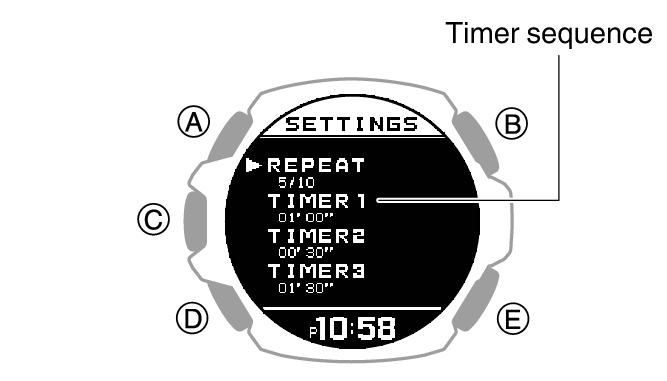
Use (A) and (D) to move the pointer to [REPEAT].
-
Press (C).
-
Use (A) and (D) to specify the number of timer repeats (Auto Repeat).
-
Press (C).
-
Use (A) and (D) to specify the sequence of the timers.
-
Press (C).
-
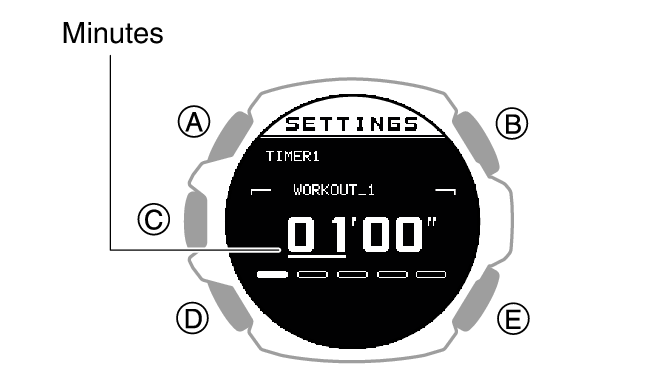
Use (A) and (D) to change the minutes setting.
-
Press (C).
-
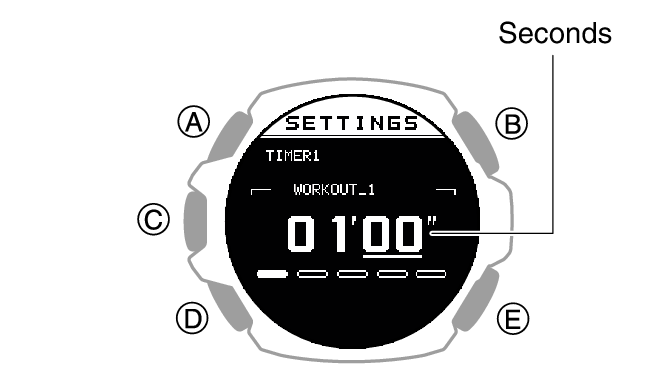
Use (A) and (D) to change the seconds setting.
-
Press (C) to complete the setting operation.
-
Repeat steps 11 through 16 as many times as necessary to configure the settings of other timers.
This enters the Activity Mode.
This displays the interval training setting screen.
This displays the interval timer setting screen.
This displays the number of timer repeats (1 to 10) setting screen.

After the setting operation is complete, a check mark appears for a few seconds, and then the interval timer setting screen re-appears.
To setup the first timer, setup [TIMER1].
This causes the cursor to appear at the minutes setting of the first timer.
This causes the cursor to move to the seconds setting of the first timer.
After the setting operation is complete, a check mark appears for a few seconds, and then the interval timer setting screen re-appears.
Note
Pressing (E) during the above procedure goes back one screen.
You can use the CASIO WATCHES phone app to change timer names. A timer name can include a combination of up to 14 alphabetic letters (A to Z), numbers (0 to 9), and symbols (/+-_?&).