Altitude Measurement
The watch takes altitude readings and displays results based on air pressure measurements taken by a built-in pressure sensor.

Important!
The altitude readings displayed by the watch are relative values that are calculated based on barometric pressure measured by the watch’s pressure sensor. This means that barometric pressure changes due to weather can cause altitude readings taken at the same location to be different. Also note that the value displayed by the watch may be different from the actual elevation and/or sea level elevation indicated for the area where you are located. When using the watch’s altimeter while mountain climbing, it is recommended that you regularly calibrate its readings in accordance with local altitude (elevation) indications.
The altitude correction value you specify and/or barometric pressure changes may cause a negative value to be displayed.
Check the information at the link below to find out about how to minimize differences between readings produced by the watch, and values provided by local altitude (elevation) indications.
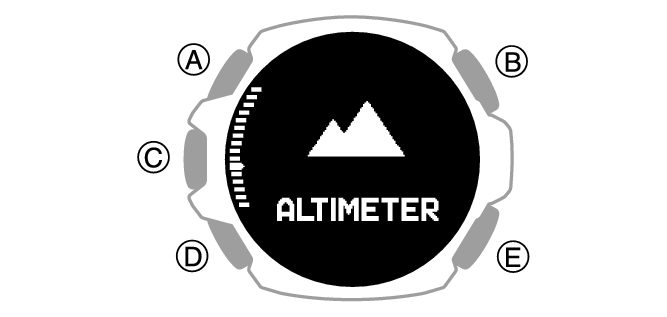
Checking the Current Altitude
-
Display the current time screen.
-
Use (A) and (D) to select [ALTIMETER].
-
Press (C).
-
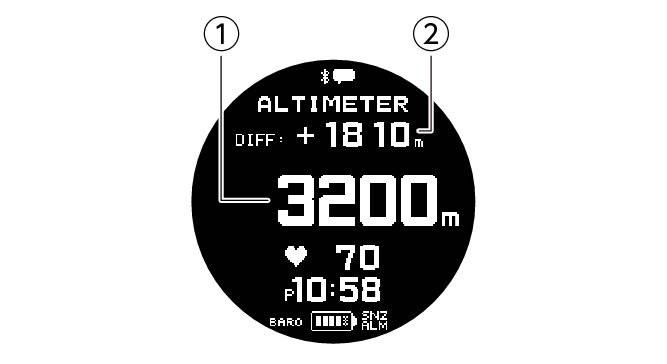
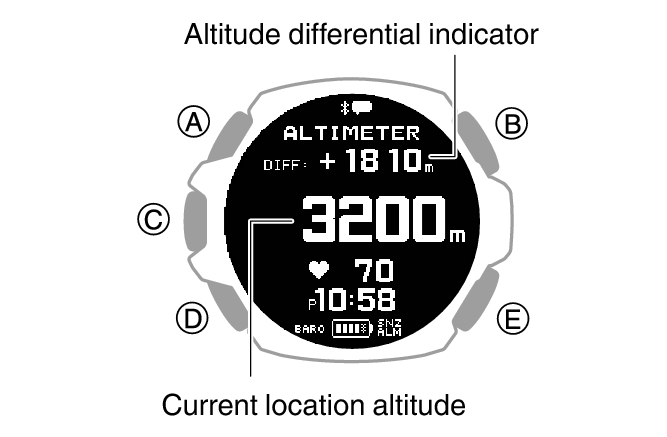
Current location altitude
-
Differential between reference altitude and current altitude
-
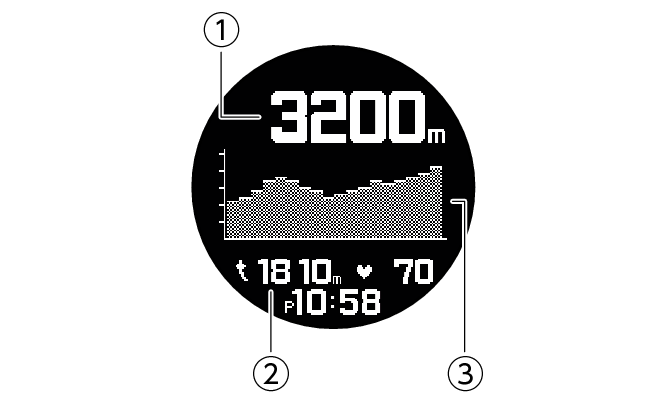
Altitude graph
This displays the altitude for your current location.
Each press of (A) or (D) toggles between the value display and graph display.
Value Screen
Graph Screen

The watch takes altitude readings every second for about the first three minutes. After that, it takes readings according to the watch’s auto measurement interval setting.
Check the information at the link below to find out how to configure the auto measurement interval.
To retrigger measurement, press (C).
To return to the current time screen, hold down (E) for at least one second.
Note
Measurement range: -10,000 m to 10,000 m (-32,800 to 32,800 feet) (Measurement unit: 1 meter (5 feet))
Note that calibrating altitude readings will cause a change in the measurement range.
[- - - - -] appears for the measured value if it is outside the allowable range.
Setting a Reference Altitude and Taking Altitude Differential Readings
You can use the procedure below to display the differential between a reference altitude and another altitude. This makes it easy to measure the altitude differential between two points while climbing or trekking.
-
Use the contour lines on your map to determine the altitude differential between your current location and your destination.
-
Take an altitude reading of your current location.
-
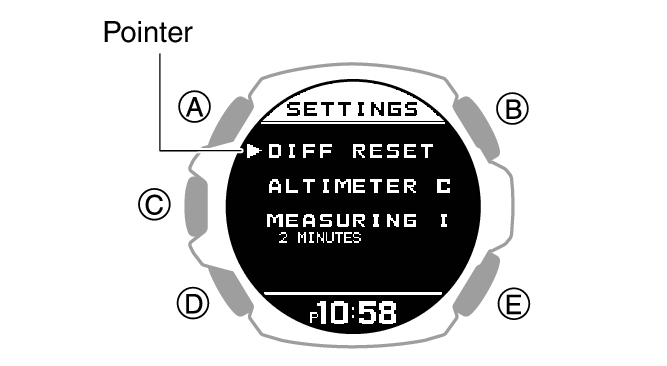
Hold down (A) for at least two seconds.
-
Use (A) and (D) to move the pointer to [DIFF RESET].
-
Use (C) to set your current location’s altitude as the reference altitude.
-
Press (E).
-
While comparing the difference between the altitude you found on the map and the altitude differential displayed by the watch, advance towards your destination.
This displays the altitude measurement setting screen.
After the setting operation is complete, a check mark appears for a few seconds, and then the altitude measurement setting screen re-appears.
This returns to the altitude measurement screen.
When the altitude differential you found on the map is the same as that displayed by the watch, it means you are close to your destination.
Note
[- - - - -] is displayed when a reading is outside the allowable altitude measurement range (±3,000 m (±9,840 feet)) or if a measurement error occurs.
Calibrating Altitude Readings
To minimize the difference between locally indicated and measured values, you should update the reference altitude value before setting off on and during treks or any other activities where you take altitude readings.
Also, you can ensure accurate measurements by checking a map local altitude indications or some other source for your current location’s altitude, and regularly calibrating watch readings with the latest information while mountain climbing.
Note
You can find out the altitude at your current location from signs, maps, on the Internet, etc.
Differences between actual altitude and watch readings can be caused by the factors below.
Changes in barometric pressure
Changes in temperature caused by variations in barometric pressure and by elevation
Though altitude readings can be taken without calibration, doing so may produce readings that are very different from indications by altitude markers, etc.
-
Display the current time screen.
-
Use (A) and (D) to select [ALTIMETER].
-
Press (C).
-
Hold down (A) for at least two seconds.
-
Use (A) and (D) to move the pointer to [ALTIMETER CALIBRATION].
-
Press (C).
-
Use (A) and (D) to move the pointer to [MANUAL].
-
Press (C).
-
Use (A) and (D) to input the altitude at your current location.
-
Press (C) to complete the setting operation.
-
Press (E) to exit the setting screen.
This displays the altitude measurement setting screen.
To return the altitude setting to its initial factory default value, select [OFFSET OFF].
This displays the manual correction screen.

After the setting operation is complete, a check mark appears for a few seconds, and then the altitude measurement setting screen re-appears.
Setting the Auto Measurement Interval
You can select an auto measurement interval of either five seconds or two minutes.
-
Display the current time screen.
-
Use (A) and (D) to select [ALTIMETER].
-
Press (C).
-
Hold down (A) for at least two seconds.
-
Use (A) and (D) to move the pointer to [MEASURING INTERVAL].
-
Press (C).
-
Use (A) and (D) to select an auto measurement interval.
-
Press (C) to complete the setting operation.
-
Press (E) to exit the setting screen.
This displays the altitude measurement setting screen.
|
[2 MINUTES] |
Readings taken every second for the first three minutes, and then every two minutes for about the next 12 hours. |
|
[5 SECONDS] |
Readings taken every second for the first three minutes, and then every five seconds for about one hour. |
After the setting operation is complete, a check mark appears for a few seconds, and then the altitude measurement setting screen re-appears.
Note
The watch automatically returns to the current time screen if you do not perform any operation for about one hour during altitude measurement.
Altitude Reading Precautions
Effects of Temperature
When taking altitude readings, take the steps below to keep the watch at as stable a temperature as possible. Changes in temperature can affect altitude readings.
Take readings with the watch on your wrist.
Take readings in an area where temperature is stable.
Altitude Readings
Do not use this watch while skydiving, hang gliding, paragliding, gyrocopter flying, glider flying, or engaged in other activities where altitude changes suddenly.
Altitude readings produced by this watch are not intended for special-purpose or industrial level use.
In an aircraft, the watch measures the in-cabin pressurized air pressure, so readings will not match altitudes announced by the crew.
Altitude Readings (Relative Altitude)
This watch uses International Standard Atmosphere (ISA) relative altitude data defined by the International Civil Aviation Organization (ICAO). Barometric pressure generally becomes lower as altitude increases.
Correct measurement may not be possible under the conditions below.
During unstable atmospheric conditions
During sudden temperature changes
After the watch has been subjected to strong impact
Measured Altitude Value Adjustment Using GPS Signal Data
If you performed a GPS signal receive operation before starting measurement of an activity that uses GPS signals for measurement, the measured altitude value will be automatically corrected when the watch receives correction information. Note, however, that this also may result in some difference between the measured value and the actual altitude.
Also note that the measured altitude value adjustment operation using GPS signal data may take a few minutes. The adjustment operation may take even longer, depending on your current environment. Regular manual adjustment of the measured altitude value using locally available information is recommended. The watch will not use GPS signal data to adjust measured altitude values for one hour after you adjust the measured altitude value manually.