Using Spreadsheet
The Spreadsheet app makes it possible to perform calculations using a 45-row × 5-column (cell A1 to E45) spreadsheet.
To perform the operations in this section, first launch the Spreadsheet app. Press  , select the Spreadsheet app icon, and then press
  . This displays the spreadsheet screen.
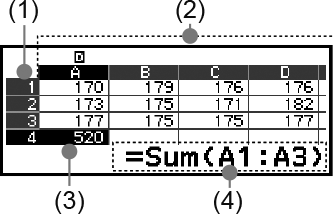
(1) Row numbers (1 to 45)
(2) Column letters (A to E)
(3) Cursor: Indicates the currently selected cell. The row number and column letter of the currently selected cell are displayed in black, and the other cell row numbers and column letters are displayed in dark gray.
(4) Edit box: Shows the contents of the cell where the cursor is currently located.
Important!
Any time you change the calculator app, turn off the calculator or press the  key, every input into the spreadsheet is cleared.
Inputting and Editing Cell Contents
You can input a constant or a formula into each cell.
Constants: A constant is something whose value is fixed as soon as you finalize its input. A constant can be either a numeric value, or a calculation expression (such as 7+3, sin30, A1×2, etc.) that does not have an equal sign (=) in front of it.
Formulas: A formula that starts with an equal sign (=), such as =A1×2, is executed as it is written.
Note
A maximum of 49 bytes can be input into a cell (number of bytes before the input is confirmed by pressing  ) that is being edited. How the number of bytes is counted is shown below.
- Numerals, variables, symbols: 1 byte per character
- Commands, functions: 1 byte each
Each entire command or function is counted as one byte. For example, the following are one byte: "√ (", "Sum(".
The number of bytes consumed after the input is confirmed is as shown below, according to the contents entered in each cell.
- Constants: 14 bytes, regardless of the number of input digits*
- Formulas: Number of input bytes (49 bytes maximum) + 15 bytes
* If you enter a constant with 11 or more significant digits, the value will be converted to 10 significant digits when the input is confirmed.
Example: If you input 12345678915 (11 digits), the value will be converted to 1.234567892 x 10¹⁰ (10 digits).
To display the remaining input capacity
Press  , select [Available Memory], and then press .
Inputting a Constant and Formula into a Cell
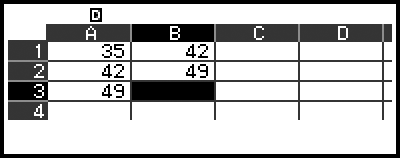
Example 1: Into cells A1, A2, and A3, input constants 7×5, 7×6, and A2+7 respectively. And then, input the following formula into cell B1: =A1+7.
1. Move the cursor to cell A1.
2. Perform the key operation below.
- 7
 576
576
 (A)
(A)
 7
7 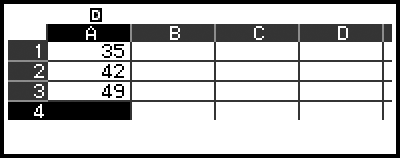
3. Move the cursor to cell B1, and then perform the key operation below.
 (=)(A)
 7
7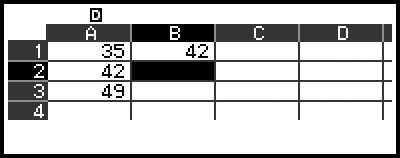
Note
On the spreadsheet screen, you can store the value in a cell to a variable. For example, performing the following operation while the screen in step 3 is displayed will store 42 (calculation result of the formula input into cell B1) to variable A: 
 – [A=] > [Store]. For details about variables, see "Variables (A, B, C, D, E, F, x, y, z)".
You can specify whether a formula in the edit box should be displayed as it is or as its calculation result value. See "Spreadsheet App Setting Items".
To edit existing cell data
1. Move the cursor to the cell whose contents you want to edit, and then press .
Instead of pressing , you can also perform the operation below.
– [Edit Cell]
Cell contents in the edit box will change from align right to align left. A text cursor (|) will appear in the edit box so you can edit its contents.
2. Use  and
and  to move the text cursor around the contents of the cell, and edit them as required.
3. To finalize and apply your edits, press .
To input a cell reference name using the Grab command
The Grab command can be used in place of manual reference name (such as A1) input using a key operation to select and input a cell you want to reference.
Example 2: Continuing from Example 1, input the following formula into cell B2: =A2+7.
1. Move the cursor to cell B2.
2. Perform the operation below.
- (=)
 – [Spreadsheet] > [Grab]
- 7
Cell Relative and Absolute References
There are two types of cell reference: relative and absolute.
Relative cell reference
The cell reference (A1) in a formula like =A1+7 is a relative reference, which means that it changes depending on the cell where the formula is located. If the formula =A1+7 is originally located in cell B1, for example, copying and then pasting to cell C3 will result in =B3+7 being input into cell C3. Since the copy and paste operation moves the formula one column (B to C) and two rows (1 to 3) the A1 relative cell reference in the formula is moved one column and two rows to B3. If the result of a copy and paste operation causes a relative cell reference name to change to something that is outside the range of the spreadsheet cells, the applicable column letter and/or row number will be replaced by a question mark (?), and "ERROR" will be displayed as the cell’s data.
Absolute cell reference
If you want the row or the column, or both the row and the column parts of a cell reference name to remain the same no matter where you paste them, you need to create an absolute cell reference name. To create an absolute cell reference, put a dollar sign ( ) in front of the column name and/or row number. You can use one of three different absolute cell references: absolute column with relative row (A1), relative column with absolute row (A1), or absolute row and column (A1).
To input the absolute cell reference symbol ()
While inputting a formula into a cell, press and then select [Spreadsheet] > [].
To cut and paste spreadsheet data
1. Move the cursor to the cell whose data you want to cut.
2. Press , select [Cut & Paste], and then press .
This enters paste standby. To cancel paste standby, press  or
or  .
.
3. Move the cursor to the cell into which you want to paste the data you just cut, and then press .
Pasting data simultaneously deletes the data from the cell where you performed the cut operation, and automatically cancels paste standby.
Note
In the case of a cut and paste operation, cell references do not change when pasted, regardless of whether they are relative or absolute.
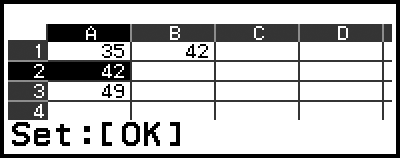
To copy and paste spreadsheet data
1. Move the cursor to the cell whose data you want to copy.
2. Press , select [Copy & Paste], and then press .
This causes "Paste:[OK]" to appear at the bottom of the screen. You can continue to paste while this message is displayed.
3. Move the cursor to the cell into which you want to paste the data you just copied.
4. Press .
The contents of the cell you copied are pasted and the cursor moves down to the next cell.
5. If you want to paste the same contents to another cell, repeat steps 3 and 4.
If you want to continue pasting to the cell to which the cursor has been moved, just repeat the operation in step 4.
6. To end the paste operation, press or .
Note
When you copy the contents of a cell containing a formula with a relative reference, the relative reference will change in accordance with the location of the cell where the contents are pasted.
To delete input data from a specific cell
Move the cursor to the cell whose contents you want to delete and then press  .
.
To delete the contents of all the cells in a spreadsheet
Press , select [Delete All], and then press .
Using Spreadsheet App Special Commands
In the Spreadsheet app, the commands below can be used inside formulas or constants. These commands are on the menu that appears when you press and then select [Spreadsheet].
Min(
Returns the minimum of the values in a specified range of cells.
Syntax: Min(start cell:end cell)
Max(
Returns the maximum of the values in a specified range of cells.
Syntax: Max(start cell:end cell)
Mean(
Returns the mean of the values in a specified range of cells.
Syntax: Mean(start cell:end cell)
Sum(
Returns the sum of the values in a specified range of cells.
Syntax: Sum(start cell:end cell)
Example 3: Continuing from Example 1, input the formula =Sum(A1:A3), which calculates the sum of cells A1, A2, and A3, into cell A4.
1. Move the cursor to cell A4.
2. Input =Sum(A1:A3).
- (=) – [Spreadsheet] > [Sum]
(A)
– [Spreadsheet] > [:]
(A)

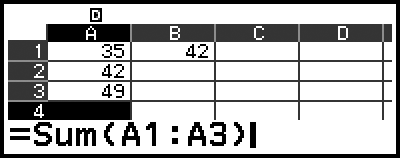
3. Press .

Batch Inputting the Same Formula or Constant into Multiple Cells
You can use the procedures in this section to input the same formula or constant into a specific series of cells. Use the Fill Formula command to batch input a formula, or Fill Value to batch input a constant.
Note
If the input formula or constant includes a relative reference, the relative reference will be input in accordance with the upper-left cell of the specified range. If the input formula or constant includes an absolute reference, the absolute reference will be input into all of the cells in the specified range.
To batch input the same formula into a series of cells
Example 4: Continuing from Example 1, batch input into cells B1, B2, and B3 a formula that doubles the value of the cell to the left and then subtracts 3.
1. Move the cursor to cell B1.
2. Press , select [Fill Formula], and then press .
This displays a Fill Formula screen.
3. In the "Form" line, input the formula =2A1−3: 2(A) 3.
3.
Input of the equals symbol (=) at the beginning is not required.
4. In the "Range" line, specify B1:B3 as the range of the batch input.

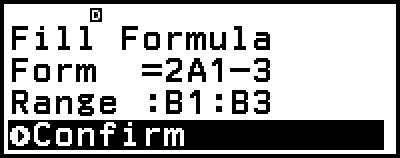
5. To apply the input, press .
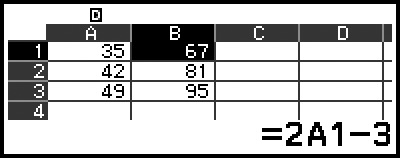
This inputs =2A1−3 into cell B1, =2A2−3 into cell B2, and =2A3−3 into cell B3.
To batch input the same constant into a series of cells
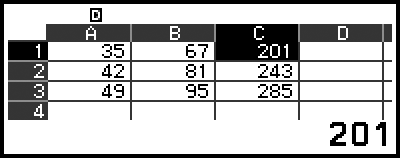
Example 5: Continuing from Example 4, batch input into cells C1, C2, and C3 values that are triple the values in the cells to their left.
1. Move the cursor to cell C1.
2. Press , select [Fill Value], and then press .
This displays a Fill Value screen.
3. In the "Value" line, input the constant B1×3:  (B)3.
(B)3.
4. In the "Range" line, specify C1:C3 as the range of the batch input.
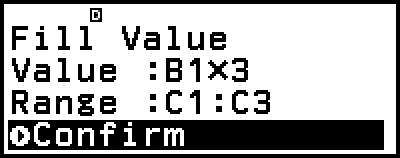
5. To apply the input, press .
This inputs the values of each calculation result into cells C1, C2, and C3.
Spreadsheet App Setting Items
The setting items below are included on the TOOLS menu.
"◆" indicates the initial default setting.
Auto Calc
Specifies whether or not formulas should be re-calculated automatically.
On◆: Enables auto re-calculation.
Off: Disables auto re-calculation.
Show Cell
Specifies whether a formula in the edit box should be displayed as it is or as its calculation result value.
Formula◆: Displays the formula as it is.
Value: Displays the calculation result value of the formula.
Auto Calc and Recalculate
"Auto Calc" is a setting item on the TOOLS menu (see "Spreadsheet App Setting Items").
With the Spreadsheet app’s initial default setting (Auto Calc: On), formulas in a cell are automatically re-calculated each time the cell contents are edited. Depending on the content of the spreadsheet, auto re-calculation can take a long time to complete. When Auto Calc is disabled (Off), you need to execute re-calculation manually as required.
To execute re-calculation manually
Press , select [Recalculate], and then press .
Note
Even if the Auto Calc setting is On, you should execute [Recalculate] in the cases below.
- When the SETTINGS menu is used to change the Angle Unit setting
- When a cell contains a formula using a variable and the corresponding variable is updated