Specifying a Port
After you specify a port, you can view its high tide and low tide information, Moon age, and sunrise and sunset time information.
-
1.Enter the Timekeeping Mode.
-
2.Hold down (A) for at least two seconds.
-
This displays the Timekeeping Mode setting screen.
-
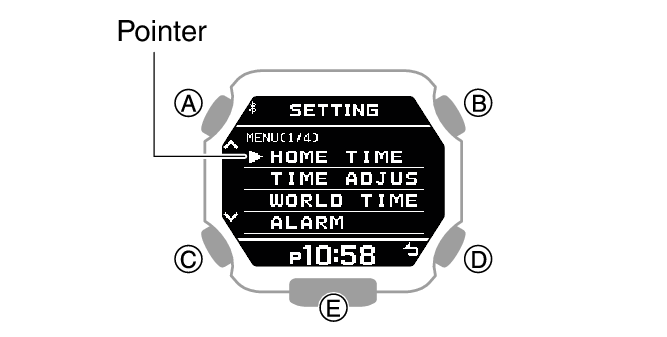
3.Use (A) and (C) to move the pointer to [TIDE&MOON&SUN].
-
4.Press (B).
-
5.Use (A) and (C) to select a port specification method.
-
[APP]
Port specification using CASIO WATCHES.
[PRESET]
Specification of a port from the list of presets in watch memory.
[USER]
Specification of a port defined by you.
-
6.Press (B).
-
- If you selected [APP] above, this will complete the port specification operation. [SETTING COMPLETED] will appear for a few seconds, and then the port specification method setting screen will re-appear.
- If you selected [PRESET] above, continue with port selection.
- If you selected [USER] above, specify the details of the custom point you want to use.
-
7.To exit the setting screen, hold down (C) for at least one second.
-
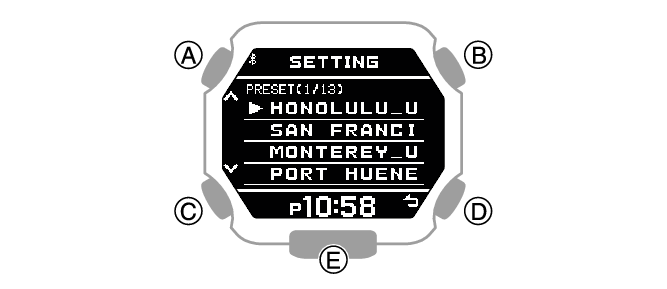
If you selected [PRESET]
50 ports selected from among the total of approximately 3,300 ports available using CASIO WATCHES are preset in watch memory.
Selecting [PRESET] and pressing (B) in the above procedure will display a list of watch preset ports.
-
1.Use (A) and (C) to move the pointer to the port you want.
-
2.Press (B).
-
After the setting operation is complete, [SETTING COMPLETED] will appear for a few seconds, and then the port setting screen will re-appear.
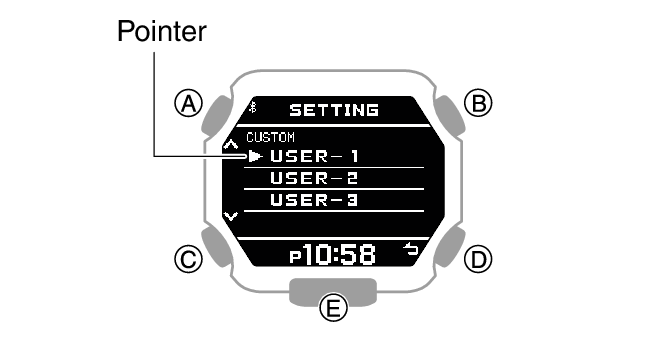
If you selected [USER]
You can configure settings for up to three custom points.
-
1.Use (A) and (C) to move the pointer to [CUSTOM].
-
- If you want to use a custom point you previously configured, move the pointer to [SELECT].
-
2.Press (B).
-
3.Use (A) and (C) to move the pointer to the custom point you want to set.
-
- If you selected [SELECT] in step 1
- ①
-
Select a custom point you previously configured.
- ②
-
Press (B).
After the setting operation is complete, [SETTING COMPLETED] will appear for a few seconds, and then the [USER] setting screen will re-appear. Go to step 7 under “Specifying a Port”.
-
4.Press (B).
-
- This displays the custom point item selection screen.
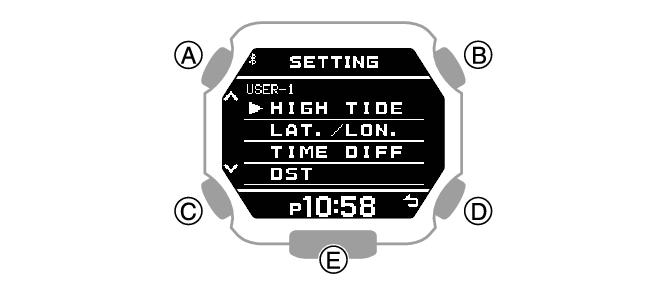
[HIGH TIDE]
High tide time
[LAT./LON.]
Latitude and longitude
[TIME DIFF]
Time offset
[DST]
Summer time
-
5.Use (A) and (C) to move the pointer to the item whose setting you want to change.
-
6.Press (B).
-
7.Specify the high tide time of the custom point.
-
- On the custom point item selection screen, select [HIGH TIDE].
- ①
-
Use (A) and (C) to change the high tide time hour setting.
- ②
-
Press (B).
- ③
-
Use (A) and (C) to change the high tide time minute setting.
- ④
-
Press (B).
- ⑤
-
Use (A) and (C) to specify whether or not you want to save the current input values.
[YES]
Saves current settings.
[NO]
Discards current settings.
[RETURN]
Returns to the high tide time setting screen.
- ⑥
-
Press (B) to register the high tide time.
After registration of the information is complete, [SETTING COMPLETED] will appear for a few seconds, and then the custom point item selection screen will re-appear.
-
8.Specify the latitude and longitude of the custom point.
-
- On the custom point item selection screen, move the pointer to [LAT./LON.].
- ①
-
Use (A) and (C) to specify [N] (north) or [S] (south) as the latitude direction.
- ②
-
Press (B).
- ③
-
Use (A) and (C) to specify a latitude value.
- ④
-
Press (B).
- ⑤
-
Use (A) and (C) to specify [E] (east) or [W] (west) as the longitude direction.
- ⑥
-
Press (B).
- ⑦
-
Use (A) and (C) to specify a longitude value.
- ⑧
-
Press (B).
- ⑨
-
Use (A) and (C) to specify whether or not you want to save the current input values.
[YES]
Saves current settings.
[NO]
Discards current settings.
[RETURN]
Returns to the hour setting screen.
- ⑩
-
Press (B) to register your latitude and longitude.
After registration of the information is complete, [SETTING COMPLETED] will appear for a few seconds, and then the custom point item selection screen will re-appear.
-
9.Specify the UTC time offset of the custom point.
-
- On the custom point item selection screen, move the pointer to [TIME DIFF].
- ①
-
Use (A) and (C) to change the UTC time offset.
- ②
-
Press (B).
- ③
-
Use (A) and (C) to specify whether or not you want to save the current input values.
[YES]
Saves current settings.
[NO]
Discards current settings.
[RETURN]
Returns to the time offset setting screen.
- ④
-
Press (B) to complete time offset registration.
After registration of the information is complete, [SETTING COMPLETED] will appear for a few seconds, and then the custom point item selection screen will re-appear.
-
10.Specify the DST on/off setting for the custom point.
-
- On the custom point item selection screen, move the pointer to [DST].
- ①
-
Use (A) and (C) to specify [OFF] (standard time display) or [ON] (summer time display).
- ②
-
Press (B) to register the DST on/off setting.
After registration of the information is complete, [SETTING COMPLETED] will appear for a few seconds, and then the custom point item selection screen will re-appear.
-
 Top of page