Playing MIDI Data
Music Library
Use the Music Library to listen to and practice famous piano pieces.
Built-in Songs
These are 60 built-in songs (No.1 to 60 in the Music Library).
See “Music Library List” for song listings.
User Songs
These are 10 songs (No.61 to 70 in the Music Library) saved to the Digital Piano’s internal memory from an external source. Saving User Songs is executed using a smart device or via a USB flash drive connected to the Digital Piano.
For details, see “Using the Dedicated App” and “Loading USB Flash Drive Files into the Digital Piano”.
MIDI Recorder Songs
These song are recorded with this Digital Piano’s MIDI Recorder.
For more information, see “Recording a Performance with the MIDI Recorder”.
USB Flash Drive Songs
A standard MIDI file (SMF format 0/1) or CASIO MIDI file (CMF format) song stored on a USB flash drive. You can easily play these back without loading them into the unit.
For saving MIDI data that can be played on this unit to a USB flash drive, see “Copying MIDI Song Data to a USB Flash Drive Using a Computer”.
Switching to MIDI Recorder
The default setting for [Recorder] on this Digital Piano is <MIDI Recorder>.
-
While holding down the “FUNCTION” button, press the B3 key (MIDI Recorder).
Selecting a Setting Value Directly (operation type A)

Selecting Songs for Playback from the Music Library
Operate with <MIDI Recorder>.
-
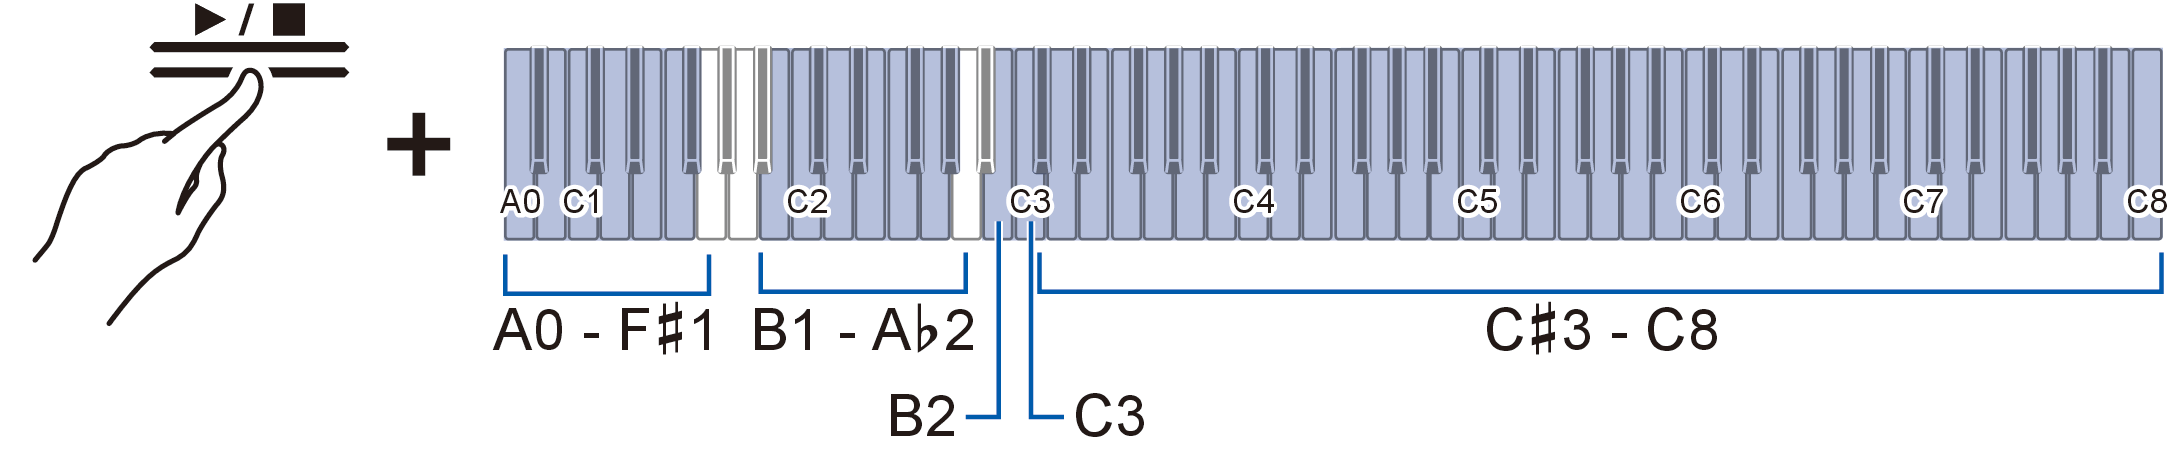
Hold down the “a” button and use the corresponding key to select a song. Once you have made your selection, release the “a” button.
-
See “Music Library List” for song listings.
-
Select a song assigned to a key (Built-in Songs: C{3 to C8 keys, User Songs: B1 to A}2 keys)
-
Specify song numbers (Built-in Songs: 1 to 60, User Songs: 61 to 70) using the A0 to F{1 keys
Inputting Setting Values Using the Keys 0 to 9 (operation type C)
-
Use keys B2/C3 (Song Select – / Song Select +) to specify previous/next song (Built-in Songs, User Songs, MIDI Recorder Songs)
Using the +/– Keys to Raise or Lower the Setting Value by 1 (operation type B)
-
-
To start playback, touch the “a” button.
-
To stop playback in the middle of a song, touch the “a” button again.
-
The beat indicator lights up in time with the beat of the song (left side for the first beat, right side for the remaining beats).
-
Playback ends when the end of the song is reached.
-
Selecting a MIDI Recorder Song for Playback
Operate with <MIDI Recorder>.
-
While holding down the “a” button, press the A2 key (MIDI Recorder Song).
Selecting a Setting Value Directly (operation type A)

-
To start playing a song, touch the “a” button.
-
To stop playback in the middle of a song, touch the “a” button again.
-
Playback ends when the end of the song is reached.
-
Selecting a USB Flash Drive Song for Playback
Attach the USB flash drive containing the songs to the USB Type A port on the Digital Piano.
For information on using USB flash drives, see “Inserting/Removing a USB Flash Drive from the Digital Piano”.
Operate with <MIDI Recorder>.
-
While holding down the “a” button, press the B}2 key (USB Flash Drive Song).
Switching On/Off or Changing Setting Values Using a Single Key (operation type D)

-
Default value: Off
Setting Value
Setting Details
Off
Songs stored in the Digital Piano (Music Library songs, MIDI Recorder Song) are eligible for song selection
On
Songs stored on a USB flash drive (USB Flash Drive Songs) are eligible for song selection
-
-
Hold down the “a” button and use the corresponding key to select a song. After selecting a song, press the “a” button.

-
Specify song numbers 0 to 99 using the A0 to F{1 keys (numbers 0 to 99 are automatically assigned to each file in ascending order of the file name).
Inputting Setting Values Using the Keys 0 to 9 (operation type C)
-
Use keys B2/C3 (Song Select – / Song Select +) to specify previous/next song number
Using the +/– Keys to Raise or Lower the Setting Value by 1 (operation type B)
-
-
To start playback, touch the “a” button.
-
To stop playback in the middle of a song, touch the “a” button again.
-
The beat indicator lights up in time with the beat of the song (left side for the first beat, right side for the remaining beats).
-
Playback ends when the end of the song is reached.
-
Changing the Tempo
Select the song to be played before changing the setting.
-
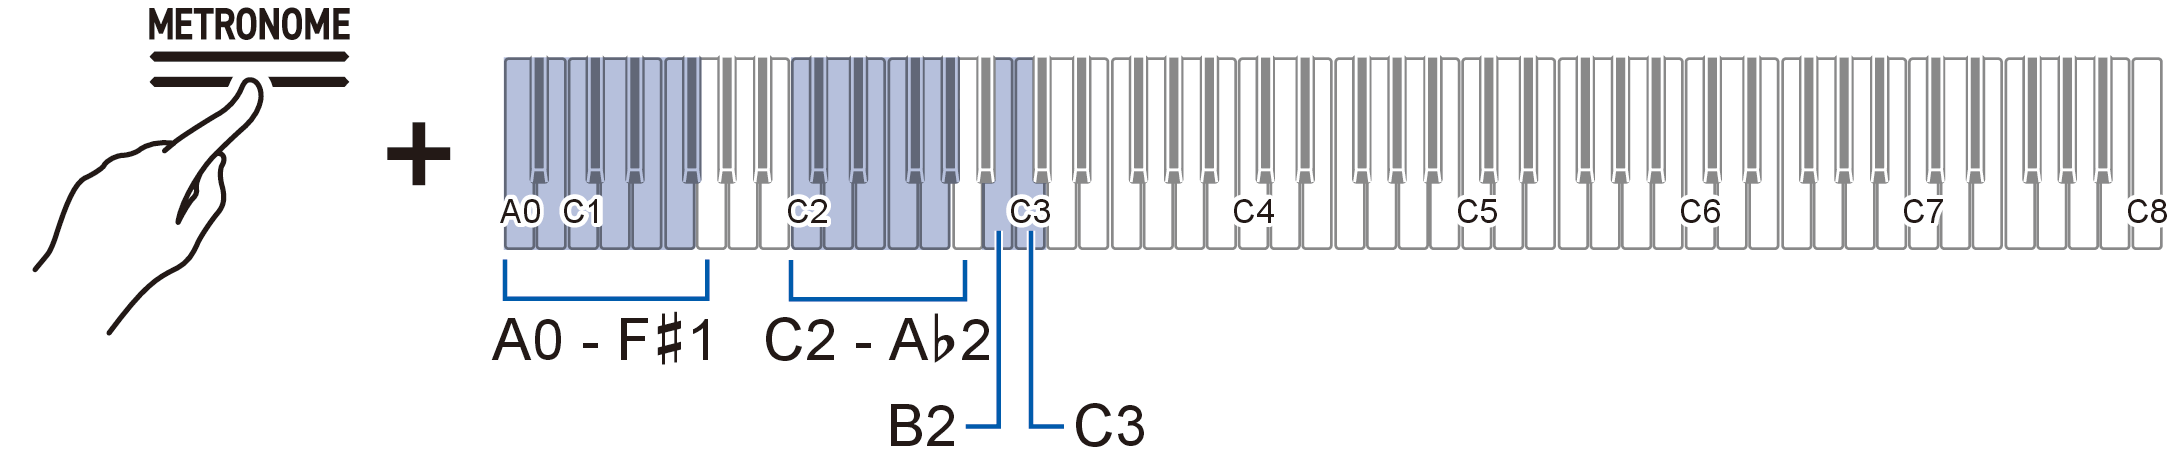
While holding down the “METRONOME” button, press the corresponding key.
-
Sets the tempo in the range of 20 to 255 (beats per minute).
-
-
To start playback, touch the “a” button.
Selecting a Playback Part
You can mute the right-hand or left-hand part of a song and practice playing it yourself.
-
Select the song to be played before changing the setting.
-
Set the tempo as needed.
For more information, see “Changing the Tempo”.
-
While holding down the “a” button, press the B}1 key (Song Playback Part selection (LR/L/R)).
Switching On/Off or Changing Setting Values Using a Single Key (operation type D)
-
The “L” and “R” track indicators light up respectively.

Track Indicator
Setting Details
Only L lights up
Plays the left-hand part and mutes the right-hand part.
Only R lights up
Plays the right-hand part and mutes the left-hand part.
Both L & R light up
Both left and right parts are played back.
-
-
To start playback, touch the “a” button.