Using the Location Memory App
The Location Memory app makes it quick and easy to record map-related information. You can use the Location Memory app to perform the operations described below.
- Display a map to check your current location.
- Select from a variety of different map skins including street view, geographic view, satellite view, and more.
- While the app is running, you can track your route on the map.
- Use dictation to create a text memo about your current location.
- Use marks to leave quick memos or when a network connection is not available.
- Use “Revisit” marks to record a memo and have the watch alert you with a notification and navigation instructions back to the marked point whenever you are in the vicinity.
Location Memory App Basic Operations
You can perform main Location Memory app operations using the MAP button and TOOL button. The operations you can perform with these two buttons are indicated by on-screen icons displayed to the left of each button. You can also perform the operations by tapping the icons.
|
Icon |
Pressing the button or tapping the icon does this: |
|---|---|
|
|
Changes the functions of the two buttons to zoom in and zoom out (see below). |
|
|
Changes the functions of the two buttons to mark and dictation (see below). |
|
|
Zooms in on the map. |
|
|
Zooms out from the map. |
|
|
Records a memo with a mark. |
|
|
Records a dictated memo. |
Downloading Mapbox Maps
If you are planning to go to a location where there is no net access but you still want to use maps, you can download them ahead of time while you still have net access.
Using the procedure below to download a map automatically changes the “Map Type” setting to “Mapbox”.
- 1.
-
While the map is displayed, swipe the touch screen from bottom to top. On the menu that appears, tap “Download Map”.
- 2.
-
Perform the procedure from step 2 under “Download Map”.
“Revisit” Marks
Use “Revisit” marks (![]() ) to record a memo and have the watch alert you with a notification whenever you are in the vicinity (within 5 km under initial default settings). For information about changing the notification distance setting and disabling notification, see “Changing the “Revisit” Mark Notification Setting”.
) to record a memo and have the watch alert you with a notification whenever you are in the vicinity (within 5 km under initial default settings). For information about changing the notification distance setting and disabling notification, see “Changing the “Revisit” Mark Notification Setting”.
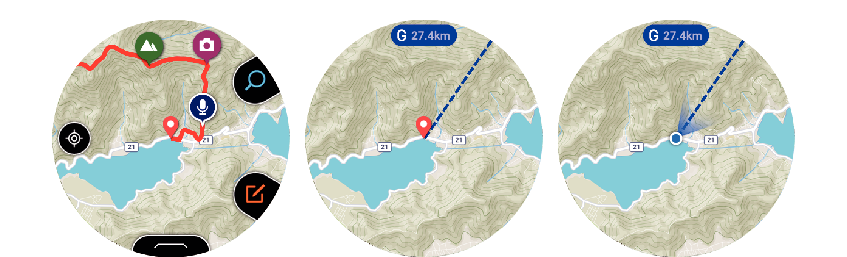
Point Navigation and Show Direction
Using “Point Navigation” and “Show Direction” at the same time provides you with intuitive information about your destination.

Point Navigation
- This setting can be used to have the direction and distance to a destination displayed on the map. While a map is displayed, swipe from bottom to top. On the menu that appears, tap “Point Navigation”.
For details, see “Using Point Navigation”.
Show Direction
- This setting can be used to have the direction that the 12 o’clock position of the watch is pointing displayed on the map. While a map is displayed, swipe from bottom to top. On the menu that appears, tap “Show Direction” to change the setting to “ON”.
While the “Show Direction” setting is “ON”, directions also are displayed on the Activity app maps.
When the direction to the destination (linear) indicated by “Point Navigation” and the cone of view displayed by “Show Direction” are aligned with each other, it means that 12 o’clock on the watch is pointed in the direction of your destination.
Other Operations
- To view a recorded memo, swipe the displayed map from bottom to top. On the menu that appears, tap “History”.
- For information about how to track your route on a map, see “Enabling Route Tracking on the Map (Route Display)”.
- For information about map display settings, see “Common Outdoor Function Settings” and perform one or more of the operations below.
- To switch the map between Google MapsTM and Mapbox: Map Type
- To change the map skin to geographic view or satellite view: Map Skin
Location Memory App Settings
This section explains settings that are particular to the Location Memory app (“Route Display” and “Revisit”). For information about other setting items, see “Common Outdoor Function Settings”.
Enabling Route Tracking on the Map (Route Display)
Your route can be tracked on the map.
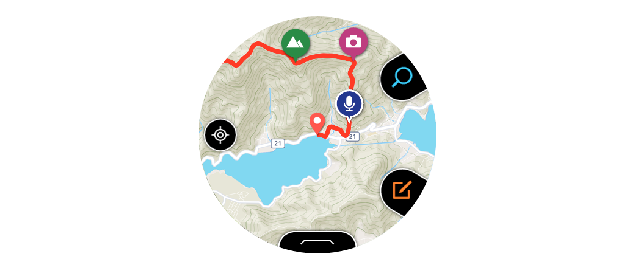
Your route is normally displayed as a blue line. However, the portion of your route where you performed an Activity app measurement operation is indicated by a red line.
To display your route, use the procedure below to change “Route Display” on the setting menu from “OFF” (initial default setting) to “ON”.
-
1.While the map is displayed, swipe the touch screen from bottom to top. On the menu that appears, tap “Settings”.
-
2.Scroll the setting menu downwards. After confirming that the “Route Display” setting is “OFF”, tap to change it to “ON”.
Changing the “Revisit” Mark Notification Setting
Use “Revisit” marks to record a mark and have the watch alert you whenever you are in the vicinity. Under the watch’s initial default settings, notification is performed when both of the conditions below are satisfied.
- You are <<within five kilometers>> of the “Revisit” mark location.
- <<At least one day>> has passed since you were last <<within one kilometer>> of the “Revisit” mark location.
The parts of the above conditions enclosed in double angle brackets (<< >>) can be specified by you. You can also disable notifications, if you want. You can use the steps below to configure settings.
-
1.While the map is displayed, swipe the touch screen from bottom to top. On the menu that appears, tap “Settings”.
-
2.Scroll the setting menu downwards. When “Revisit” is displayed, tap it.
-
3.On the screen that appears, configure the required settings.
-
- Perform the steps below to modify notification conditions.
- 1.
-
If the “Notifications” setting is “OFF”, tap to change it to “ON”.
- 2.
-
Tap “Region”. On the list that appears, tap the distance you want to specify.
- 3.
-
Tap “Notification Control”. On the list that appears, tap the interval you want to specify.
- To disable notification, tap “Notifications” to change its setting to “OFF”.
Viewing Your Route on a Phone
You can perform the procedure below to export a route stored in watch memory and view it on a phone using Google EarthTM, etc. Note that your phone needs to have “Google DriveTM” and “Google Earth” installed in order to perform this procedure.
To output a traveled route from the history display
-
1.While the map is displayed, swipe the touch screen from bottom to top. On the menu that appears, tap “History”.
-
2.Select the date of the history data you want to display.
-
3.Tap “Show on Map”.
-
- This displays the history data of the route you traveled on the map.
-
4.Swipe the touch screen from bottom to top. On the menu that appears, tap “Output as KML file”.
-
- If this is the first time for you to perform this operation, an account selection screen will appear. The KML file will be stored on Google Drive, so select your Google account.
- Once export starts, do not perform any operation on the watch until it is complete.
- The exported KML file will be stored on your Google Drive in a folder named “CASIO-WSD”.
To output a traveled route from a normal map display
-
1.While the map is displayed, swipe the touch screen from bottom to top. On the menu that appears, tap “Settings”.
-
2.Scroll the setting menu downwards. Tap “Export” and then “Output as KML file” in sequence.
-
- If this is the first time for you to perform this operation, an account selection screen will appear. The KML file will be stored on Google Drive, so select your Google account.
-
3.Select the date of the route you want to export.
-
- This will start export. Do not perform any operation on the watch until the export is complete.
- The exported KML file will be stored on your Google Drive in a folder named “CASIO-WSD”.
 Top of page