Time Correction
Your watch can connect with a phone to obtain information that it uses to correct its date and time setting.
Important!
Disable auto time correction while on an aircraft or in any other place where connecting to a smartphone is not allowed.
Referring to the information below, configure the time setting in accordance with the method that suits your own lifestyle.
Do you use a phone?

If your phone cannot connect with the watch
You can correct time settings by performing operations on the watch.

Using Watch Operations to Adjust the Time Setting
If your watch cannot connect with a phone for some reason, you can use watch operations to adjust date and time settings.
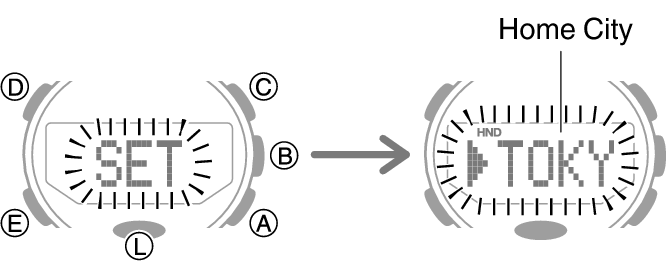
Setting a Home City
Use the procedure in this section to select a city to use as your Home City. If you are in an area that observes summer time, you can also enable or disable summer time.
Note
The initial factory default summer time setting for all cities is [AUTO]. In many cases, the [AUTO] setting lets you use the watch without switching between summer time and standard time.
-
Enter the Timekeeping Mode.
-
Hold down (D) for at least two seconds. Release the button when the name of the currently selected Home City appears on the display.
-
Use (A) and (C) to change the Home City.
-
Press (E).
-
Use (A) to select a summer time setting.
-
Press (D) twice to exit the setting screen.
For details refer to the information below.
Each press of (A) cycles through available settings in the sequence shown below.
[AUTO]
The watch switches between standard time and summer time automatically.
[OFF]
The watch always indicates standard time.
[ON]
The watch always indicates summer time.

Setting the Time/Date
-
Enter the Timekeeping Mode.
-
Hold down (D) for at least two seconds. Release the button when the name of the currently selected Home City appears on the display.
-
Press (D).
-
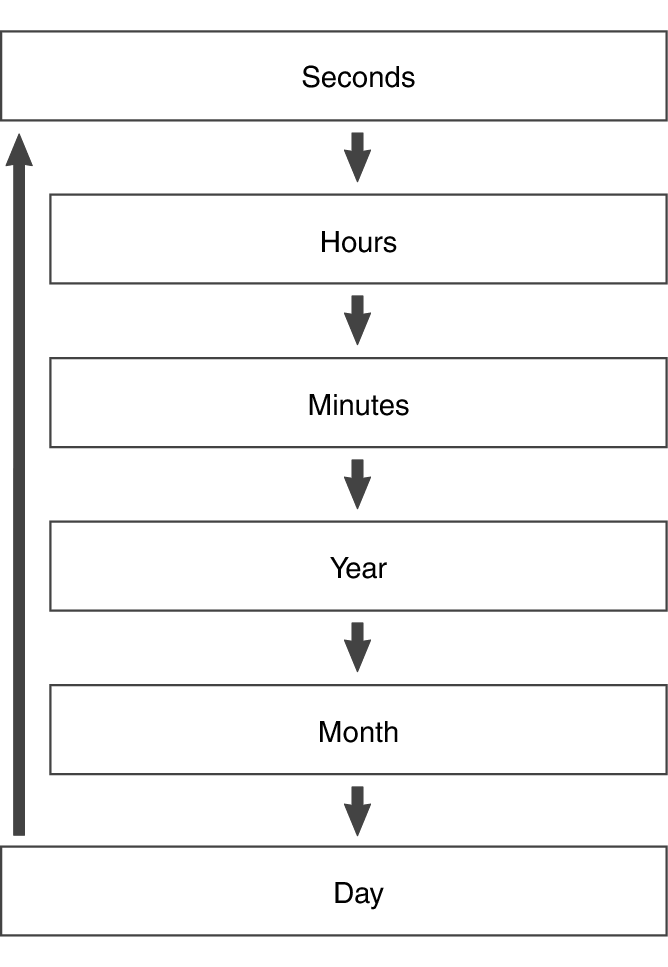
Keep pressing (E) until the setting item you want to change is selected.
-
Configure the date and time settings.
-
Repeat steps 4 and 5 to configure time and date settings.
-
Press (D) to exit the setting screen.
This causes the seconds to flash.
Each press of (E) moves to the next setting item in the sequence shown below.
To reset the seconds to 00: Press (A). 1 is added to the minutes when the current count is between 30 and 59 seconds.
Use (C) and (A) to change the other settings.
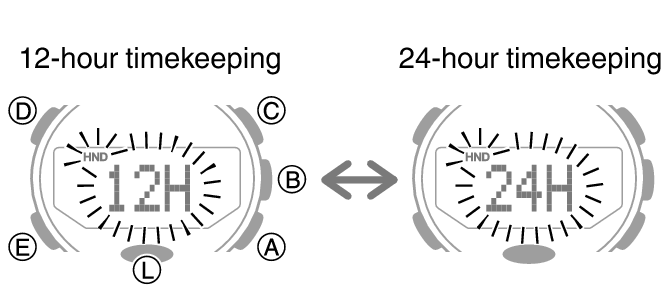
Switching between 12-hour and 24-hour Timekeeping
You can specify either 12-hour format or 24-hour format for the time display.
-
Enter the Timekeeping Mode.
-
Hold down (D) for at least two seconds. Release the button when the name of the currently selected Home City appears on the display.
-
Press (E) four times.
-
Press (A) to toggle the setting between [12H] (12-hour timekeeping) or [24H] (24-hour timekeeping).
-
Press (D) twice to exit the setting screen.
This causes [12H] or [24H] to flash on the display.

Using the Watch in a Medical Facility or Aircraft
Whenever you are in a hospital, on an aircraft, or in any other location where connection with a phone may cause problems, you can perform the procedure below to disable auto time correction. To re-enable auto time correction, perform the same operation again.
-
Enter the Timekeeping Mode.
-
Hold down (D) for at least two seconds. Release the button when the name of the currently selected Home City appears on the display.
-
Press (E) five times.
-
Press (A) to change the auto time correction setting.
-
Press (D) twice to exit the setting screen.
This displays [RCV].

[OFF]: Auto time correction disabled.
[ON]: Auto time correction enabled.
Note
If the watch is paired with a phone, you can use the CASIO WATCHES phone app to disable auto time correction.