Digital Compass
You can use the Digital Compass Mode to determine the direction of north, and to check your bearing to a destination.

Important!
Check the information at the link below to find out how to ensure correct readings.
Taking a Compass Reading
-
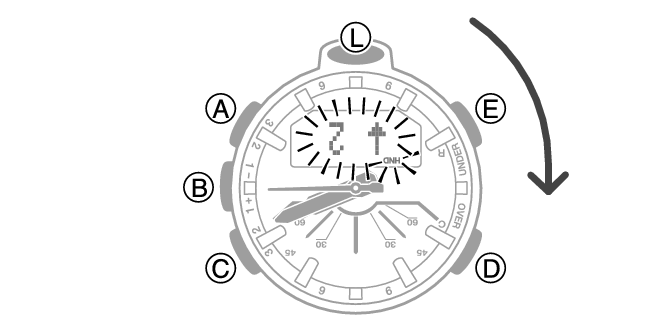
Enter the Compass Mode.
-
Keeping the watch level, point 12 o’clock in the direction of your desired objective.
Entering the Compass Mode starts compass readings.
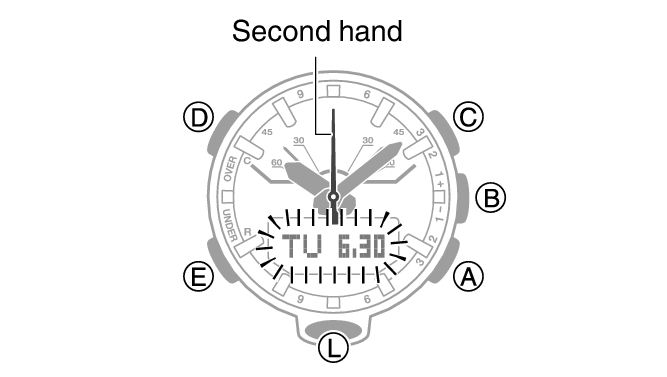
The second hand will point North. The digital display will show one of 16 literal direction indications or the bearing angle.
You can toggle between literal direction indications and bearing angle display by pressing (D).
To retrigger the compass operation, press (C).
Interpreting Bearing Readings
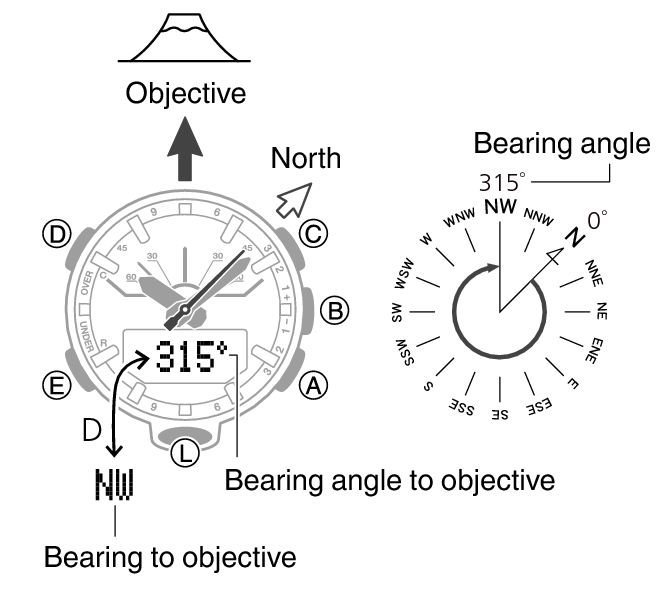
Directions: N (North), E (East), W (West), S (South)
Note
Normally the compass indicates magnetic north. You can also configure settings to indicate true north.
After the initial reading is displayed, the watch will continue to take readings about every second for about the next 60 seconds. The watch will return to the Timekeeping Mode automatically about 60 seconds after you press (C).
Auto Light will not illuminate the face while a compass operation is in progress.
If an alarm or other beeper sounds, or if you turn on illumination by pressing (L) while a compass operation is in progress, the compass operation will be suspended momentarily. The compass operation will resume when the beeper stops or illumination turns off.
You can use CASIO WATCHES to record location information and then use the watch to display the distance and bearing to the recorded location.
Aligning a Map with Actual Surroundings (Setting a Map)
Setting a map means to align the map so the directions indicated on it are aligned with the actual directions of your location. Once you set a map, you can more easily get a grasp of the relationship between map markings and actual geographic contours. To set a map with this watch, align north on the map with the north indication of the watch. Once you set the map, you can compare your bearing on the map with your surroundings, which will help you determine your current location and destination.
Note that map reading skills and experience are required to determine your current location and destination on a map.
Calibrating the Compass
Calibrating Compass Readings
Perform figure 8 or two-point calibration whenever you notice the watch’s compass readings are different from those of another compass, or before setting out on a climb or trek.
Note that accurate compass readings and/or calibration will not be possible in an area where strong magnetism is present.
Figure 8 calibration
-
Enter the Compass Mode.
-
Hold down (D) for at least two seconds. Release the button when [SET] starts flashing and then
 appears on the display.
 -
Press (C).

Move your arm in a figure 8 pattern as shown in the illustrations below.
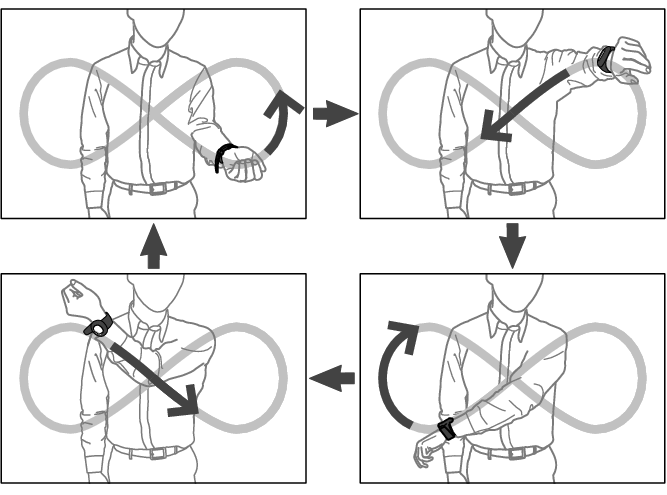
Allow your wrist to twist.
Keep your arm as far as possible from your body as you move it.
The ![]() symbol will stop flashing on the display while calibration is in progress.
symbol will stop flashing on the display while calibration is in progress.
When calibration is successful, [OK] will appear on the display and the watch will return to the Digital Compass screen. This completes the calibration operation.
Note
If [ERR] is displayed, press any button besides (D) and then perform this procedure again from step 3.
2-Point Calibration
-
Enter the Compass Mode.
-
Hold down (D) for at least two seconds. Release the button when [SET] starts flashing and then
appears on the display. -
Press (E).
-
While keeping the watch horizontal, press (C).
-
Rotate the watch 180 degrees, taking care to be as exact as possible.
-
Press (C).
This causes [ 1] to appear on the display.

This starts calibration of the first point, which causes [WAIT] to appear on the display. When calibration is successful, indicators will appear on the display in the following sequence: [OK]  [TURN] [180°] [
 2].
2].
This starts calibration of the second point, which causes [WAIT] to appear on the display.
When calibration is successful, [OK] will appear on the display and the watch will return to the Digital Compass screen. This completes the calibration operation.
Note
[ERR] will appear if calibration fails for some reason. If this happens, restart the above procedure from step 2.
Auto Calibration
Your watch performs auto bearing calibration.
When bearing calibration starts, the second hand will move to 12 o’clock, and the digital display contents will flash.
Note
Auto bearing calibration is performed when the conditions below exist.
Watch is worn on the wrist.
Watch is in the Timekeeping Mode.
You are walking
After calibration is successful, auto calibration will not be performed again for 24 hours.
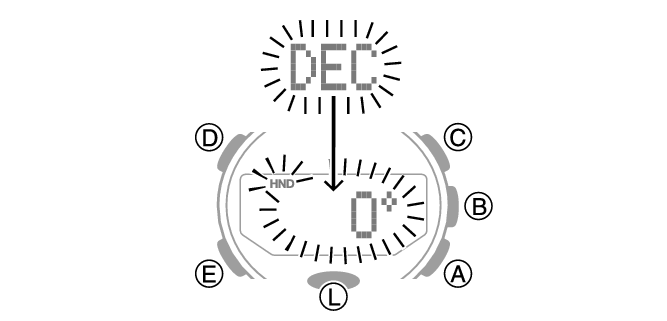
Setting Up for True North Readings (Magnetic Declination Calibration)
If you want the watch to indicate true north instead of magnetic north, you need to specify your current location’s magnetic declination direction (east or west) and declination angle.
The magnetic declination angle value can be set in 1° (degree) units only. Use a value that is closest to the angle you want to set.
Example: For an angle of 7.4°, set 7°.
Example: For an angle of 7°40’ (7 degrees, 40 minutes), set 8°.
Note
Magnetic declination angles (east or west) and angle degree values for specific locations can be found on geographic maps, mountain climbing maps, and other maps that include contour lines.
-
Enter the Compass Mode.
-
Hold down (D) for at least two seconds. Release the button when [SET] starts flashing and then
appears on the display. -
Press (E) twice.
-
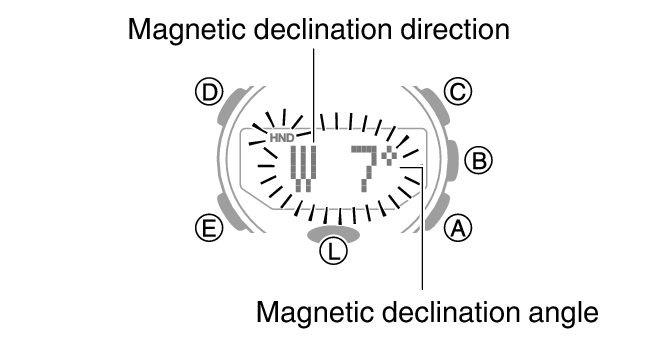
Use (A) (East) and (C) (West) to change the magnetic declination direction and angle.
-
Press (D) to exit the setting screen.
[DEC] will appear on the display, followed by [0°].
Setting range: 90° west to 90° east
[0° (OFF)]: Magnetic north
[E]: East declination (Magnetic north is east of true north.)
[W]: West declination (Magnetic north is west of true north.)
To return the setting to [0° (OFF)], press (A) and (C) at the same time.
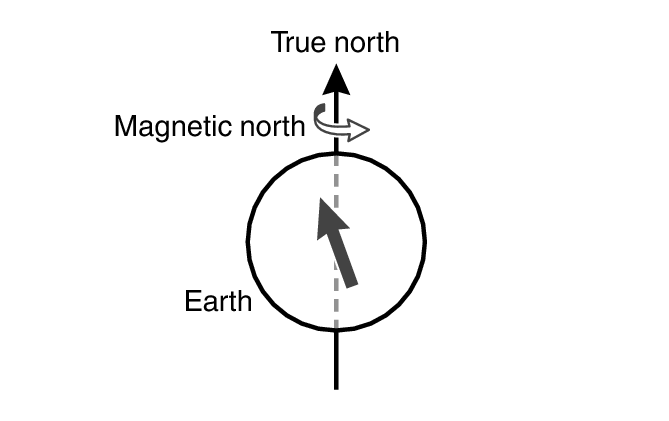
Magnetic North and True North
There are actually two types of north: magnetic north and true north.
Magnetic north: North indicated by the needle of a compass
True north: Direction to the North Pole
As shown in the illustration below, magnetic north and true north are not the same.
Note
The north indicated on commercially available maps is normally true north.
Digital Compass Reading Precautions
Location During Use
Taking readings near sources of strong magnetism can cause reading error. Keep the watch away from the following types of items.
Permanent magnets (magnetic accessories, etc.), metal objects, high-voltage wires, aerial wires, electrical household appliances (TVs, computers, cellphones, etc.)
Note that correct direction readings are not possible indoors, especially inside of reinforced concrete structures.
Accurate direction readings are not possible on electric trains, on boats, on aircraft, etc.
Storage Location
Exposure of the watch to magnetism can affect the accuracy of digital compass readings. Keep the watch away from the types of items below.
Permanent magnets (magnetic accessories, etc.), metal objects, electrical household appliances (TVs, computers, cellphones, etc.)