About This Watch
This section provides an overview of the watch and introduces convenient ways it can be used.
Watch Features
Sunlight and artificial light generate electricity for watch operation as it charges.
The watch receives a radio signal containing time information and uses it to keep its time setting accurate.
The LCD is coated with phosphorescent paint that absorbs light to make it readable even in the dark.
Displays the current time in any one of 48 cities (31 time zones) around the globe and UTC.
An alarm sounds whenever a time specified by you is reached.
You can use the compass function to determine the direction of north, and to check your bearing to a destination.
You can use this function to take an altitude reading at your current location.
You can record the altitude, along with the date and time of the measurement.
You can also measure the altitude differential between two points.
Barometric Pressure and Temperature Measurement
You can display the current barometric pressure tendency, which helps you be on the alert for noteworthy pressure changes.
The watch can be used to take current air temperature readings.
You can view or delete records of altitude measurements.
You can look up the sunrise and sunset times for a specified date and location.
The stopwatch performs elapsed time measurement up to 999 hours, 59 minutes, 59.9 seconds in 1/10 second units.
Countdown from a start time specified by you. An alarm sounds when the countdown reaches zero.
Important!
This watch is not a special-purpose measuring instrument. Measurement function readings are intended for general reference only.
Whenever using the Digital Compass of this watch for serious trekking, mountain climbing, or other activities, be sure to always take along another compass to confirm readings. If the readings produced by the Digital Compass of this watch are different from those of the other compass, perform 2-point calibration of the Digital Compass to ensure better accuracy.
Compass readings and calibration will not be possible if the watch is in the vicinity of a permanent magnet (magnetic accessory, etc.), metal objects, high-voltage wires, aerial wires, or electrical household appliances (TV, computer, cellphone, etc.)
The watch’s altimeter function calculates and displays relative altitude based on barometric pressure readings produced by its pressure sensor. Because of this, altitude values displayed by the watch may be different from your actual elevation and/or sea level elevation indicated for the area where you are located. Regular calibration in accordance with the local altitude (elevation) indications is recommended.
Note
The illustrations included in this operation guide have been created to facilitate explanation. An illustration may differ somewhat from the item it represents.
General Guide
A button
Pressing this button in the Timekeeping Mode enters the Altimeter Mode.
B button
Pressing this button in the Timekeeping Mode enters the Barometer/Temperature Mode.
C button
Pressing this button in the Timekeeping Mode enters the Compass Mode.
D button
Each press cycles between watch modes.
In any mode, hold down this button for at least two seconds to return to the Timekeeping Mode.
E button
Pressing this button in the Timekeeping Mode cycles between displays.
L button
Press to turn on illumination.
Indicators
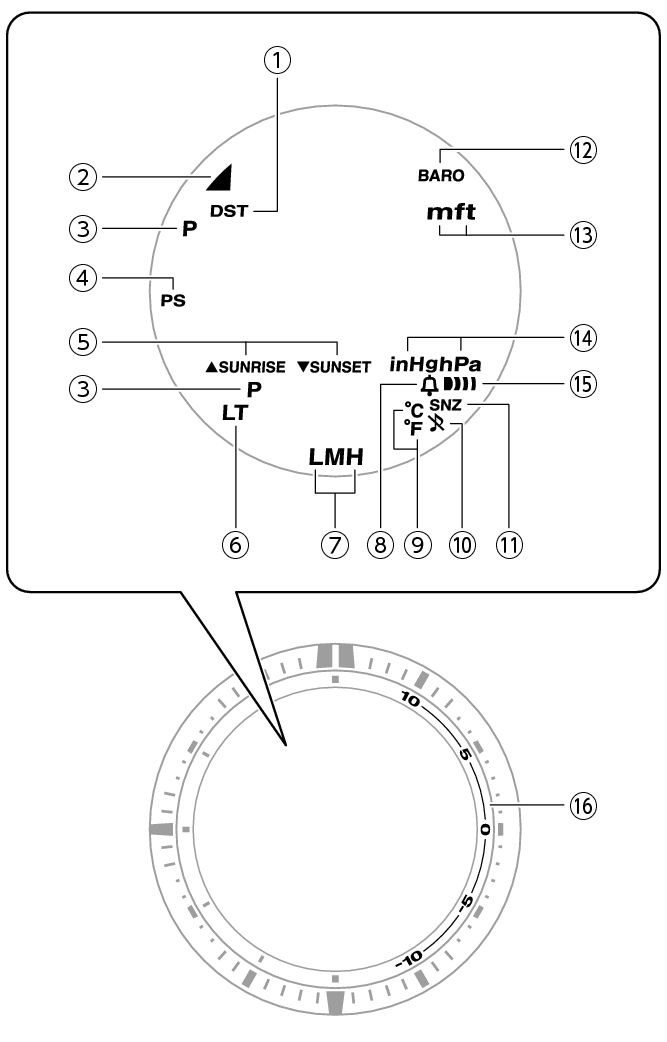
-
Displayed while the watch is indicating summer time.
-
Appears when the time signal receive operation is successful.
-
Displayed during p.m. times while 12-hour timekeeping is being used.
-
Displayed while Power Saving is enabled.
-
Displayed when the watch is in the Sunrise/Sunset Mode.
-
Displayed while Full Auto Light is enabled.
-
Shows the current charge level.
-
Appears when the hourly time signal is on.
-
Shows the temperature unit being used.
-
Displayed while the button operation tone is disabled.
-
Displayed while the snooze alarm is turned on.
-
Displayed while barometric pressure change indication is enabled.
-
Shows the altitude unit being used.
-
Shows the barometric pressure measurement unit.
-
Displayed when an alarm is turned on.
-
Graphic display of the altitude/barometric pressure differential.
Navigating Between Modes
Your watch has the modes shown below.
To return to the Timekeeping Mode from any other mode, hold down (D) for at least two seconds.
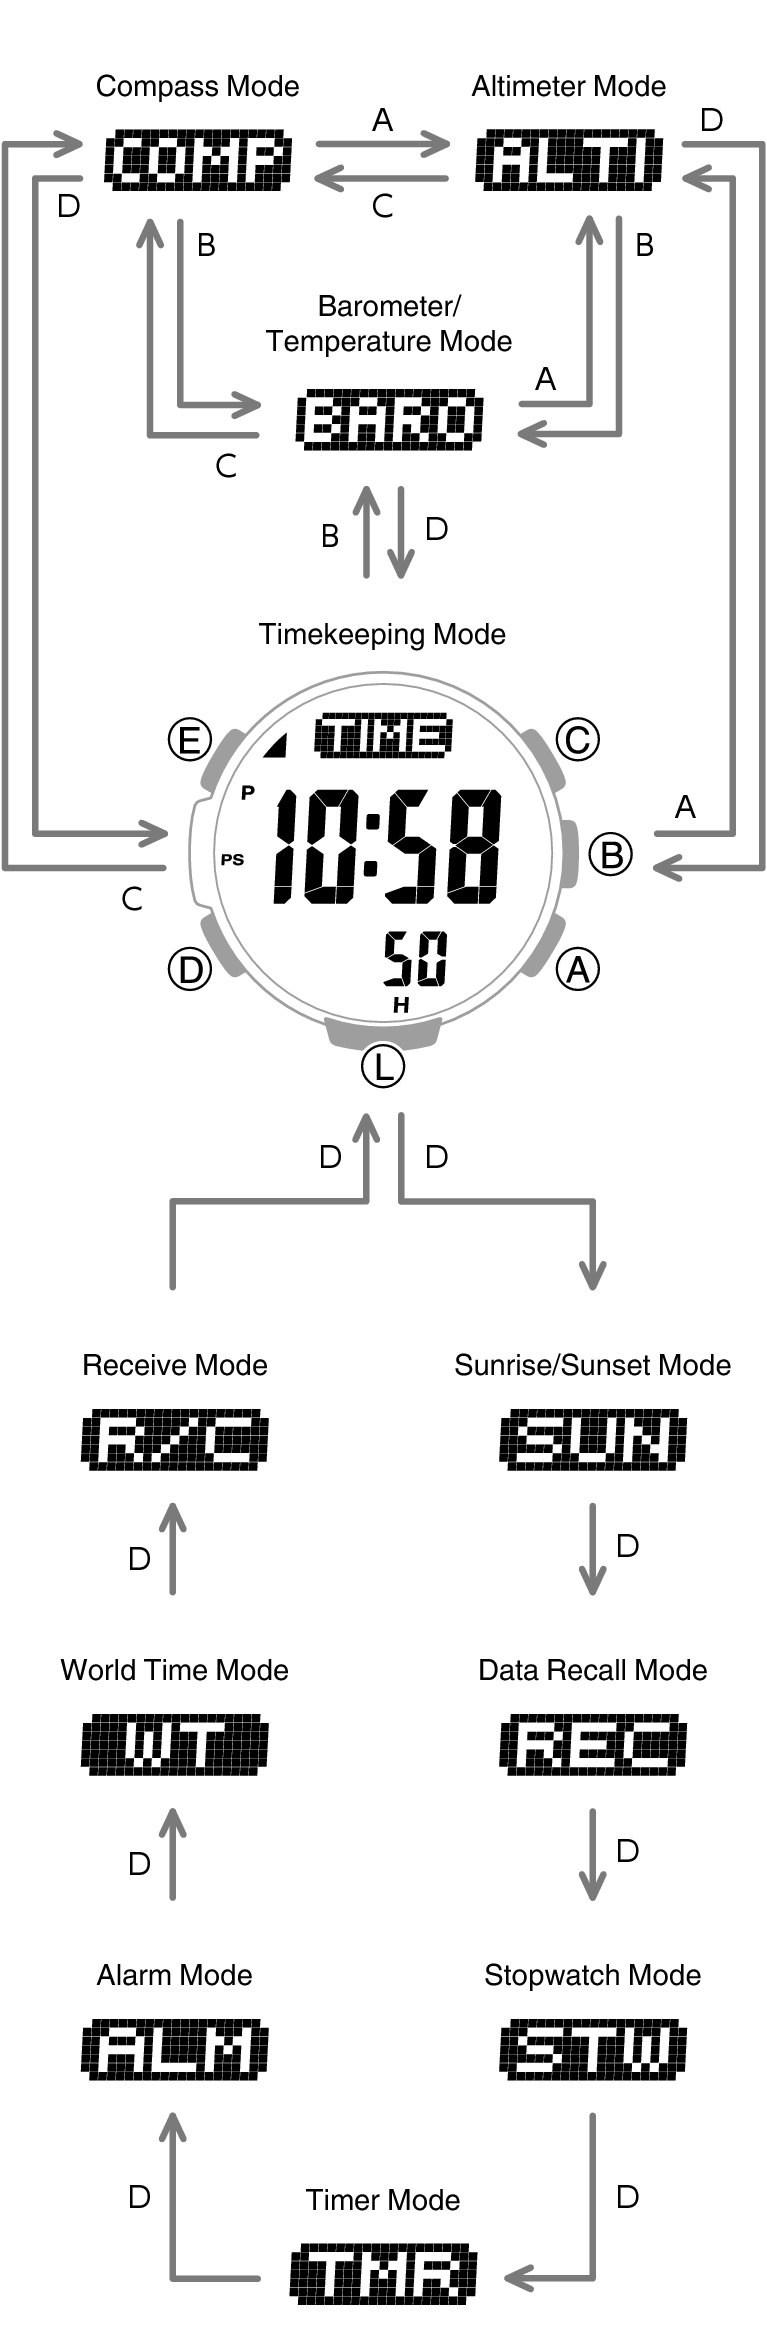
Use the buttons in the illustration above to navigate between modes.
Mode Overview
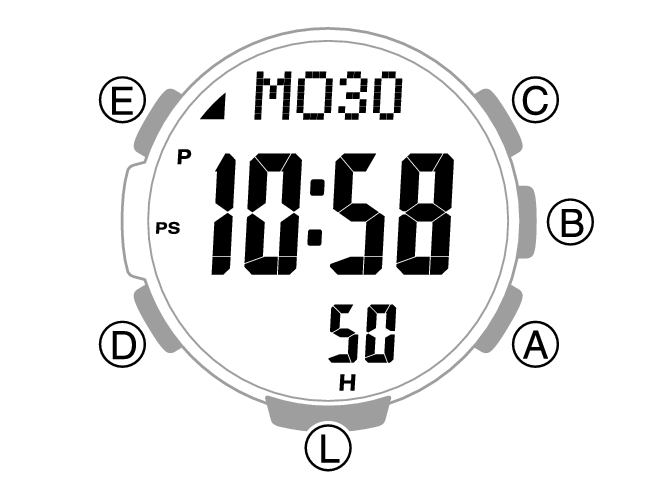
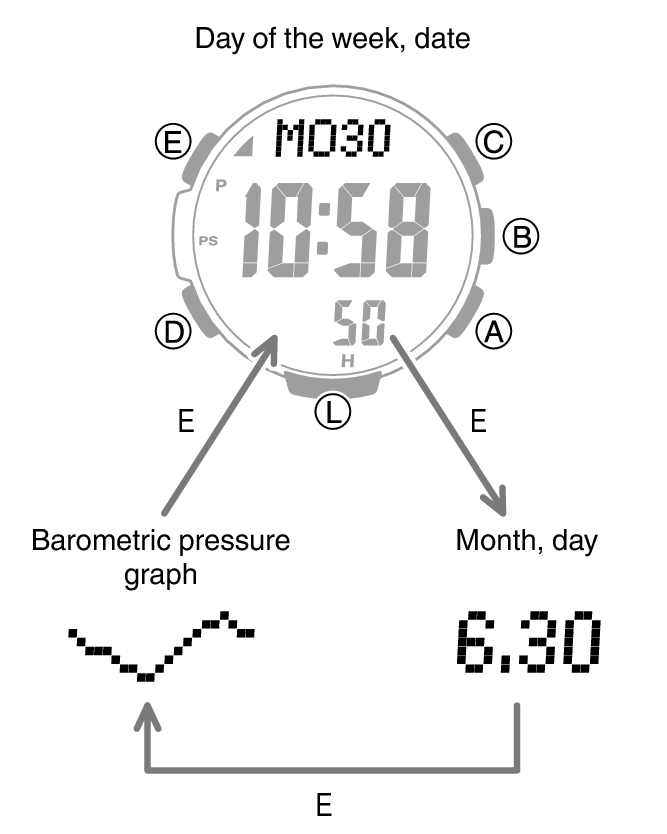
Timekeeping Mode
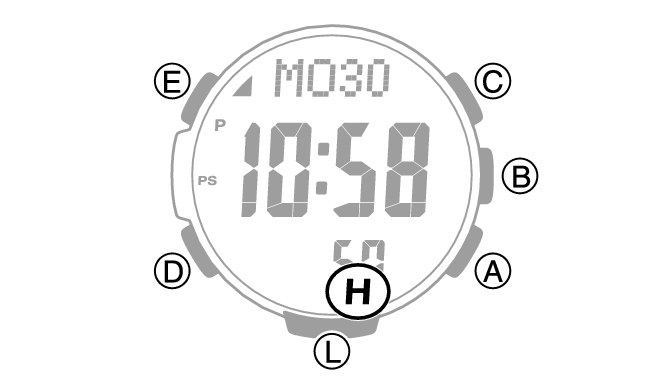
In this mode, the digital display shows the current date and time.
You can also display the items below in the upper display area by pressing (E).
Month, day
Barometric pressure graph
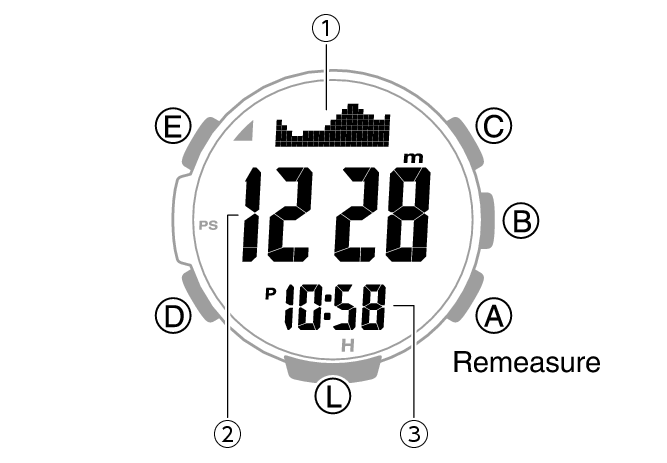
Altimeter Mode
Use this mode to take an altitude reading for your current location.
-
Altitude graph/altitude differential
-
Altitude
-
Current time
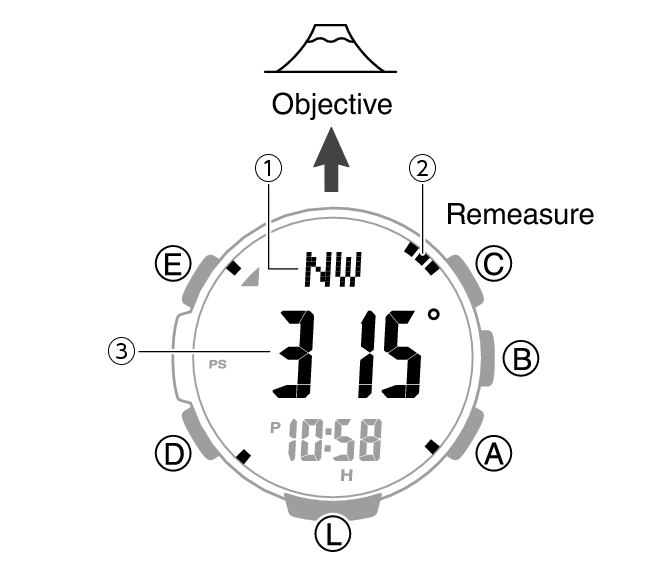
Compass Mode
Use this mode to take direction and bearing angle readings.
-
Bearing at 12 o’clock
-
Graphic pointer indicating north
-
Bearing angle at 12 o’clock
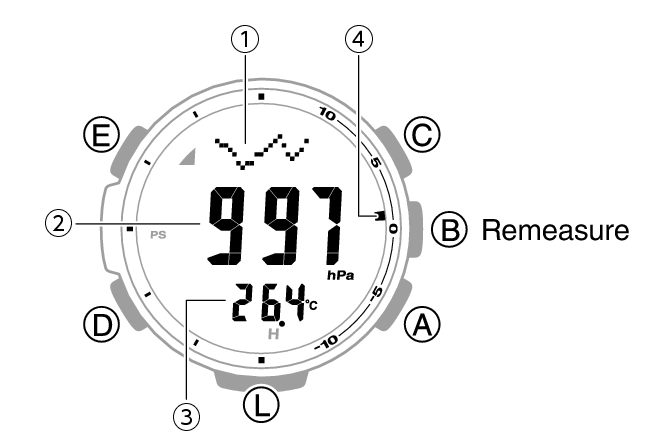
Barometer/Temperature Mode
Use this mode to take barometric pressure and temperature readings for your current location.
-
Barometric pressure graph
-
Barometric pressure
-
Temperature
-
Barometric pressure differential graphic
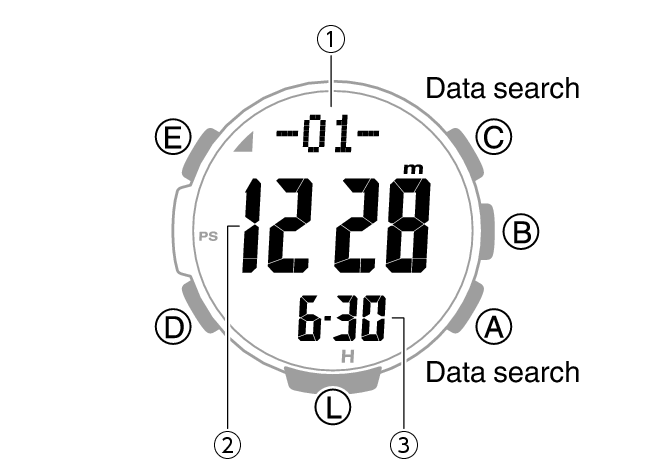
Data Recall Mode
Use this mode to view altitude records.
-
Record number
-
Altitude
-
Recording date
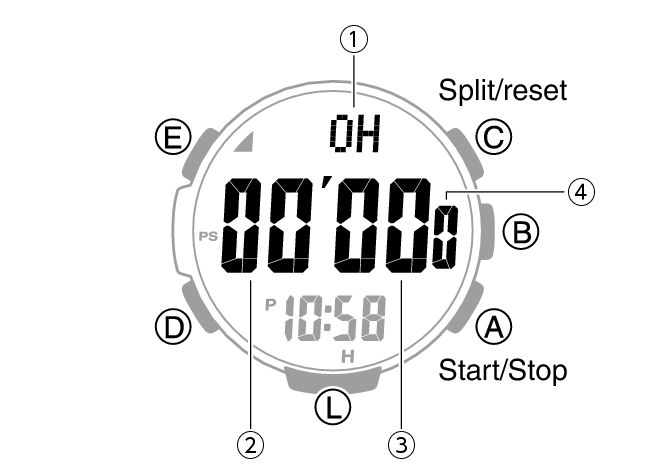
Stopwatch Mode
Use this mode to measure elapsed time.
-
Stopwatch hours
-
Stopwatch minutes
-
Stopwatch seconds
-
Stopwatch 1/10 second
Timer Mode

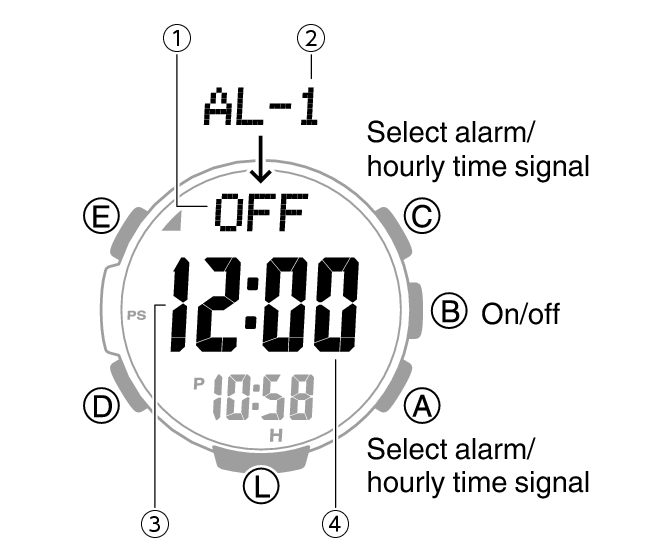
Alarm Mode
The watch will beep when an alarm time is reached.
-
Alarm or hourly time signal status (on/off)
-
Alarm number
-
Alarm hour
-
Alarm minute
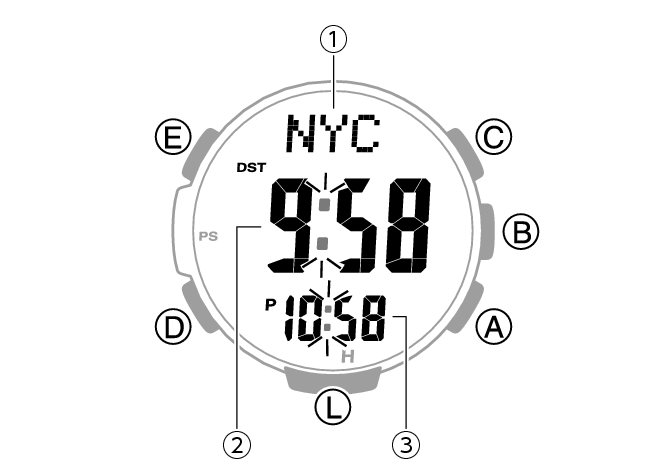
World Time Mode
You can view the current time in 48 cities (31 time zones), and UTC (Coordinated Universal Time) time.
-
City Codes (World Time Codes)
-
World Time City current time
-
Home City time
Receive Mode
With this mode, you can receive a time signal manually.
-
Receive level indicator
Charging
This watch runs on power supplied from a rechargeable (secondary) battery that is charged by a solar panel. The solar panel is integrated into the face of the watch, and power is generated whenever the face is exposed to light.
Charging the Watch
When you are not wearing the watch, put it in a location where it is exposed to bright light.
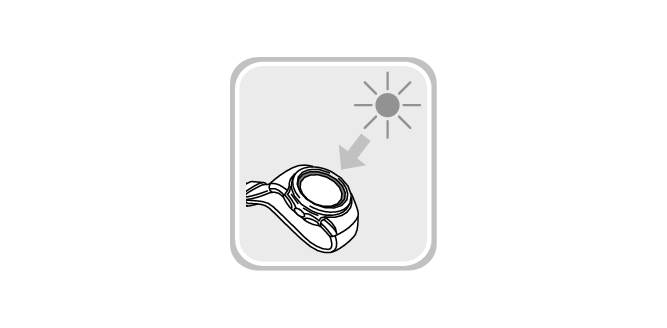
While you are wearing the watch, make sure that its face (solar panel) is not blocked from light by the sleeve of your clothing. Power generation efficiency is reduced even when the face of the watch is blocked only partially.
Important!
Some light sources and environments can cause the watch to become extremely hot during charging, which creates the risk of burn injury and damage to internal watch components.
Avoid charging the watch under conditions like the ones described below, where the temperatures may exceed 60 °C (140 °F).
On the dashboard of a vehicle parked in the sun
Near incandescent lamps, camera lights, halogen lamps, or other sources of heat
In locations exposed to direct sunlight for long periods and other hot locations
The display panel may become black (or white, depending on the LCD type) under very high temperatures. This is temporary, and the display will return to normal at lower temperatures.
Checking the Charge Level
A display indicator shows the watch’s current charge level.
Charge Level 1: Good
All functions enabled.

Charge Level 2: Good
All functions enabled.

Charge Level 3: Low
[L] and [LOW] flash on the display and the functions below become disabled.
Time signal reception
Compass, altitude, barometric pressure/temperature measurements
Face illumination
Sounds (alarm, etc.)

Charge Level 4: Low
When the battery charge drops lower than Level 3, [CHG] starts to flash on the display and all functions become disabled.

Charge Level 5: Dead
The digital display will go blank if the battery goes dead. Memory data is lost, and watch settings are returned to their initial factory defaults.
Important!
Should the battery go low or go dead, expose the face (solar panel) to light as soon as possible.
Note
When [H], [M], and [L] are all flashing on the display, it means that all functions are disabled due to momentary battery power consumption.
Charging Time Guidelines
The table below shows guidelines for approximate charging times.
Charging Times Required for 1 Day of Operation
|
Light Level (Lux) |
Approximate Charging Time |
|---|---|
|
50,000 |
5 minutes |
|
10,000 |
24 minutes |
|
5,000 |
48 minutes |
|
500 |
8 hours |
Charge Recovery Times
Sunny day, outdoors (50,000 lux)
|
Dead battery |
2 hours |
|
Medium charge |
16 hours |
|
High charge |
5 hours |
 Medium charge
Sunny day, near a window (10,000 lux)
|
Dead battery |
6 hours |
|
Medium charge |
77 hours |
|
High charge |
21 hours |
Overcast day, near a window (5,000 lux)
|
Dead battery |
12 hours |
|
Medium charge |
156 hours |
|
High charge |
42 hours |
Indoor fluorescent lighting (500 lux)
|
Dead battery |
144 hours |
|
Medium charge |
- |
|
High charge |
- |
Note
Actual charging time depends on the charging environment, watch settings, and other factors.
Power Saving Function
Leaving the watch in a dark location for about one hour between the hours of 10 p.m. and 6 a.m. will cause the display to go blank, and the watch to enter Level 1 power saving. If the watch is left in this condition for six or seven days, the watch will enter Level 2 power saving.
Power Saving Level 1:
Digital display goes blank to save power.
Power Saving Level 2:
Digital display goes blank to save power. All functions are disabled.
Recovering from Power Saving Operation
Use one of the operations below to exit power saving.
Press any button.
Move the watch to a bright location.
Trigger Full Auto Light by angling the watch towards your face.
Note
The watch will not enter power saving in the cases below.
While in the Stopwatch Mode
While in the Timer Mode
While the barometric pressure change indicator is displayed
You can enable or disable Power Saving.
Note that the watch also may enter power saving if its face is blocked from light by your sleeve while you are wearing it.
Viewing the Face in the Dark
The face of the watch can be illuminated for viewing in the dark.
The watch’s face also is a luminous LCD. The display can be read in the dark for approximately one hour after exposure to light.
To illuminate the face manually
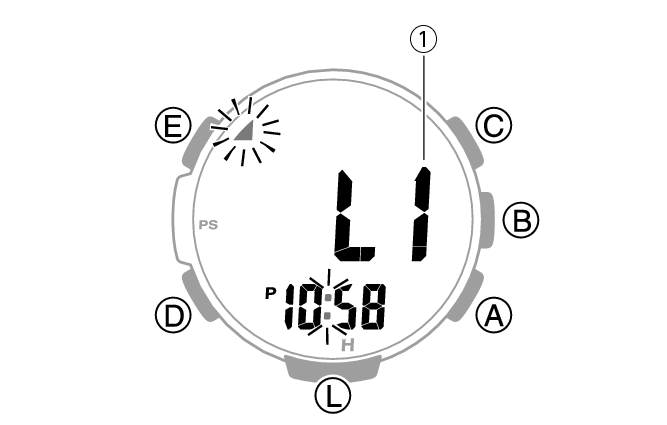
Pressing (L) turns on illumination.
Illumination will turn off automatically if an alarm starts to sound.
Illumination will not turn on while a signal receive operation is in progress. Also, illumination may not turn on while a sensor is taking a reading.

To illuminate the face when Auto Light is enabled
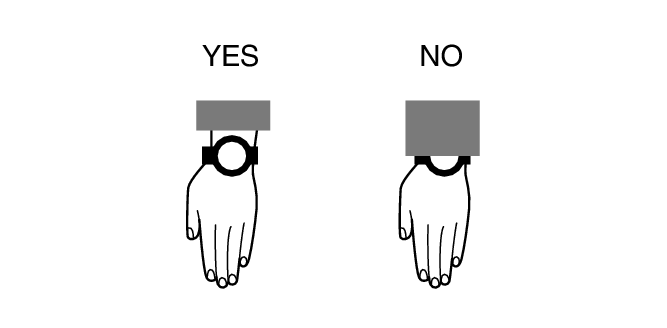
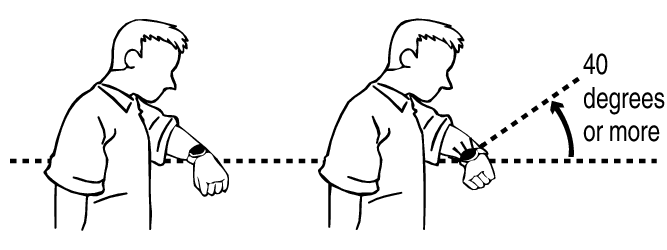
If Full Auto Light is enabled, face illumination will turn on automatically whenever the watch is positioned at an angle of 40 degrees or more.
Important!
Auto Light may not operate properly when the watch is at a horizontal angle of 15 degrees or greater from horizontal as shown in the illustration below.

Electro-static charge or magnetism can interfere with proper Full Auto Light operation. If this happens, try lowering your arm and then angle it towards your face again.
When moving the watch you may note a slight rattling sound. This is the sound of Full Auto Light switch operation and does not indicate malfunction.
Note
Full Auto Light does not turn on illumination if you are in a well-lit location.
Full Auto Light is disabled when any one of the conditions below exists.
While an alarm, timer alert, or other beepper is sounding
Watch in the Compass Mode
While a time signal receive operation is in progress
While sunrise/sunset times are being calculated
Configuring the Full Auto Light Setting
-
Enter the Timekeeping Mode.
-
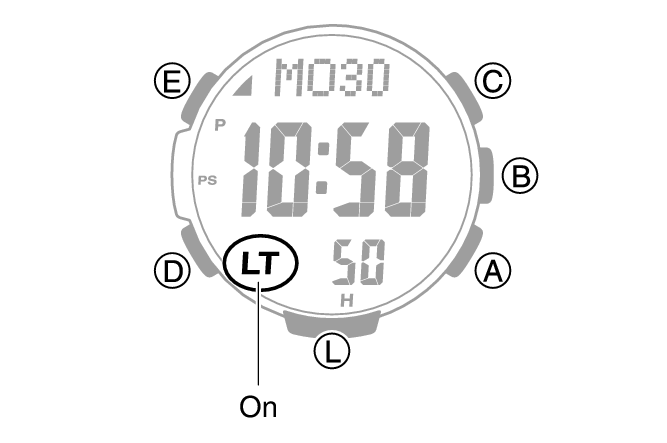
Hold down (L) for at least three seconds to toggle Full Auto Light between enabled and disabled.
[LT] is displayed while Full Auto Light is enabled.
Note
Full Auto Light is disabled while [CHG] is shown on the display.
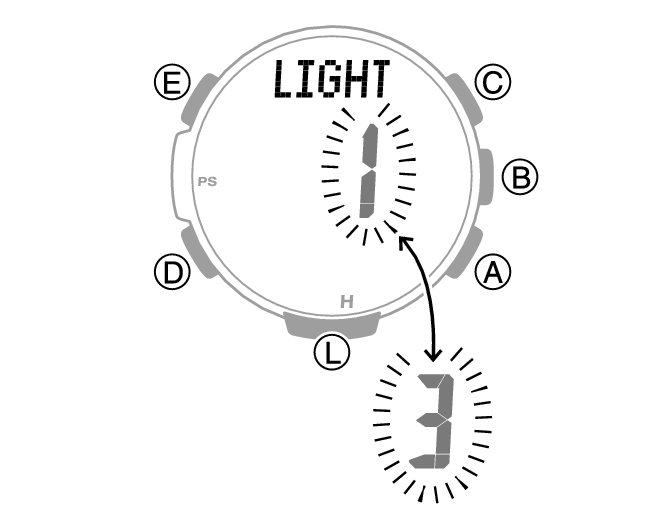
Specifying the Illumination Duration
You can select either 1.5 seconds or three seconds as the illumination duration.
-
Enter the Timekeeping Mode.
-
Hold down (E) for at least two seconds. Release the button when the name of the currently selected Home City appears on the display.
-
Press (D) 10 times.
-
Press (A) to select an illumination duration.
-
Press (E) twice to complete the setting operation.
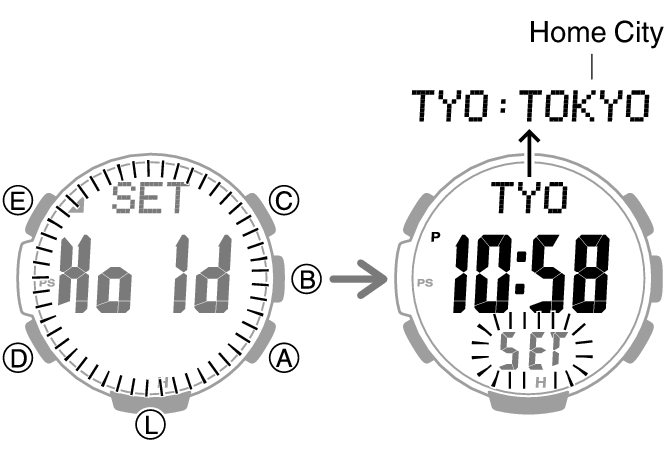
[LIGHT] appears on the display with [1] or [3] flashing.
[1]: 1.5-second illumination
[3]: 3-second illumination