Using the Activity App
The Activity app shows cumulative elapsed time from when one of the outdoor activities listed below starts until it stops, a track of the route followed on a map, and a list of data (activity time, distance traveled, etc.)
|
Running |
Trail Running |
|||
|
Trekking |
Paddle |
|||
|
Fishing |
Snow |
|||
|
Cycling |
Starting an Activity Measurement Operation
Use the procedure below to start an Activity measurement operation for any activity besides Snow. For information about the Snow activity, see “To start a Snow activity measurement operation.”
-
1.Tap the center of the touch screen or press the lower (APP) button, and then select the Activity type.
-
- To facilitate acquisition of location information, you should perform the above step outdoors in a location where the sky is visible.
-
2.Press the upper (MAP) button.
-
- In the case of the Trekking and Fishing activities, this operation starts the Activity measurement operation immediately. For other activities, it starts a countdown.
- If the “Location info being acquired...” message appears, perform one of the operations below.
Move outdoors to a location with an unobstructed view of the sky and wait there without moving until location information can be acquired.
To start without waiting, press the upper button.
-
3.Wait until the countdown reaches zero, and then start your activity.
-
- To start without waiting, press the upper button.
To start a Snow activity measurement operation
While the “Auto Record” setting is “OFF”
-
1.Tap the center of the touch screen or press the lower button, and then select Snow.
-
2.Press the upper button.
-
3.To start a Snow activity measurement operation, press the upper button again.
While the “Auto Record” setting is “ON”
-
1.Tap the center of the touch screen or press the lower button, and then select Snow.
-
2.Press the upper button.
-
- Measurement will start automatically when the watch detects the start of a Snow run.
Pausing, Restarting, and Stopping an Activity Measurement Operation
Use the procedure below to pause, restart, or stop the Activity measurement operation of any activity besides Snow. For information about the Snow activity, see “To pause, restart, and stop the Snow activity measurement operation.”
-
1.To pause a measurement operation, display the Activity measurement in progress screen and then press the upper button.*
-
- This displays the measurement paused screen.
- To restart an Activity measurement operation, press the upper button.
* In the case of the Fishing activity, display any Activity measurement in progress screen besides the Catch (fishing result) screen, and then press the upper button.
-
2.To stop measurement while the measurement paused screen is displayed, hold down the lower button for about two seconds.
-
- This displays a “Save history?” message.
-
3.To save the history, tap “Save”. To discard the data, tap “Discard”.
-
- Tapping “Save” displays the Stats screen after the save operation is complete. Tapping “Discard” will return to the “START” screen.
To pause, restart, and stop the Snow activity measurement operation
While the “Auto Record” setting is “OFF”
-
1.At the end of a Snow run, display the Activity measurement in progress screen and press the upper button to pause measurement.
-
- This displays the Snow run result screen, with the route of your Snow run shown on a map.
- When starting the next Snow run, press the upper button to restart the Activity measurement operation.
-
2.To stop an Activity measurement operation, display the Snow run result screen and then tap the lower button.
-
- This displays a “Save history?” message.
-
3.To save the history, tap “Save”. To discard the data, tap “Discard”.
-
- Tapping “Save” displays the Stats screen after the save operation is complete. Tapping “Discard” will return to the “START” screen.
While the “Auto Record” setting is “ON”
- The watch detects when your movement has stopped and automatically pauses Activity measurement, which causes the measurement paused screen to appear. The Activity measurement will restart automatically when the watch detects that you have started your activity again.
- To stop an Activity measurement operation, press the upper button while the measurement paused screen is displayed. This will display the Snow run result screen. Perform the steps of the procedure from step 2 above.
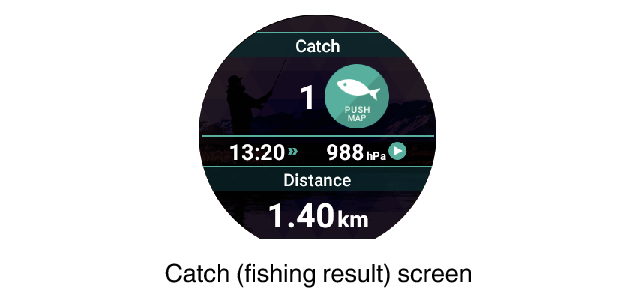
To input fishing results during Fishing measurement
While a Fishing data measurement operation is in progress, display the Catch (fishing result) screen and then press the upper button or tap ![]() .
.
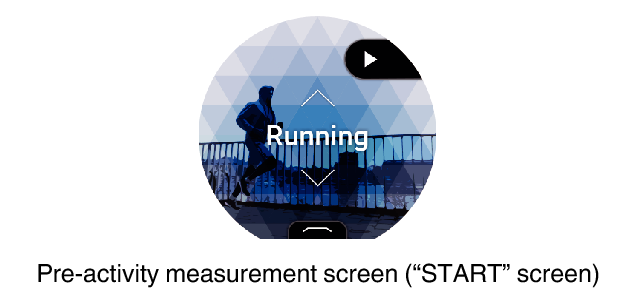
Activity App Screen
Pre-activity measurement screen (“START” screen)
Swipe the touch screen from bottom to top. You can use the menu that appears to perform the operations below.
|
Use this menu item: |
To do this: |
|---|---|
|
Running Display |
To specify items that appear on the Running and Trail Running screens while an Activity measurement operation is in progress, and the locations of the items on the screens. |
|
Download Map |
Download maps ahead of time while you have net access when you want to use maps where there is no net access. After tapping this menu item, perform the procedure from step 2 under “Download Map”. Using this procedure to download a map automatically changes the “Map Type” setting to “Mapbox”. |
|
History/Route Import→ Activity History |
Display an activity history (activity end dates and times). You can tap an item in the history to display its measurement result screen and/or map screen. |
|
History/Route Import→Route Import / Google Drive |
Import route data* stored on Google Drive and superimpose it on a map, so it can be used as reference while performing an activity. Imported routes are displayed as gray lines on the map during Activity measurement operations. * KML and GPX format files are supported. However, depending on how a file is created, format incompatibilities and import errors may occur. |
|
History/Route Import |
Enable “History Auto Save”, which will cause the operations below to be performed whenever you stop a logging operation with the Activity app. This means you can view history data on the phone.
For details about the required procedure, see “Enabling History Auto Save”. |
|
History/Route Import |
Display a calendar (Google Calendar or another similar app) on the phone. To view the route you traveled with Google Earth or another app, tap the desired data on the Calendar. For details about the required procedure, see “Viewing History Data on a Phone”. |
|
History/Route Import |
Link the watch to Google Fit. When this item is enabled (“ON”), the watch automatically sends measurement results to Google Fit after recording by the Activity app is complete. |
|
History/Route Import |
Shows stats for all activities that have statistical data available. To browse activity statistics on a smartphone
|
|
History/Route Import |
Shows the heart rate zone, maximum oxygen uptake (VO2Max) and an estimated full marathon time based on your heart rate settings. This item cannot be selected unless you have configured “Initial Default Settings for Heart Rate Measurement”. |
|
Point Navigation |
This setting can be used to have the direction and distance to a destination displayed on the activity map. For details, see “Using Point Navigation”. |
|
MOMENT SETTER |
Configure MOMENT SETTER notification settings to get useful information delivered when you need it during an activity. For details, see “Using the MOMENT SETTER App”. |
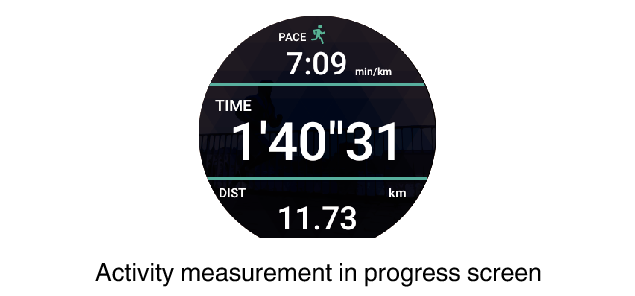
Activity Measurement in Progress Screens
Pressing the lower button while measurement is in progress will switch between a measurement data screen, map screen, etc. The screens that can be displayed depend on the activity type.
Enabling History Auto Save
-
1.Display the Activity app “START” screen.
-
2.Swipe the touch screen from bottom to top. On the menu that appears, tap the following in sequence: “History/Route Import”, “History Auto Save”.
-
3.On the Select Account screen that appears, select the Google account you want to use.
-
4.In response to the confirmation message that appears, tap “Enable”.
-
- At this point, a message may appear asking you to grant access to your Google Calendar and/or Google Drive. If this happens, scroll downwards as you read the message, and then tap
 to allow access.
- Check to confirm that “ON” is displayed for “History Auto Save”.
- While “History Auto Save” is enabled, history data will be uploaded automatically whenever a logging operation performed with the Activity app is stopped.
- At this point, a message may appear asking you to grant access to your Google Calendar and/or Google Drive. If this happens, scroll downwards as you read the message, and then tap
Viewing History Data on a Phone
-
1.On the phone, start up Google Calendar.
-
2.On Google Calendar, tap the history data whose details you want to view.
-
- On the detailed information screen that appears, tap the link of the KML file stored on Google Drive.
-
3.Use Google Earth to open the KML file.
-
Android phone:
- 1.
-
Tap the KML file link.
- 2.
-
On the app selection screen that appears, tap Google Earth.
- This starts up Google Earth and shows the route you traveled on a map.
iPhone:
- 1.
-
Tap the KML file link.
- This will display the following message: “Unsupported File Format.”
- 2.
-
In the upper right corner of the screen tap the more options (...) icon. On the screen that appears, tap “Open In”.
- 3.
-
On the dialog box that appears, tap “Google Earth”.
- This starts up Google Earth and shows the route you traveled on a map.
Data Displayed During Measurement Operations
Note the points below concerning the data displayed while a measurement operation is in progress.
- For information about procedures to calibrate the barometric pressure and altitude values displayed by the Activity app to make them more accurate, read “Common Outdoor Function Settings” and then refer to the following items: “Barometric Pressure Calibration”, “Altitude Calibration”, and “Correct Altitude Using Location”.
- Since speed and distance traveled are measured using the watch’s or your smartphone’s GPS function, location measurement error may result in measured value error.
- Speed and distance are calculated at regular intervals, so there may be some lag before values are displayed.
- If the watch is not able to acquire location information (GPS) at the start of an Activity measurement operation, “----” will be displayed in place of the measurement value.
Linking to Google Fit
-
1.Display the Activity app “START” screen.
-
2.Swipe the touch screen from bottom to top. On the menu that appears, tap the following in sequence: “History/Route Import” → “Link to a Partner” → “Google Fit”.
-
3.On the account selection screen that appears, select the Google account you want to use.
-
4.In response to the confirmation message that appears, tap “Link”.
-
- Confirm that the “Google Fit” setting is “ON”.
- When this setting is enabled (“ON”), the watch automatically sends measurement results to Google Fit after recording by the Activity app is complete.
Using a Phone to View Activity App Measurement Results with Google Fit
-
1.On your phone, start up Google Fit.
-
2.Tap the “Journal” icon at the bottom of the screen. On the list that appears, select the Activity app measurement results sent from the watch to the phone to view their details.
Google Fit
Google Fit is a Google service that helps you manage daily fitness data. For details, refer to Google Fit help.
 Top of page