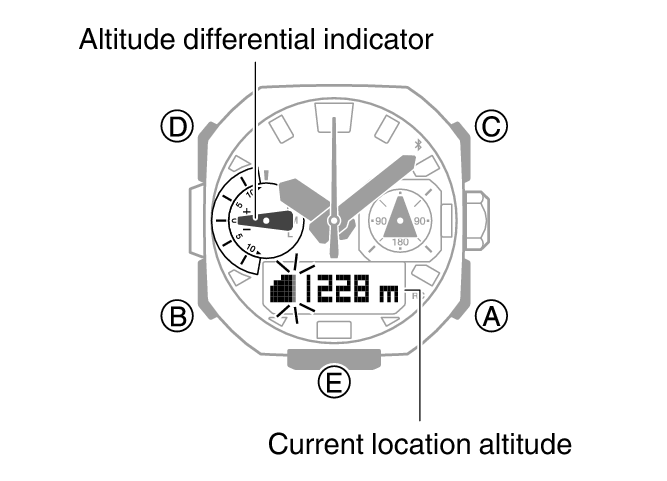
Altitude Measurement
The watch takes altitude readings and displays results based on air pressure measurements taken by a built-in pressure sensor.
Important!
The altitude readings displayed by the watch are relative values that are calculated based on barometric pressure measured by the watch’s pressure sensor. This means that barometric pressure changes due to weather can cause altitude readings taken at the same location to be different. Also note that the value displayed by the watch may be different from the actual elevation and/or sea level elevation indicated for the area where you are located. When using the watch’s altimeter while mountain climbing, it is recommended that you regularly calibrate its readings in accordance with local altitude (elevation) indications.
The altitude correction value you specify and/or barometric pressure changes may cause a negative value to be displayed.
Check the information at the link below to find out about how to minimize differences between readings produced by the watch, and values provided by local altitude (elevation) indications.
Checking the Current Altitude
-
Enter the Altimeter Mode.
Entering the Altimeter Mode will start altitude measurement and display the altitude at your current location.
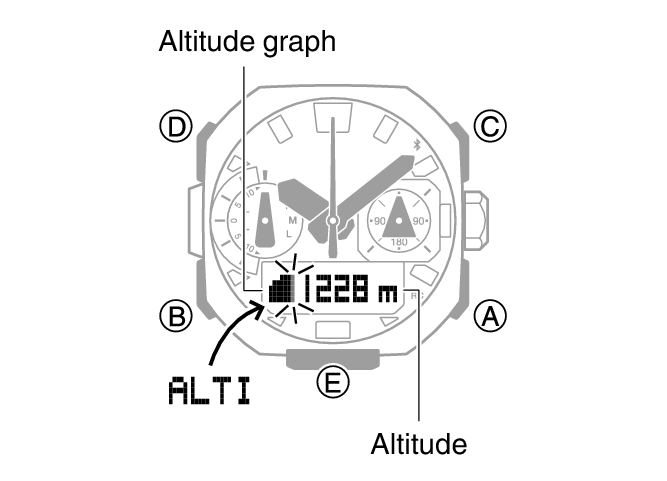
The watch takes altitude readings every second for about the first three minutes. After that, it takes readings according to the watch’s auto measurement interval setting.
Check the information at the link below to find out how to configure the auto measurement interval.
To retrigger measurement, press (A).
To return to the Timekeeping Mode, press (B).
Note
If the hour and/or minute hand is located over the digital display when you perform an altitude measurement, the hands will temporarily shift to the 22-second or 38-second position to allow easier reading of measurement values. The hands will unshift to their normal positions after about three seconds.
When you enter the Altimeter Mode, the function hand indicates the altitude difference if the previous altitude measurement was retained.
Measurement range: -700 to 10,000 meters (-2,300 to 32,800 feet) (Measurement unit: 1 meter (5 feet))
Note that calibrating altitude readings will cause a change in the measurement range.
[- - -] will appear for the measured value if it is outside the allowable range.
Interpreting Altitude Graph Contents
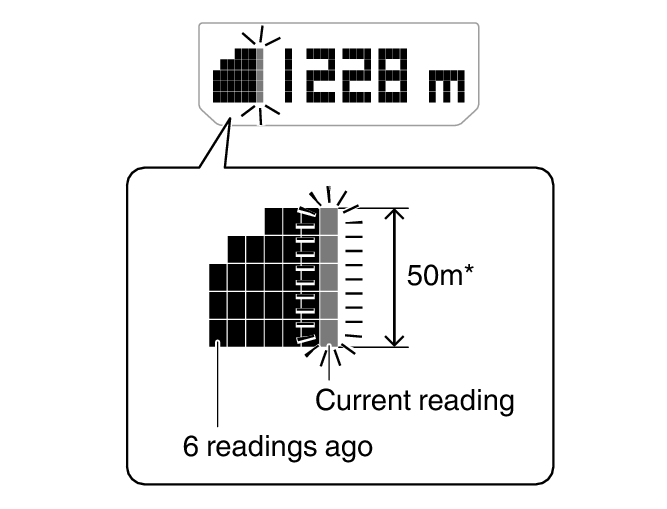
1 square ( ) is 10 m.
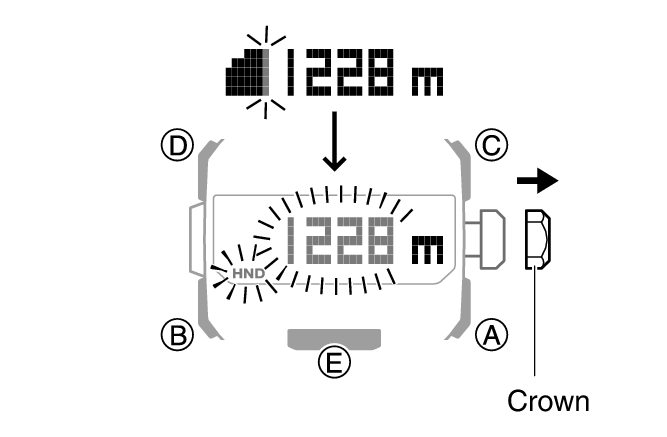
Calibrating Altitude Readings (Offset)
To minimize the difference between locally indicated and measured values, you should update the reference altitude value (offset) before setting off and during treks or any other activities where you take altitude readings.
Also, you can ensure accurate measurements by checking a map local altitude indications or some other source for your current location’s altitude, and regularly calibrating watch readings with the latest information while mountain climbing.
Note
You can find out the altitude at your current location from signs, maps, on the Internet, etc.
Differences between actual altitude and watch readings can be caused by the factors below.
Changes in barometric pressure
Changes in temperature caused by variations in barometric pressure and by elevation
Though altitude readings can be taken without calibration, doing so may produce readings that are very different from indications by altitude markers, etc.
-
Enter the Altimeter Mode.
-
Loosen the crown and then pull it out.
-
Rotate the crown to calibrate the displayed value to that of a local altitude (elevation) marker.
-
Push the crown back in and then lock it.
This displays the current altitude and enters the Altitude Offset Mode.
Setting range: -3,000 to 10,000 meters (or -9,840 to 32,800 feet)
Setting unit: 1 meter (or 5 feet)
To return the altitude setting to its initial factory default, press (A) and (C) at the same time.
Note
If you do not perform any operation for about two minutes after pulling out the crown, crown operations will automatically become disabled. If that happens, push the crown back in and then pull it out again.
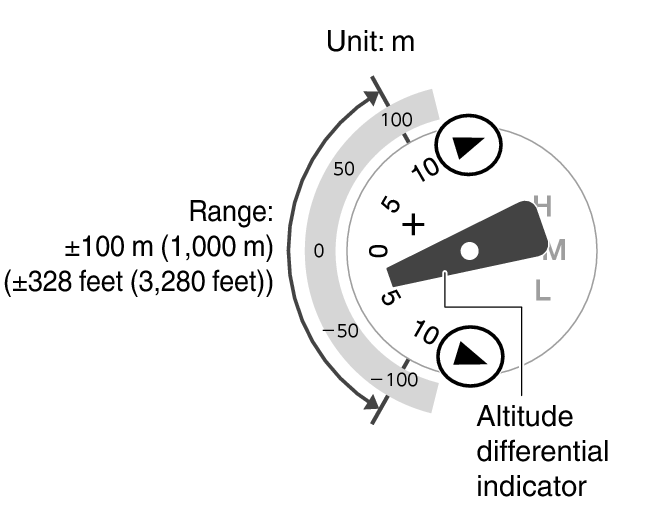
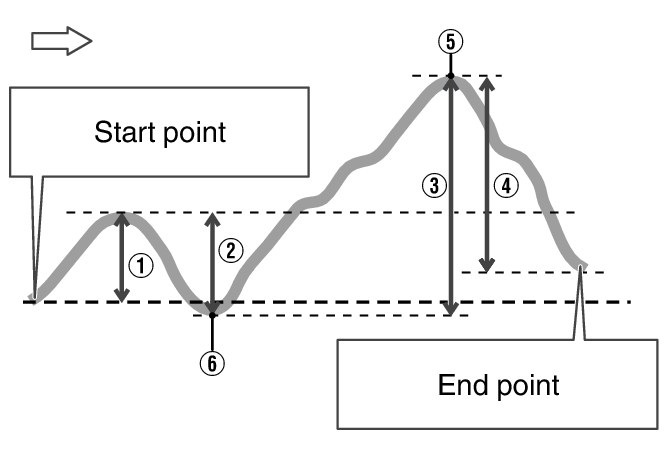
Checking the Altitude Differential from a Reference Point
After you set a reference altitude, the second hand of the watch will indicate the difference between your current altitude and the reference altitude. This makes it easy to measure the altitude difference between two points while climbing or trekking.
Setting the Altitude Differential Measurement Range
-
Enter the Altimeter Mode.
-
Loosen the crown and then pull it out.
-
Press (B) twice.
-
Rotate the crown to select either [100m] or [1000m].
-
Push the crown back in and then lock it.
This displays the altitude for your current location.
This displays the altitude differential measurement range.

[100m]: ±100 meters (±328 feet) in 5-meter (16-foot) units
[1000m]: ±1000 meters (±3280 feet) in 50-meter (164-foot) units
Note
If you do not perform any operation for about two minutes after pulling out the crown, crown operations will automatically become disabled. If that happens, push the crown back in and then pull it out again.
Measuring Altitude
-
Use the contour lines on your map to determine the altitude differential between your current location and your destination.
-
Take an altitude reading of your current location.
-
Hold down (D) for at least two seconds to set your current location’s altitude as the reference altitude.
-
While comparing the difference between the altitude you found on the map and the altitude differential indicated by the watch’s function hand, advance towards your destination.
This displays [DIFF RESET] ![]() [RESET] and then your current altitude.
[RESET] and then your current altitude.
The function hand (Altitude Differential Indicator) will indicate the difference between the reference altitude and the current altitude reading. At this time, the function hand should indicate ±0 m (±0 feet).
When the altitude differential you found on the map is the same as that indicated by the function hand, it means you are close to your destination.
Example: Altitude differential of -30 m (-98 feet) (-300 m (-984 feet))
Note
The function hand points to  (over) if the current altitude differential is greater than the setting value, or
  (under) if it is less than the setting value.
If either of these is indicated while using the ±100 m (328 feet) measurement range, change the range setting to ±1,000 m (3,280 feet).
The function hand will point [0] if a reading is outside the allowable altitude measurement range (-700 m to 10,000 m (-2,300 to 32,800 feet)), or if a reading error occurs.
Setting the Auto Measurement Interval
You can select an auto measurement interval of either five seconds or two minutes.
-
Enter the Altimeter Mode.
-
Loosen the crown and then pull it out.
-
Press (B).
-
Rotate the crown to select [0’05] or [2’00] as the auto measurement interval.
-
Push the crown back in and then lock it.
This displays the altitude for your current location.
This causes the auto measurement interval to appear on the display.
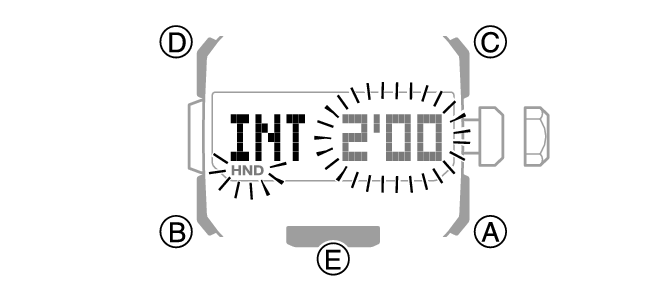
[0’05]: Readings taken every second for the first three minutes, and then every five seconds for about the next one hour.
[2’00]: Readings taken every second for the first three minutes, and then every two minutes for about the next 12 hours.
Note
If you do not perform any operation for about two minutes after pulling out the crown, crown operations will automatically become disabled. If that happens, push the crown back in and then pull it out again.
The watch will automatically return to the Timekeeping Mode if you do not perform any operation in the Altimeter Mode for about one hour while [0’05] is selected as the measurement interval or about 12 hours while [2’00] is selected.
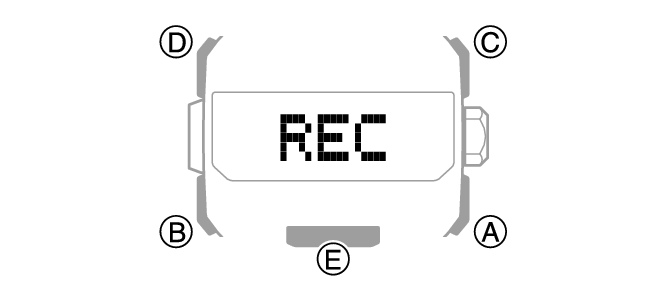
Recording Altitude Readings
Use the procedure below to record altitude measurements manually. Auto measurements are also recorded automatically.
Use the Altitude Record Recall Mode to view or delete records.
Recording Altitude Data Manually
-
Enter the Altimeter Mode.
-
Hold down (A) for at least two seconds until [REC] appears on the display.
This records the current altitude, date, and time.
There is enough memory to hold up to 30 altitude records.
Recording altitude data when there are already 30 records in memory automatically deletes the oldest record to make room for the new one.
Note
If Route Log is disabled, the watch will automatically return to normal Altitude Mode operation following recording of altitude data.
If Route Log is enabled and altitude data is recorded, the watch will connect with the phone and transfer the data to it.
When a connection between the watch and phone is established, [REC] changes to [OK], and the second hand moves from [RC] to  .
.
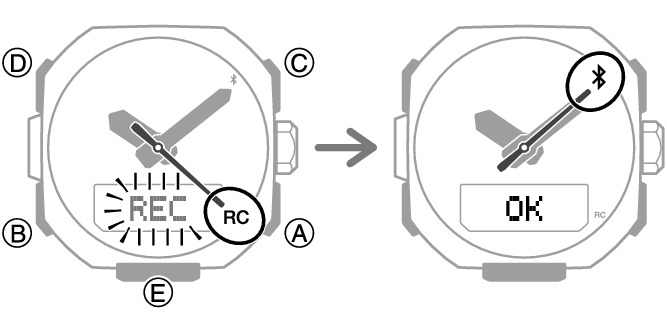
[ERR] will appear on the display if connection fails for some reason.
Auto Altitude Data Recording
The altitude data described below is recorded automatically while the watch is in the Altimeter Mode. One record each is maintained in memory for each of these items.
High Altitude (MAX): 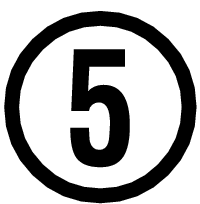
Low Altitude (MIN): 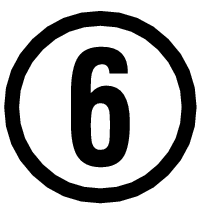
Cumulative Ascent (ASC):  +
+ *
*
Cumulative Descent (DSC): 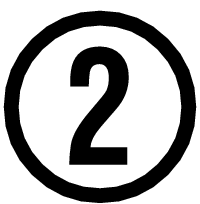 +
+ *
*
Cumulative ascent and cumulative descent values are updated whenever there is a difference of at least ±15 m (±49 feet) from one reading to the next.
Note
Auto recording ends when you exit the Altimeter Mode. Re-entering the Altimeter Mode restarts recording of cumulative values from where it was stopped when you last exited the Altimeter Mode.
Auto measurement continues if you go from the Altimeter Mode to another mode while Route Log is enabled.
Every time an auto measurement operation is performed while Route Log is enabled, the watch checks the currently saved values of the following data items and updates them as required: MAX, MIN, ASC, DSC.
[ERR] will appear on the display if connection fails for some reason.
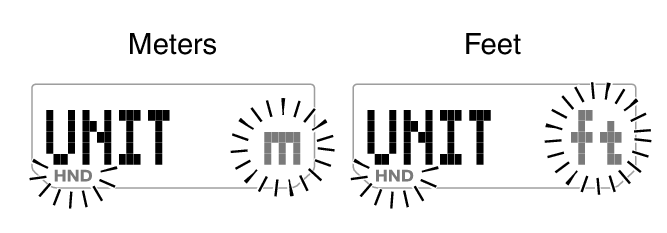
Specifying the Altitude Measurement Unit
You can select either meters (m) or feet (ft) as the Altimeter Mode display unit.
Important!
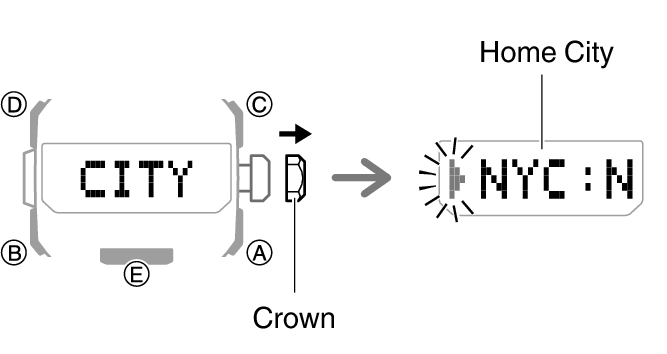
When Tokyo (TYO) is set as the Home City, the altitude unit is fixed as meters (m) and cannot be changed.
-
Enter the Timekeeping Mode.
-
Loosen the crown and then pull it out.
-
Press (B) seven times.
-
Rotate the crown to select an altitude unit.
-
Push the crown back in and then lock it.
The currently selected Home City will appear on the display.
This causes [UNIT] to appear, with [m] or [ft] flashing.
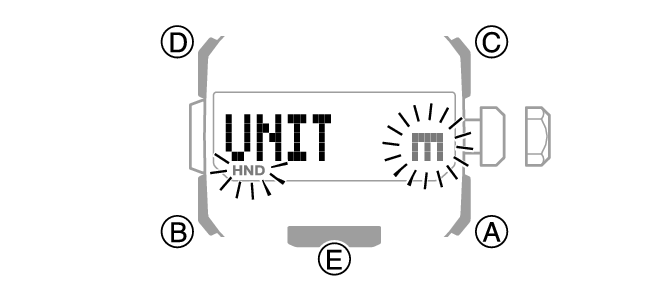
[m]: Meters
[ft]: Feet
Note
If you do not perform any operation for about two minutes after pulling out the crown, crown operations will automatically become disabled. If that happens, push the crown back in and then pull it out again.
Altitude Reading Precautions
Effects of Temperature
When taking altitude readings, take the steps below to keep the watch at as stable a temperature as possible. Changes in temperature can affect altitude readings.
Take readings with the watch on your wrist.
Take readings in an area where temperature is stable.
Altitude Readings
Do not use this watch while skydiving, hang gliding, paragliding, gyrocopter flying, glider flying, or engaged in other activities where altitude changes suddenly.
Altitude readings produced by this watch are not intended for special-purpose or industrial level use.
In an aircraft, the watch measures the in-cabin pressurized air pressure, so readings will not match altitudes announced by the crew.
Altitude Readings (Relative Altitude)
This watch uses International Standard Atmosphere (ISA) relative altitude data defined by the International Civil Aviation Organization (ICAO). Barometric pressure generally becomes lower as altitude increases.
Correct measurement may not be possible under the conditions below.
During unstable atmospheric conditions
During sudden temperature changes
After the watch has been subjected to strong impact