Module No. 3554
Specifying a Port
Use the CASIO WATCHES phone app or watch operations to specify the port whose tide information you want to view.
To use the CASIO WATCHES phone app to specify a port
Check the connection
Make sure the  symbol is shown on the watch display when you perform the procedure below. If is not displayed, refer to the information at the link below.
Note
You can use CASIO WATCHES to specify any one of 3,300 points around the world as the port.
You can use the CASIO WATCHES phone app to specify any location you want as a port. A user-specified port is indicated by an underline character (“_”) at the beginning of its displayed port name.
-
 Tap the “CASIO WATCHES” icon.
 -
Tap the “My Watch” tab.
-
Select “GPR-H1000” and tap it.
-
Select the setting you want to change and then perform the operation shown on the screen.
To use phone operations to specify a port
You can use watch operations to register any location you want (custom point).
-
Display the current time screen.
-
Use (A) and (D) to select [TIDEGRAPH].
-
Press (C).
-
Hold down (A) for at least two seconds.
-
Use (A) and (D) to move the pointer to the item whose setting you want to change.
-
Press (C).
-
Specify the high tide time of the custom point.
-
Use (A) and (D) to change the high tide time hour setting.
-
Press (C).
-
Use (A) and (D) to change the high tide time minute setting.
-
Press (C) to complete the high tide time registration.
-
Specify the latitude and longitude of the custom point.
-
Use (A) and (D) to specify [N] (north) or [S] (south) as the latitude direction.
-
Press (C).
-
Use (A) and (D) to specify a latitude value.
-
Press (C).
-
Use (A) and (D) to specify [E] (east) or [W] (west) as the longitude direction.
-
Press (C).
-
Use (A) and (D) to specify a longitude value.
-
Press (C) to complete the latitude and longitude registration.
-
Specify the UTC time offset of the custom point.
-
Use (A) and (D) to change the UTC time offset.
-
Press (C) to complete time offset registration.
-
Specify the DST on/off setting for the custom point.
-
Use (A) and (D) to specify [OFF] (standard time display) or [ON] (summer time display).
-
Press (C) to complete the DST on/off registration.

This displays a Tide Graph.
This displays the custom point item selection screen.
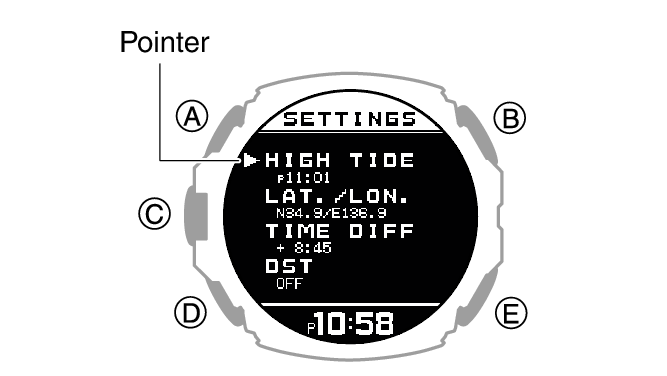
|
[HIGH TIDE] |
High tide time |
|
[LAT./LON.] |
Latitude and longitude |
|
[TIME DIFF] |
Time offset |
|
[DST] |
Summer time |
On the custom point item selection screen, select [HIGH TIDE].
After registration of the information is complete, a checkmark appears for a few seconds and then the custom point item selection screen re-appears.
Note
Pressing (E) during the above procedure will go back one screen.
On the custom point item selection screen, move the pointer to [LAT./LON.].
After registration of the information is complete, a checkmark appears for a few seconds and then the custom point item selection screen re-appears.
Note
Pressing (E) during the above procedure will go back one screen.
On the custom point item selection screen, move the pointer to [TIME DIFF].
After registration of the information is complete, a checkmark appears for a few seconds and then the custom point item selection screen re-appears.
Note
Pressing (E) during the above procedure will go back one screen.
On the custom point item selection screen, move the pointer to [DST].
After registration of the information is complete, a checkmark appears for a few seconds and then the custom point item selection screen re-appears.