Module No. 3506
Using Watch Operations to Adjust the Time Setting
If your watch cannot connect with a phone for some reason, you can use watch operations to adjust date and time settings.
Setting a Home City
Use the procedure in this section to select a city to use as your Home City.
-
Enter the Timekeeping Mode.
-
Hold down (A) for at least two seconds.
-
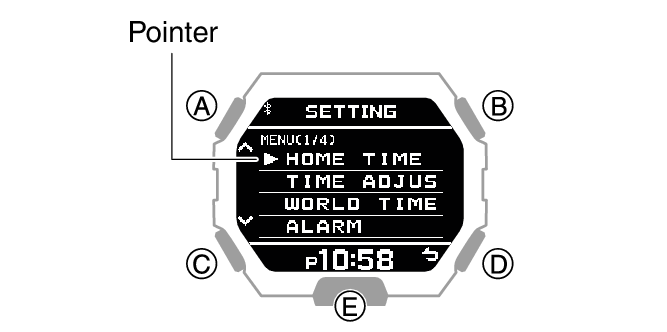
Use (A) and (C) to move the pointer to [HOME TIME].
-
Press (B).
-
Use (A) and (C) to move the pointer to [CITY].
-
Press (B).
-
Use (A) and (C) to move the pointer to the city you want to use as your Home City.
-
Press (B) to complete the setting operation.
-
Press (D) twice to exit the setting screen.
This displays the Timekeeping Mode setting screen.

After the setting operation is complete, [SETTING COMPLETED] will appear for a few seconds, and then the Home Time setting screen will re-appear.
Configuring the Summer Time Setting
If you are in an area that observes summer time, you can also enable or disable summer time.
Note
The initial factory default summer time setting for all cities is [AT (AUTO)]. In many cases, [AT (AUTO)] lets you use the watch without switching manually between summer time and standard time.
-
Enter the Timekeeping Mode.
-
Hold down (A) for at least two seconds.
-
Use (A) and (C) to move the pointer to [HOME TIME].
-
Press (B).
-
Use (A) and (C) to move the pointer to [DST].
-
Press (B).
-
Use (A) and (C) to select a summer time setting.
-
Press (B) to complete the setting operation.
-
Press (D) twice to exit the setting screen.
This displays the Timekeeping Mode setting screen.

|
[AUTO] |
Auto switching between standard time and summer time |
|
[OFF] |
Always standard time |
|
[ON] |
Always summer time |
After the setting operation is complete, [SETTING COMPLETED] will appear for a few seconds, and then the Home Time setting screen will re-appear.
To correct the time manually
-
Enter the Timekeeping Mode.
-
Hold down (A) for at least two seconds.
-
Use (A) and (C) to move the pointer to [TIME ADJUSTMENT].
-
Press (B).
-
Use (A) and (C) to move the pointer to [MANUAL].
-
Press (B).
-
Use (A) and (C) to change the current time hour setting.
-
Press (B).
-
Use (A) and (C) to change the current time minute setting.
-
Press (B).
-
Use (A) and (C) to change the year setting.
-
Press (B).
-
Use (A) and (C) to change the month setting.
-
Press (B).
-
Use (A) and (C) to change the day setting.
-
Press (B).
-
Use (A) and (C) to select whether or not you want to save your current settings.
-
Press (B) to complete the setting operation.
-
Press (D) twice to exit the setting screen.
This displays the Timekeeping Mode setting screen.

This causes a cursor to appear under the hour setting.
This moves the cursor to the minute setting.
This moves the cursor to the year setting.
This moves the cursor to the month setting.
This moves the cursor to the day setting.
|
[YES] |
Saves current settings. |
|
[NO] |
Discards current settings. |
|
[RETURN] |
Returns to the hour setting screen. |
After the setting operation is complete, [SETTING COMPLETED] will appear for a few seconds, and then the time adjustment screen will re-appear.
Note
To exit the current time setting operation at any point, press (D) and advance to step 17.
Switching between 12-hour and 24-hour Timekeeping
You can specify either 12-hour format or 24-hour format for the time display.
-
Enter the Timekeeping Mode.
-
Hold down (A) for at least two seconds.
-
Use (A) and (C) to move the pointer to [TIME ADJUSTMENT].
-
Press (B).
-
Use (A) and (C) to move the pointer to [12/24H].
-
Press (B).
-
Use (A) and (C) to select [12H] (12-hour timekeeping) or [24H] (24-hour timekeeping).
-
Press (B) to complete the setting operation.
-
Press (D) twice to exit the setting screen.
This displays the Timekeeping Mode setting screen.

After the setting operation is complete, [SETTING COMPLETED] will appear for a few seconds, and then the time adjustment screen will re-appear.
While 12-hour timekeeping is selected, [P] will be displayed for p.m. times.
