Time Adjustment
Your watch can connect with a phone to obtain information that it uses to correct its date and time setting.
Important!
Switch to Airplane Mode and use watch operations for time adjustment whenever you are inside an aircraft or any other area where phone use is prohibited or restricted.
Automatically Connecting with a Phone to Sync the Current Watch’s Time Setting
Auto Time Adjustment
Your watch can connect with your phone to adjust the watch’s time setting.
If you leave your watch with the current time screen displayed, it will perform the adjustment operation automatically as you go about your daily life, without any operation required by you.

Important!
The watch may not be able to perform auto time correction under the conditions described below.
While the watch is too far away from its paired phone
While communication is not possible due to radio interference, etc.
While the phone is updating its system
While the CASIO WATCHES phone app is not running on the phone
Note
If there is a World Time City specified with the CASIO WATCHES phone app, its time will also be corrected automatically.
Auto time correction is performed at the times described below.
After your phone’s time zone or summer time setting is changed
After 24 hours or more have passed since the last time adjustment using Bluetooth connection
After 24 hours or more have passed since the last home city change or time adjustment using watch operation
The watch remains connected with your phone even after time adjustment is complete.
If time adjustment fails for some reason, [FAILED] will appear.
Watch operation can be performed even while it is connected with your phone.
Connection with your phone is not possible while the watch’s Airplane Mode is enabled. To connect with your phone, disable the Airplane Mode.
Manually Connecting with a Phone to Sync the Watch’s Time Setting
You can use the procedure below to connect manually with a phone that is already paired with the watch.
-
Display the current time screen.
-
Hold down (C) for at least two seconds.
-
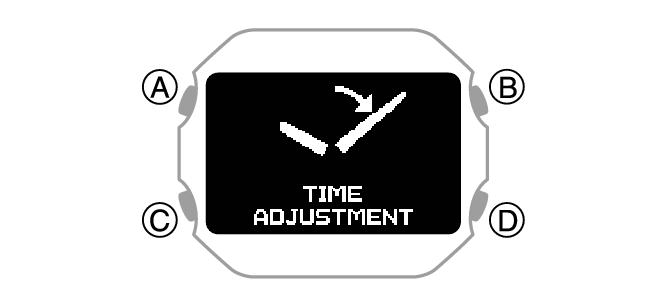
Use (C) to select [TIME ADJUSTMENT].
-
Press (A).
-
Press any button and return to the TIME ADJUSTMENT screen.
-
Press (D) to complete the setting operation.
This enters the Control Mode.
This starts Bluetooth connection.
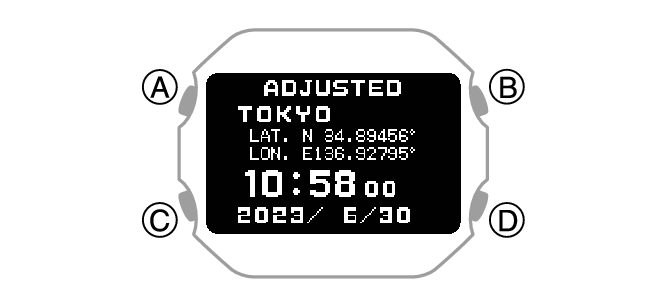
The acquired information appears on the watch display when time acquisition is successful.
[FAILED] appears if acquisition fails.
Using Watch Operations to Adjust the Time Setting
When your watch cannot communicate with your phone for some reason, you can use watch operations to adjust date and time settings.
Setting a Home City
Use the procedure in this section to select a city to use as your Home City.
-
Display the current time screen.
-
Hold down (C) for at least two seconds.
-
Use (C) to select [SETTING].
-
Press (A).
-
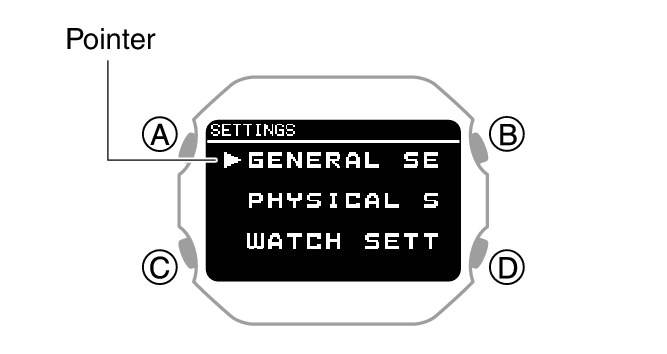
Use (C) to move the pointer to [WATCH SETTINGS].
-
Press (A).
-
Use (C) to move the pointer to [HOME TIME].
-
Press (A).
-
Use (C) to move the pointer to [HOME TIME CITY].
-
Press (A).
-
Use (C) to move the pointer to the city you want to use as your Home City.
-
Press (A) to complete the setting operation.
-
Hold down (D) for at least one second to return to the current time screen.
This enters the Control Mode.
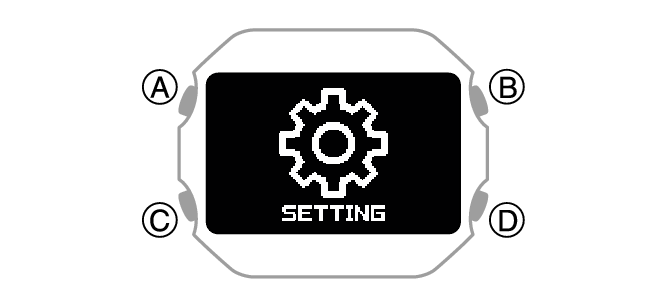
This displays the setting menu screen.
After the setting operation is complete, a check mark appears for a few seconds, and then the home time setting screen re-appears.
Configuring the Summer Time Setting
If you are in an area that observes summer time, you can also enable or disable summer time.
Note
The initial factory default summer time setting for all cities is [AUTO]. In many cases, [AUTO] lets you use the watch without switching manually between summer time and standard time.
-
Display the current time screen.
-
Hold down (C) for at least two seconds.
-
Use (C) to select [SETTING].
-
Press (A).
-
Use (C) to move the pointer to [WATCH SETTINGS].
-
Press (A).
-
Use (C) to move the pointer to [HOME TIME].
-
Press (A).
-
Use (C) to move the pointer to [DST].
-
Press (A).
-
Use (C) to select a summer time setting.
-
Press (A) to complete the setting operation.
-
Hold down (D) for at least one second to return to the current time screen.
This enters the Control Mode.
This displays the setting menu screen.
|
[AUTO] |
Auto switching between standard time and summer time |
|
[OFF] |
Always standard time |
|
[ON] |
Always summer time |
After the setting operation is complete, a check mark appears for a few seconds, and then the home time setting screen re-appears.
To adjust the date manually
-
Display the current time screen.
-
Hold down (C) for at least two seconds.
-
Use (C) to select [SETTING].
-
Press (A).
-
Use (C) to move the pointer to [WATCH SETTINGS].
-
Press (A).
-
Use (C) to move the pointer to [DATE & TIME].
-
Press (A).
-
Use (C) to move the pointer to [DATE SETTING].
-
Press (A).
-
Use (C) to change the year setting.
-
Press (A).
-
Use (C) to change the month setting.
-
Press (A).
-
Use (C) to change the day setting.
-
Press (A) to complete the setting operation.
-
Hold down (D) for at least one second to return to the current time screen.
This enters the Control Mode.
This displays the setting menu screen.
This causes a cursor to appear under the year setting.
This moves the cursor to the month setting.
This moves the cursor to the day setting.
After the setting operation is complete, a check mark appears for a few seconds, and then the current time setting screen re-appears.
Note
Pressing (D) during the above procedure will go back one screen.
To correct the time manually
-
Display the current time screen.
-
Hold down (C) for at least two seconds.
-
Use (C) to select [SETTING].
-
Press (A).
-
Use (C) to move the pointer to [WATCH SETTINGS].
-
Press (A).
-
Use (C) to move the pointer to [DATE & TIME].
-
Press (A).
-
Use (C) to move the pointer to [TIME SETTING].
-
Press (A).
-
Use (C) to change the hour setting.
-
Press (A).
-
Use (C) to change the minute setting.
-
Press (A) to complete the setting operation.
-
Hold down (D) for at least one second to return to the current time screen.
This enters the Control Mode.
This displays the setting menu screen.
This causes a cursor to appear under the hour setting.
This moves the cursor to the minute setting.
After the setting operation is complete, a check mark appears for a few seconds, and then the current time setting screen re-appears.
Switching between 12-hour and 24-hour Timekeeping
You can specify either 12-hour format or 24-hour format for the time display.
-
Display the current time screen.
-
Hold down (C) for at least two seconds.
-
Use (C) to select [SETTING].
-
Press (A).
-
Use (C) to move the pointer to [WATCH SETTINGS].
-
Press (A).
-
Use (C) to move the pointer to [DATE & TIME].
-
Press (A).
-
Use (C) to move the pointer to [TIME FORMAT].
-
Press (A).
-
Use (C) to select [12H] (12-hour timekeeping) or [24H] (24-hour timekeeping).
-
Press (A) to complete the setting operation.
-
Hold down (D) for at least one second to return to the current time screen.
This enters the Control Mode.
This displays the setting menu screen.
After the setting operation is complete, a check mark appears for a few seconds, and then the current time setting screen re-appears.
While 12-hour timekeeping is selected, [P] will be displayed for p.m. times.