Selecting an Activity for Measurement
Your watch supports measurement and recording of dozens of different activities. The table below shows a partial list of supported activities.
|
Walking |
Arm curls* |
|
Cycling |
Abdominal crunches* |
|
Skiing |
Shoulder presses* |
|
Sailing |
Squats* |
|
Trail running |
Treadmill* |
|
Trekking |
Push ups* |
|
Fishing |
Planks* |
|
Pool swimming |
Bench presses* |
|
Mountain biking |
Leg presses* |
|
Running |
Lower back*, etc. |
|
Road biking, etc. |
|
Activities included in the “Workouts” item of the watch’s activity selection screen. Operations for these activities are slightly different from operations of other activities.
Important!
Note the precautions below to ensure correct heart rate measurement by the watch.
Before starting measurement, use the procedure under Configuring Initial Default Settings for Heart Rate Measurement to enter your birthday, gender, and other profile information.
Be sure to properly fasten the watch to your wrist. (See Fastening the Watch to Your Wrist.)
When you start measurement of an outdoor activity such as running, go outdoors to an open space where the sky is visible.
Note
While the watch is connected with the “G-SHOCK MOVE” phone app, you can use your phone to view Activity records.
To connect to “G-SHOCK MOVE”, press the APP button on the watch face (lower button). On the screen that appears, tap “G-SHOCK MOVE” icon in the center of the screen.
For details, see Quick Recall of Main Functions (CASIO's APPS).
Activity Measurement (Excluding Workouts)
This section describes the measurement operations for running and other activities that are mainly performed outdoors.
For details about Workouts measurement, see Activity Measurement (Workouts).
Starting, Pausing, and Stopping an Activity Measurement
Starting an Activity Measurement Operation
Note
Display of the “DIGITAL” watch face is recommended when performing step 1 of the procedure below.
Regardless of the type of watch face you have displayed, starting an activity measurement operation switches to the “DIGITAL” activity measurement in progress screen.
-
While a watch face is displayed, press the START button (upper button).
-
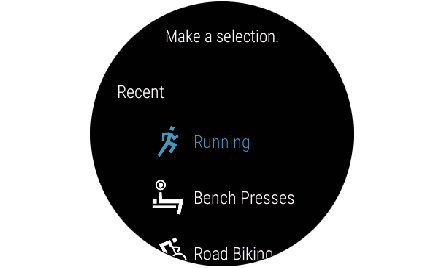
Press the APP button (lower button) to display the activity selection screen.
-
Swipe the screen up or down until you find the activity you want, and then tap it.
-
To start measurement, press the START button.
This displays the activity measurement START screen, which shows the currently selected activity.
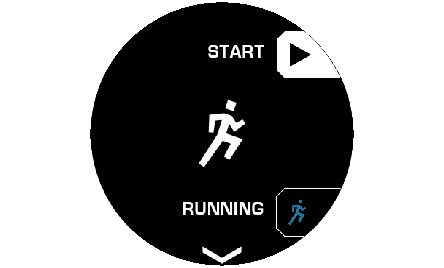
To change the sports activity, go to step 2. To start measurement using the currently selected sports activity, advance to step 4 of this procedure.
If you are using an activity that records location information, the message “Location info being acquired...” appears at this time. Move outdoors to a location with an unobstructed view of the sky and wait there without moving until location information can be acquired.
If a countdown appears, start the workout when the countdown reaches zero. If you want to start without waiting until the countdown reaches zero, press the START button.
For some activities (such as Skiing), the following message appears on the display: “Standing by. To restart recording, press the GO button.”. In this case, you can start measurement by pressing the START button.
When the measurement starts, the watch transitions to the “DIGITAL” watch face’s activity measurement in progress screen.
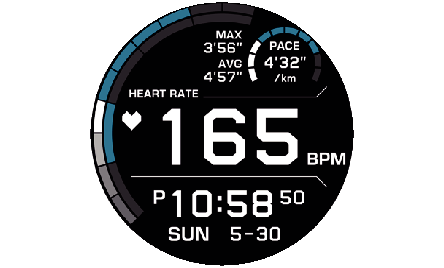
Example screen when “Running” is selected
For information about the screen items, see Activity Measurement in Progress Screen.
To pause or stop activity measurement
-
To pause a measurement operation, display the Activity measurement in progress screen and then press the START button (upper button).
-
To quit measurement, hold down the APP button (lower button) for about two seconds.
-
This displays the message “Save history?”. Tap “Save (upper button)” or press the START button.
This pauses measurement and displays the measurement paused screen.
To restart measurement, press the START button.
To discard the measurement history, tap “Discard (lower button)” or press the APP button.
Tapping “Save (upper button)” performs the save operation and then displays the stats screen. You can scroll the stats screen contents by swiping up or down.
To view saved statistical data later, select the CASIO's APPS option of “History”.
Note
Changing the “Location Recording Frequency” setting from “MAX (Every second)” (initial default) to “MID (Every 5 seconds)” or “LOW (Every 120 seconds)” reduces battery power consumption, but it also reduces the accuracy of various measurements, and disables Auto Pause and other functions.
Activity Measurement in Progress Screen
This section explains how to interpret the contents of the activity measurement screen. The “Running” screen is used as an example for this explanation.
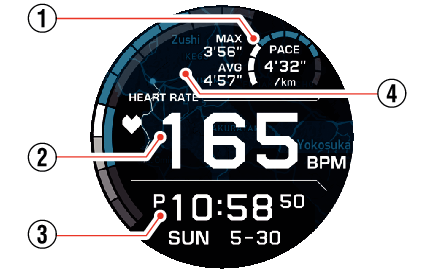
Example screen when “Running” is selected
-
The 10 segments of this ring represent 100% of your personal best pace based on your history of past runs (10% each). The initial default setting for the personal best pace is 4:00 minutes per kilometer. As you run, segments are displayed to show what percentage of your personal best your current pace is.
-
Shows your Heart Rate. See “Heart Rate” under Middle display area example.
-
Shows the current time, day of the week, and date.
-
A map around your current location and a track of your movements are displayed as the background.
The items below are displayed near the ring.
PACE: Your current pace
MAX: You maximum pace measured so far
AVG: Your current measured average pace
Activity Measurement (Workouts)
To ensure acquisition of effective Workouts measurements and recorded data, determine your own personal training amounts and the goals for each sports activity, and input the information on the watch.
Example:
|
|
Push ups Reps: 20 Sets: 3 Interval between sets: 1 minute |
|
 |
||
|
|
Sit ups Reps: 40 Sets: 3 Interval between sets: 1 minute |
|
|
|
||
|
|
Planks Hold Time: 30 seconds Sets: 3 Interval between sets: 30 seconds |
|
Inputting Training Amounts, Goals, and Other Data on Your Watch
Note
Display of the “DIGITAL” watch face is recommended when performing step 1 of the procedure below.
Regardless of the type of watch face you have displayed, starting an activity measurement operation switches to the “DIGITAL” activity measurement in progress screen.
-
While a watch face is displayed, press the START button (upper button).
-
Press the APP button (lower button) to display the activity selection screen, and then tap “Workouts”.
-
On the workout activity selection screen, tap the item whose training volume, goal, or other information you want to input.
-
Swipe the screen from bottom to top. On the menu that appears, tap “Settings”.
-
Enter each of the setting items as required by the workout activity.
-
After entering all the required items, perform the steps below to return to the START screen.
-
Swipe the setting menu screen from left to right to return to the menu screen displayed in step 4 of this procedure.
-
Swipe the screen from top to bottom.
-
If you want to enter information for another workout activity, repeat steps 2 through 6 of this procedure.
This displays the activity measurement START screen, which shows the currently selected activity.
This returns to the activity measurement START screen, which shows the activity you tapped.
If you swipe the screen from bottom to top here, the setting menu for the displayed sports activity will appear. For details about menus, see Activity Measurement Setting Menu.
This displays a setting menu in accordance with the workout activity you selected in step 3.
The setting items that need to be input depend on the selected workout activity.
Performing Measurements According to the Workouts Type
The operations you need to perform when performing Workouts measurements are slightly different depending on whether you are performing strength training, Fat Burning training, or Core training. For details about the Workouts category, see Inputting Training Amounts, Goals, and Other Data on Your Watch.
To start strength training measurement
Note
Reps, Sets, Interval settings have an effect on strength training (Push Ups, sit-ups, Bench Presses, etc.) measurements.
-
While a watch face is displayed, press the START button (upper button).
-
Press the APP button (lower button) to display the activity selection screen, and then tap “Workouts”.
-
Tap the item for which you want to start measurement.
-
To start measurement, press the START button.
-
After completing the Reps setting, press the START button.
-
On the confirmation screen, select one of the operations described below.
-
On the interval screen that appears on the display, wait until the countdown time reaches zero.
This displays the workout selection screen for Workouts.
This returns to the START screen of the tapped item.
If you selected the first item for the start of an indoor workout, the message “Obtaining sensor information” appears. Remain still, with the watch in close contact with your skin for about 15 seconds.
The watch screen shows the Sets, Reps, and Weight settings (when the workout includes such settings) for a few seconds.
Immediately after that, the screen switches to the “DIGITAL” watch face activity measurement in progress screen, and measurement of the first set starts. Start Workouts.
This displays a confirmation screen.
To save the measurement data of this set and proceed to the next set:
Tap “Save Sets”. Go to step 7.
To discard the measurement data of this set and proceed to the next set:
Tap “Discard Sets”. On the confirmation screen that appears, tap the trash icon and advance to step 7.
To save the measurement data of this set and quit the Workouts:
Tap “Save complete.”. Go to Following Completion of One Workouts, Selecting Whether to Continue with the Workouts or to Quit.
To discard the measurement data of this set and quit the Workouts:
Tap “Discard and stop measurement”. Go to Following Completion of One Workouts, Selecting Whether to Continue with the Workouts or to Quit.
If you press the START button after completing the final set, the only options that appear are “Save complete.” and “Discard Sets and Exit”.
For example, if the Interval setting is 30 seconds, the countdown time is 30 seconds. Take a break until the start of the next set.
To resume the Workouts without waiting for the countdown time to reach zero, press the START button.
The countdown time reaching zero or pressing of the START button causes measurement of the next set to start. Restart Workouts and go back to step 5 of this procedure.
To start Core training measurement
Note
With Core training (Planks, etc.) measurement, the Hold Time, Sets, and Interval settings affect operation when measurement is performed.
-
While a watch face is displayed, press the START button (upper button).
-
Press the APP button (lower button) to display the activity selection screen, and then tap “Workouts”.
-
Tap the item for which you want to start measurement.
-
To start measurement, press the START button.
-
After the Hold Time elapses and the countdown time reaches zero, press the START button.
-
On the confirmation screen, select one of the operations described below.
-
On the interval screen that appears on the display, wait until the countdown time reaches zero.
This displays the workout selection screen for Workouts.
This returns to the START screen of the tapped item.
If you selected the first item for the start of an indoor workout, the message “Obtaining sensor information” appears. Remain still, with the watch in close contact with your skin for about 15 seconds.
The watch screen shows the Sets and Hold Time settings for a few seconds.
Immediately after that, the screen switches to the “DIGITAL” watch face activity measurement in progress screen, and measurement of the first set starts. At this time, the display shows the countdown time to the Hold Time that you set. Start Workouts.
This displays a confirmation screen.
To save the measurement data of this set and proceed to the next set:
Tap “Save Sets”. Go to step 7.
To discard the measurement data of this set and proceed to the next set:
Tap “Discard Sets”. On the confirmation screen that appears, tap the trash icon and advance to step 7.
To save the measurement data of this set and quit the Workouts:
Tap “Save complete.”. Go to Following Completion of One Workouts, Selecting Whether to Continue with the Workouts or to Quit.
To discard the measurement data of this set and quit the Workouts:
Tap “Discard and stop measurement”. Go to Following Completion of One Workouts, Selecting Whether to Continue with the Workouts or to Quit.
If you press the START button after completing the final set, the only options that appear are “Save complete.” and “Discard Sets and Exit”.
Take a break until the start of the next set.
To resume the Workouts without waiting for the countdown time to reach zero, press the START button.
The countdown time reaching zero or pressing of the START button causes measurement of the next set to start. Restart Workouts and go back to step 5 of this procedure.
To start Fat Burning training measurement
-
While a watch face is displayed, press the START button (upper button).
-
Press the APP button (lower button) to display the activity selection screen, and then tap “Workouts”.
-
Tap the item for which you want to start measurement.
-
To start measurement, press the START button.
-
To pause a measurement operation, display the Activity measurement in progress screen and then press the START button.
-
To quit measurement, hold down the APP button for about two seconds.
-
On the running distance input screen, select one of the operations described below.
-
Go to Following Completion of One Workouts, Selecting Whether to Continue with the Workouts or to Quit.
This displays the workout selection screen for Workouts.
This returns to the START screen of the tapped item.
If you selected the first item for the start of an indoor workout, the message “Obtaining sensor information” appears. Remain still, with the watch in close contact with your skin for about 15 seconds.
The watch screen shows the Target Time and Target Calories settings for a few seconds.
Immediately after that, the screen switches to the “DIGITAL” watch face activity measurement in progress screen, and measurement of the first set starts. At this time, the screen shows the elapsed time from the start of measurement. Start Workouts.
This pauses measurement and displays the measurement paused screen.
To restart measurement, press the START button.
This displays the running distance input screen.
To save the running distance and quit:
Input the running distance and then tap “Save the distance and exit”.
To quit without saving the running distance:
Tap “Exit without saving the distance”.
This saves measurement data other than the running distance.
To discard current measurement data and quit:
Tap “Discard the record and exit”. On the confirmation screen that appears, tap the trash can icon.
Following Completion of One Workouts, Selecting Whether to Continue with the Workouts or to Quit
The procedure below should be performed after completing a Workouts by performing the operation under To start strength training measurement, To start Core training measurement, or To start Fat Burning training measurement. It cannot be performed as a stand-alone operation.
-
When the “Way to go!! Continue with another workout?” message appears, perform one of the operations below.
To continue with another Workouts activity:
Tap “Yes. Continue.”.
This returns to the Workouts activity selection screen.
Next, select the workout activity you want to start in step 3 of To start strength training measurement, To start Core training measurement, or To start Fat Burning training measurement.
To quit Workouts:
Tap “No. Cancel.”.
This displays the history save confirmation screen. Tap “Save (upper button)” or “Discard (lower button)”.
This displays a screen of statistics for of all the Workouts you have completed. You can scroll the stats screen contents by swiping up or down.
To return to the watch face that was displayed before you started Workouts, press the power button.
To view saved statistical data later, select the CASIO's APPS option of “History”.
Activity Measurement Setting Menu
Swiping the activity measurement START screen from bottom to top displays a setup menu for the currently displayed activity.
|
Menu Item |
Description |
|---|---|
|
History |
Displays a history list of activity measurement results. The log provides a detailed, optimized view of each workout activity. |
|
Display |
Using the submenu that appears when you tap this item, you can customize the measurement in progress display for the currently selected workout activity. “Display Item”... Selects the display items for the upper, middle, and lower display areas. “Background Image”... Selects a background. |
|
Download Map |
Download maps ahead of time while you have internet connection, to ensure accessibility when there is no network connection. The watch can have data for up to five Mapbox* maps in watch memory at a time. |
|
Show map |
Displays a map using the full display area of the watch. |
|
Import Route |
This item lets you import route data saved in watch memory as activity measurement history or external route data (GPX or KML files) saved on Google Drive, and display it as a reference route. |
|
Settings |
Displays a submenu that includes various setting items that are common to all types of sports activities. |
|
Cancel |
Cancels activity measurement and returns to the watch face prior to the START screen. |
Your watch supports use of two types of maps: “Google Maps” and “Mapbox”. Only Mapbox map data can be downloaded for use. In places where network communication is possible, perform the following operation in sequence: “Settings” (above)> “Map App”> “Map Type”. Next select “Google Maps” or “Mapbox”.
Changing Screen Items Displayed During Activity Measurement
Since the activity measurement in progress screen is one of the display formats of the “DIGITAL” watch face, you can use the same operations as those for the DIGITAL daily screen to change the display items for the upper, middle, and lower display areas. For information about the procedure, see Changing DIGITAL Screen Items.
Note
The display item selection screen that appears when you tap the activity measurement in progress screen has an on-screen pause button (![]() ). This is different from the screen that appears when you tap the daily screen. Tap this button to pause measurement.
). This is different from the screen that appears when you tap the daily screen. Tap this button to pause measurement.