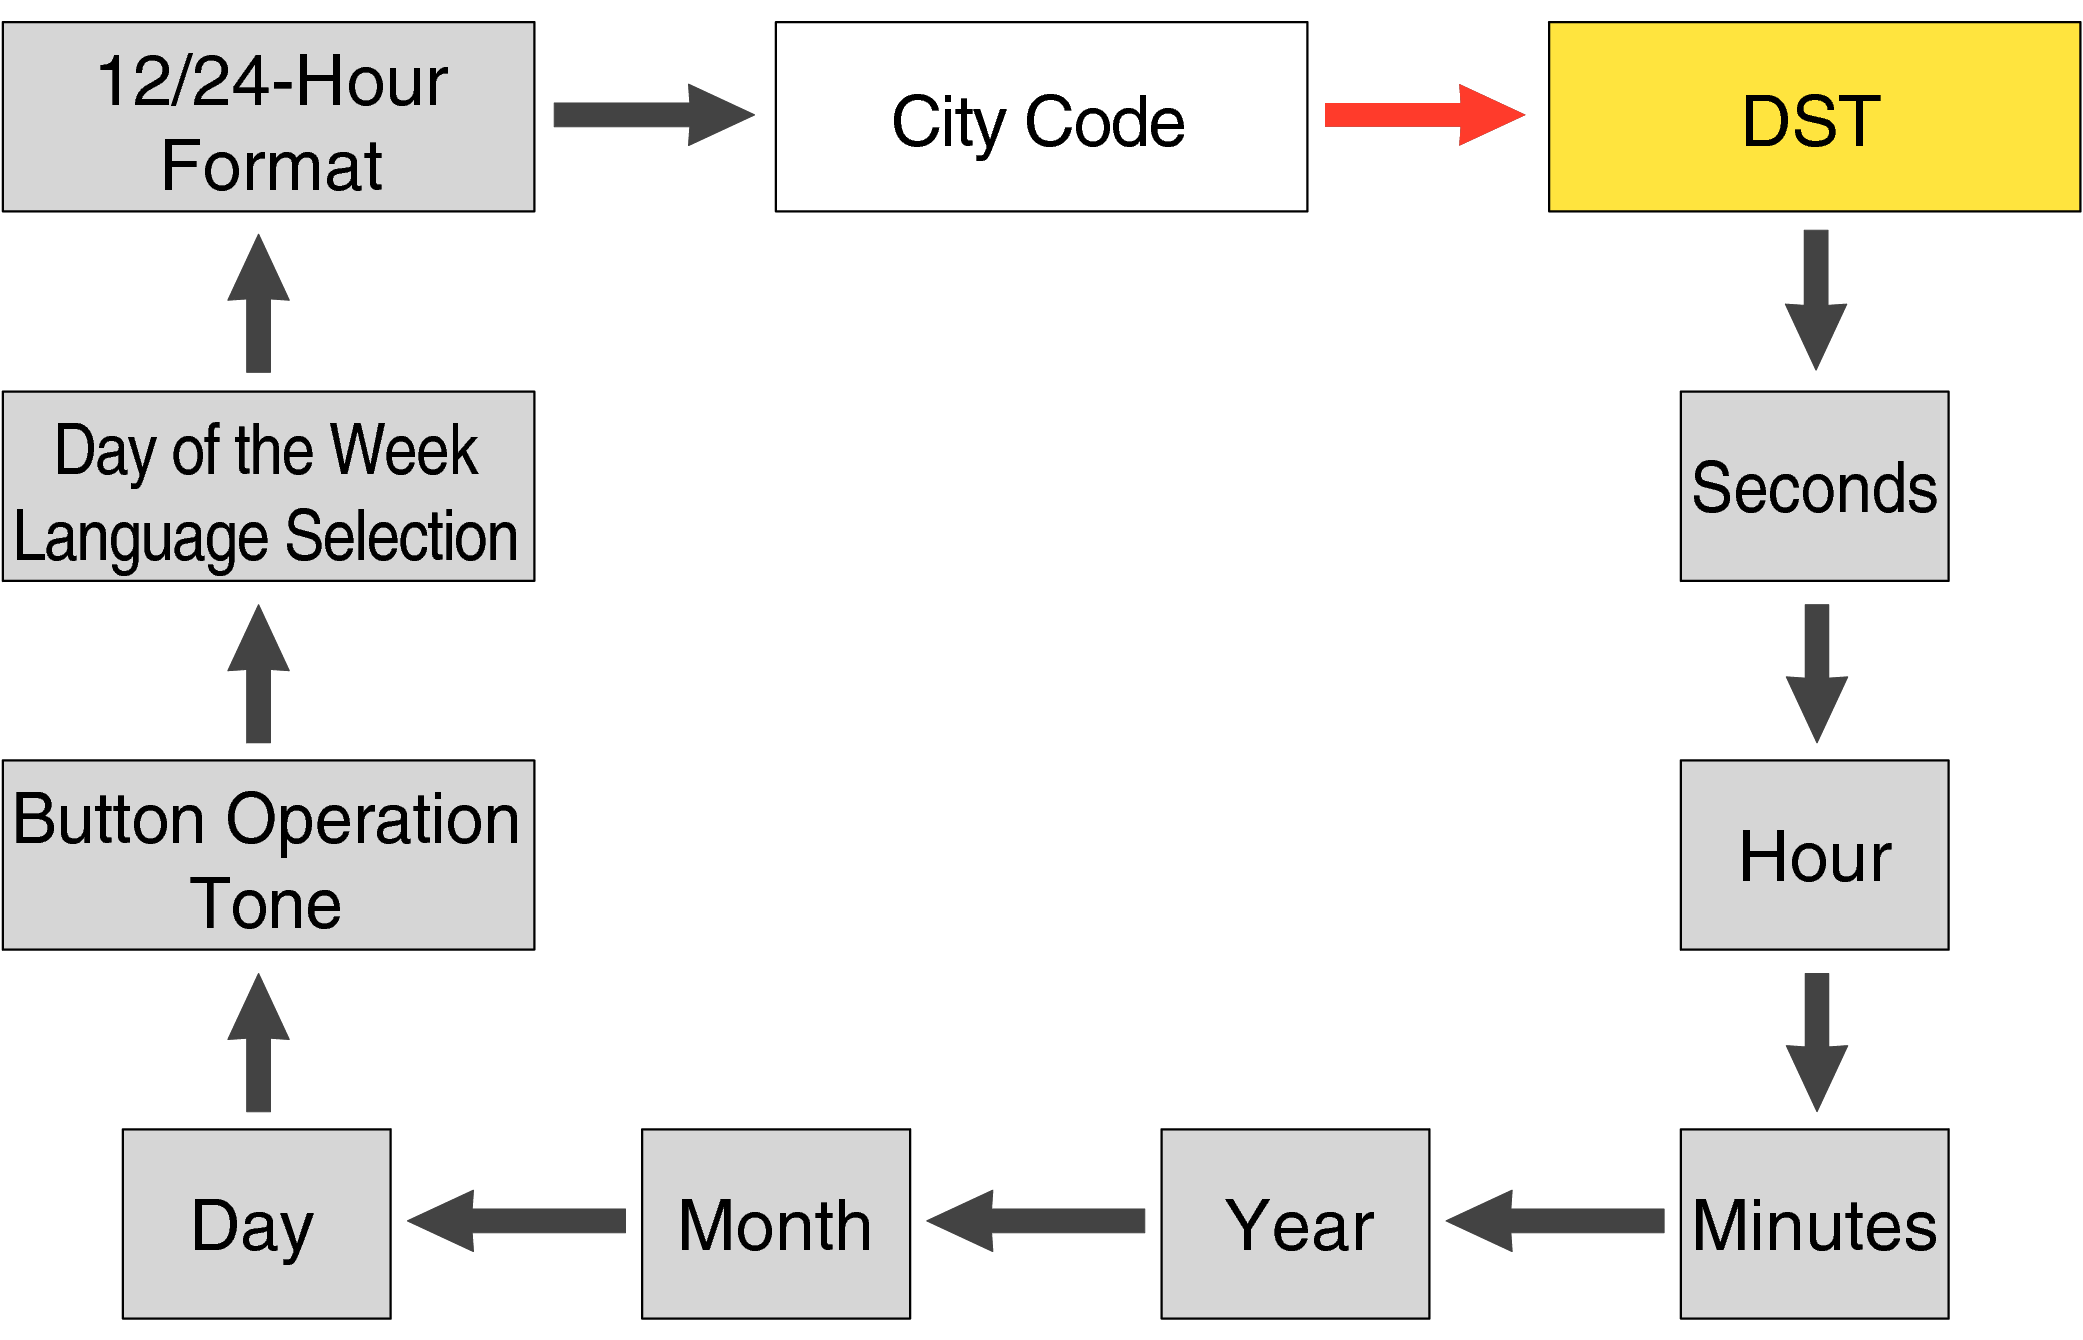
Time Adjustment
Operation procedure for time adjustment
Perform the operation in Timekeeping Mode
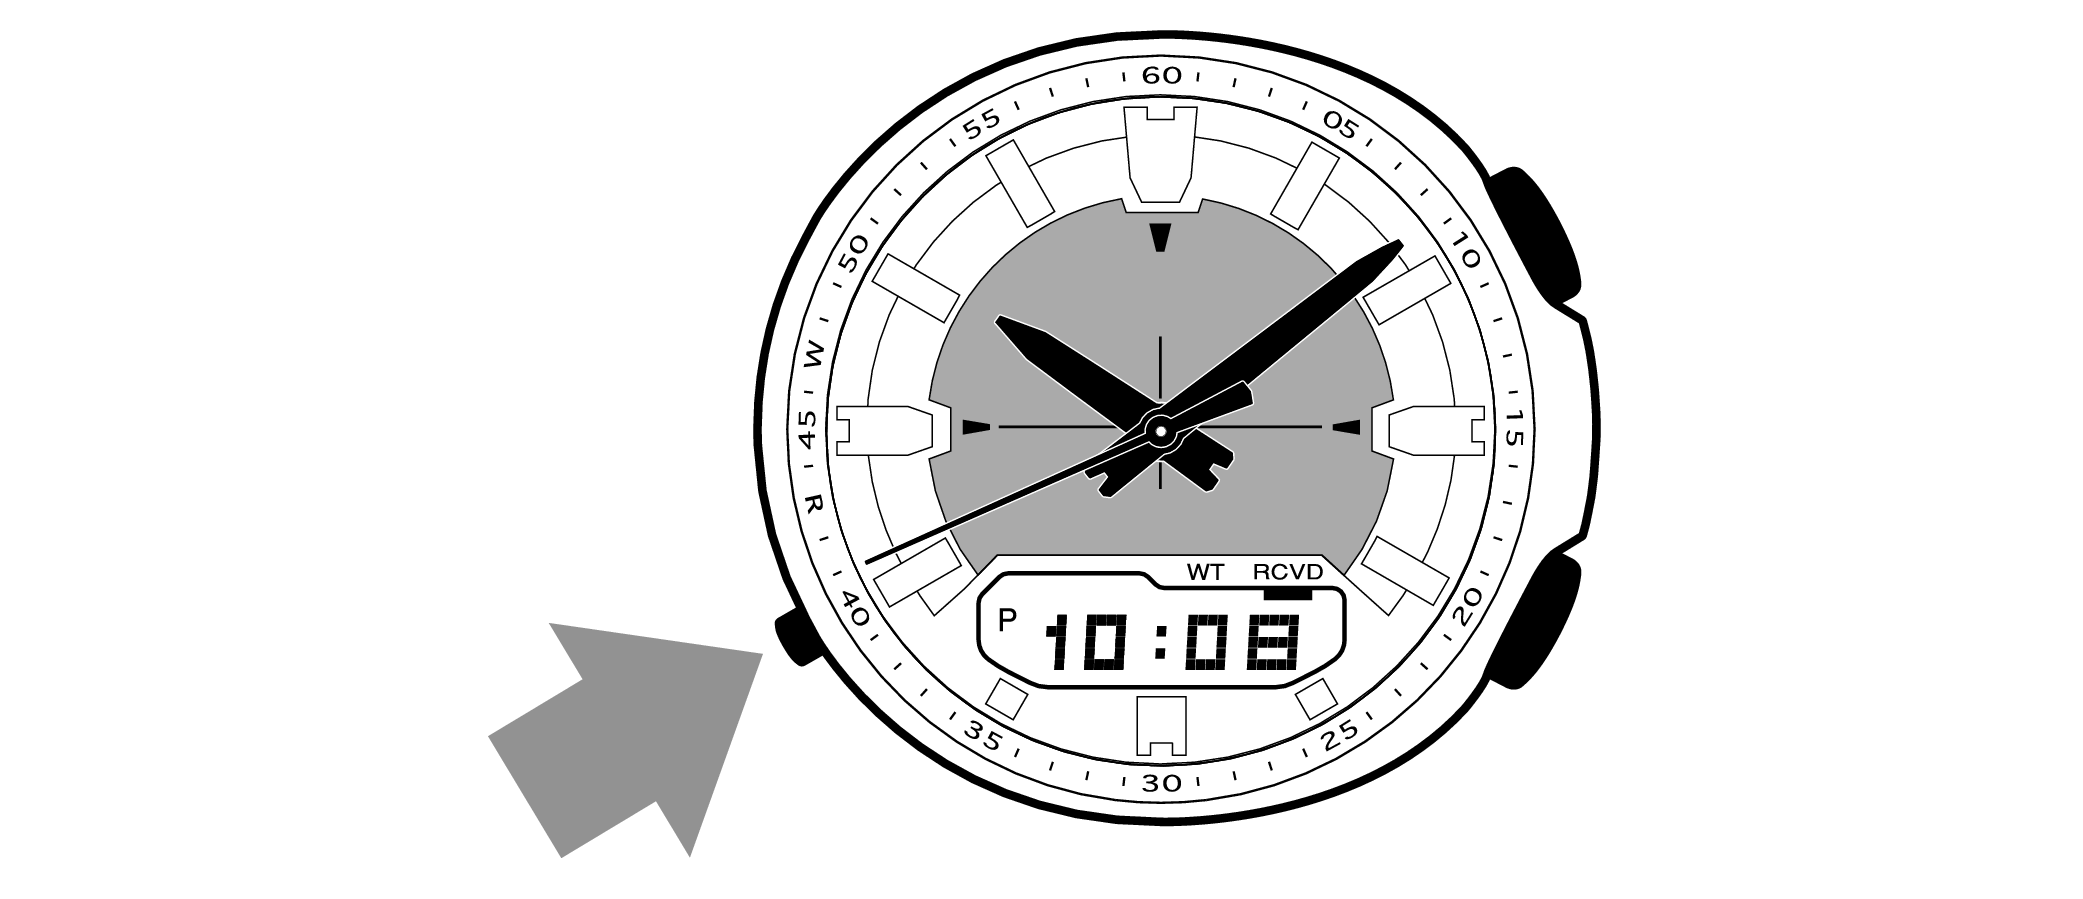
Hold down the lower left button for 2 seconds or longer to switch to Timekeeping Mode.
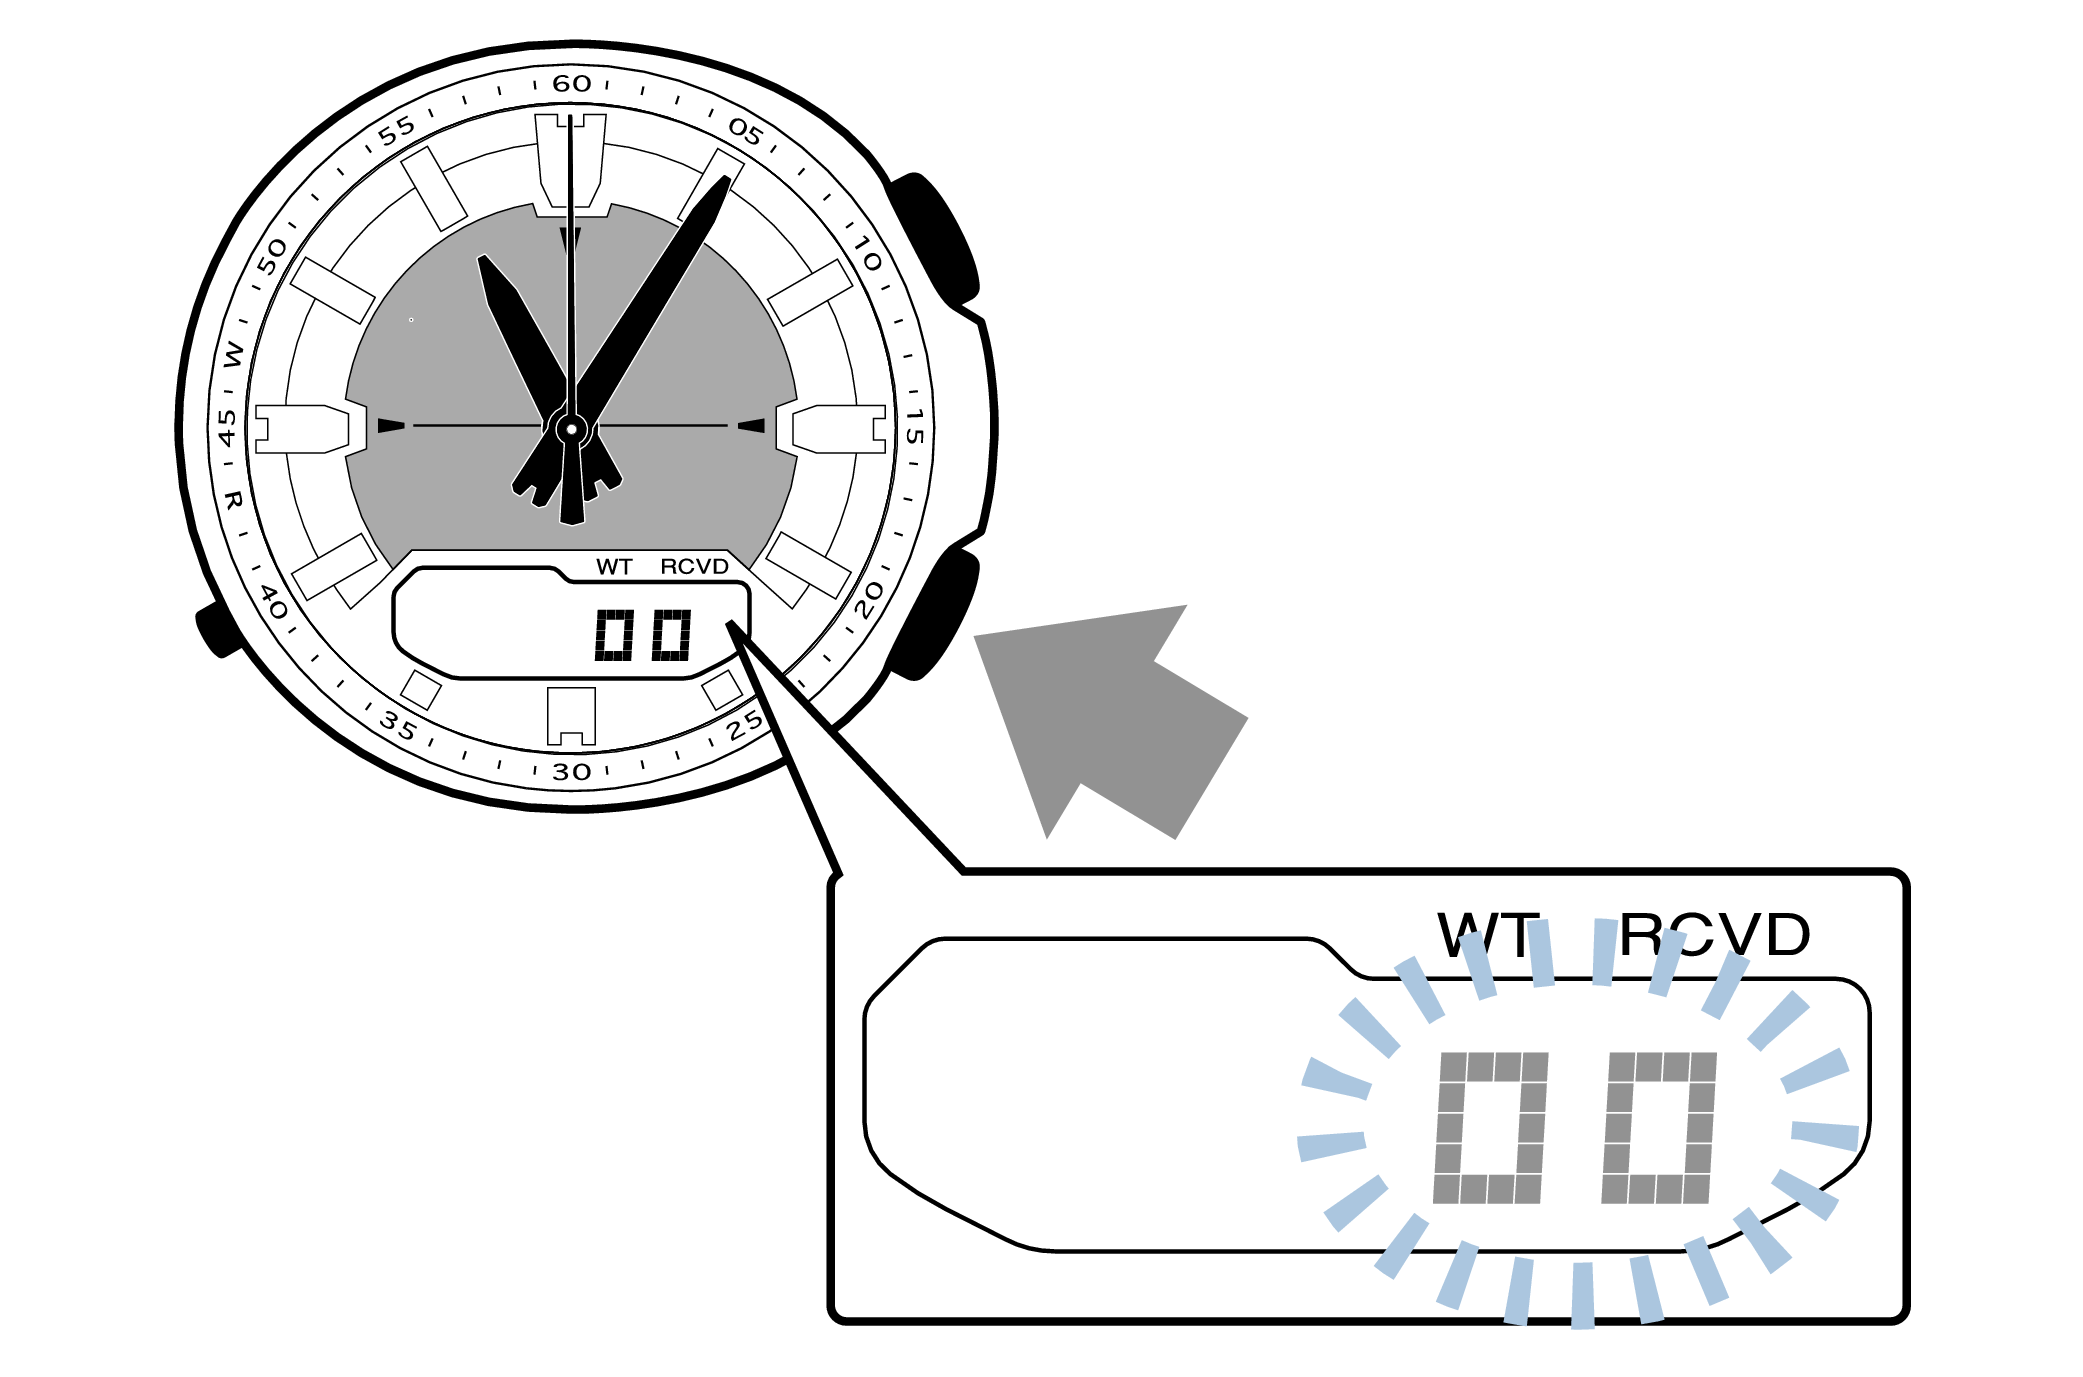
Displays the time on the digital display
Pressing the lower right button will switch to the time display.
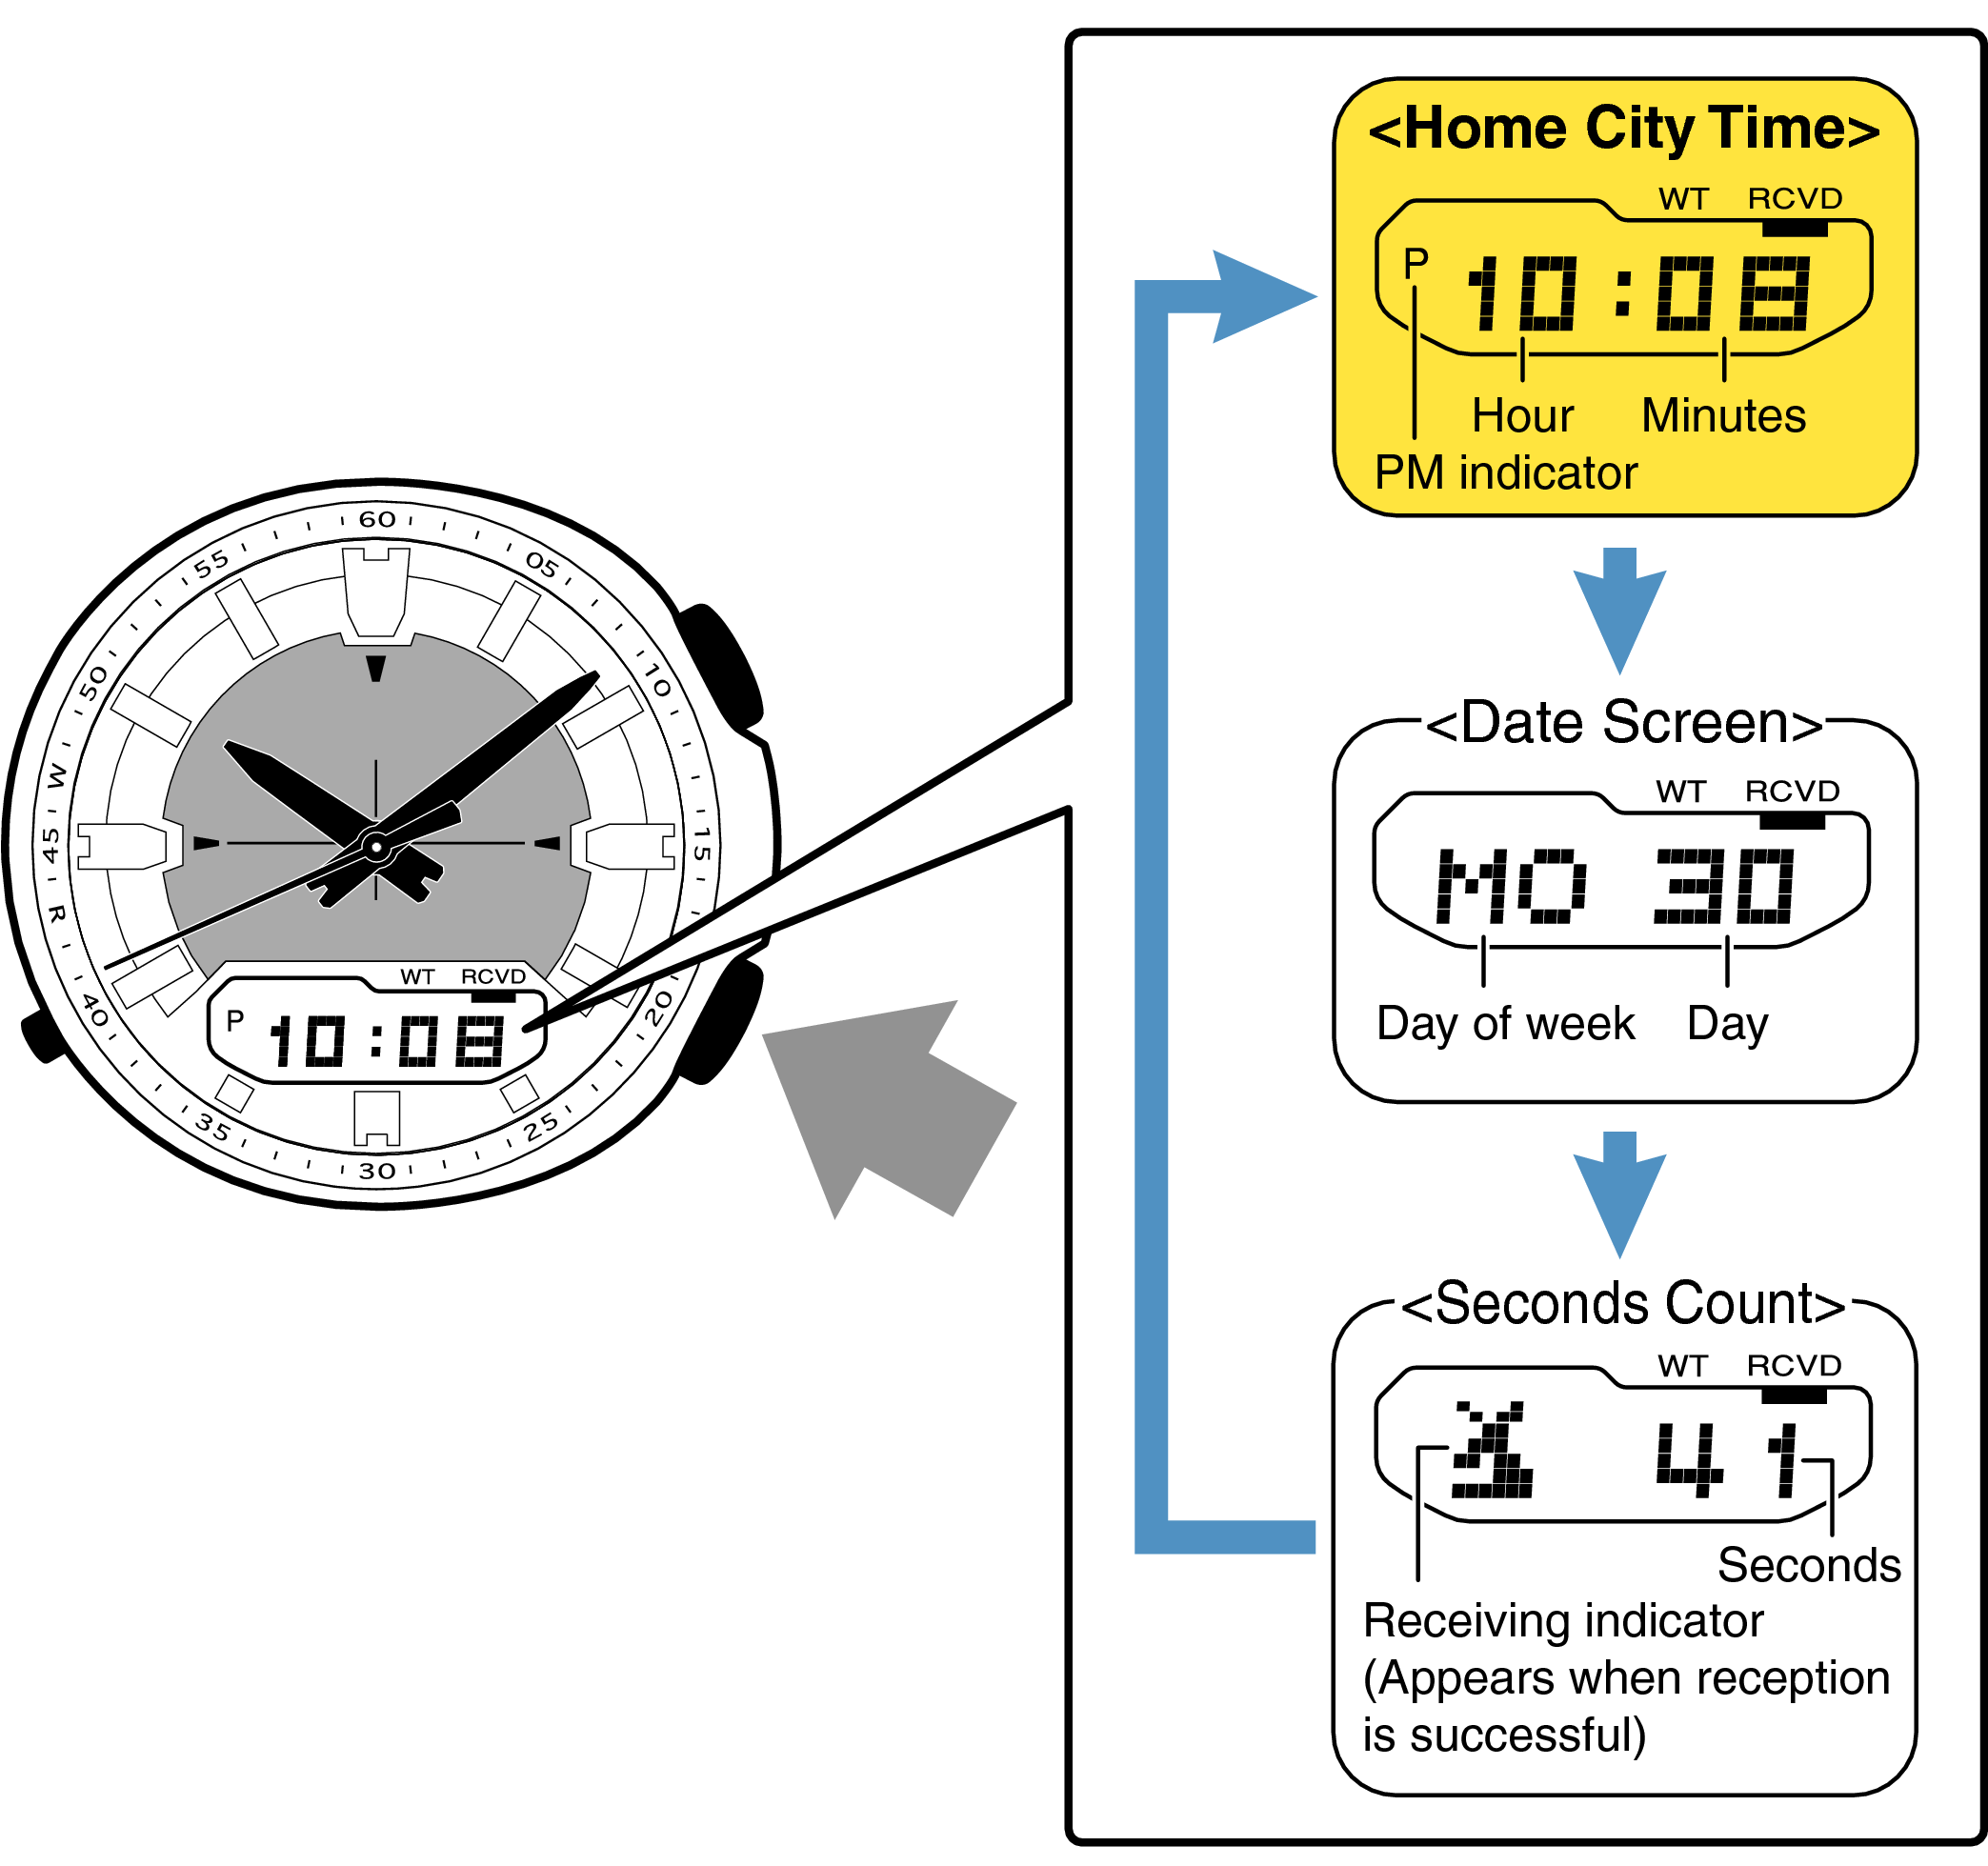
Each press of the lower right button will switch to a different display.
Are both the digital display and the hands set to the correct time?
Time Adjustment is completed
What is your issue?
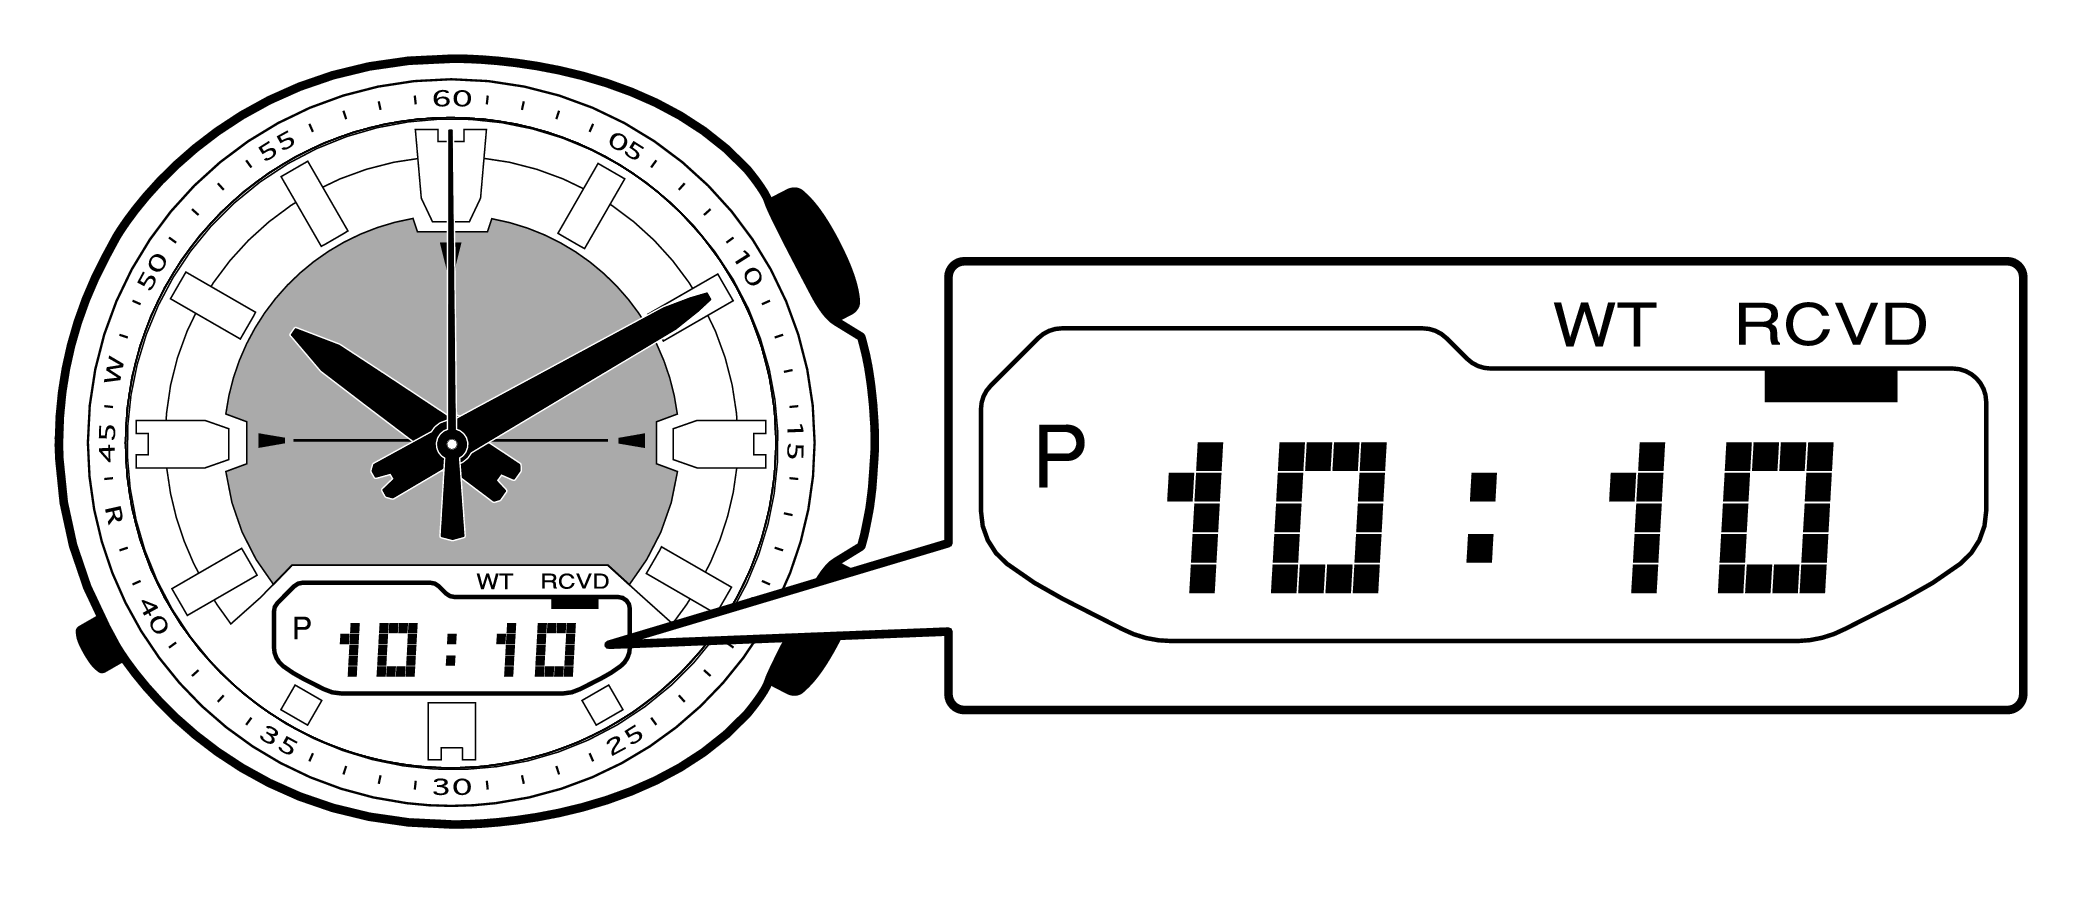
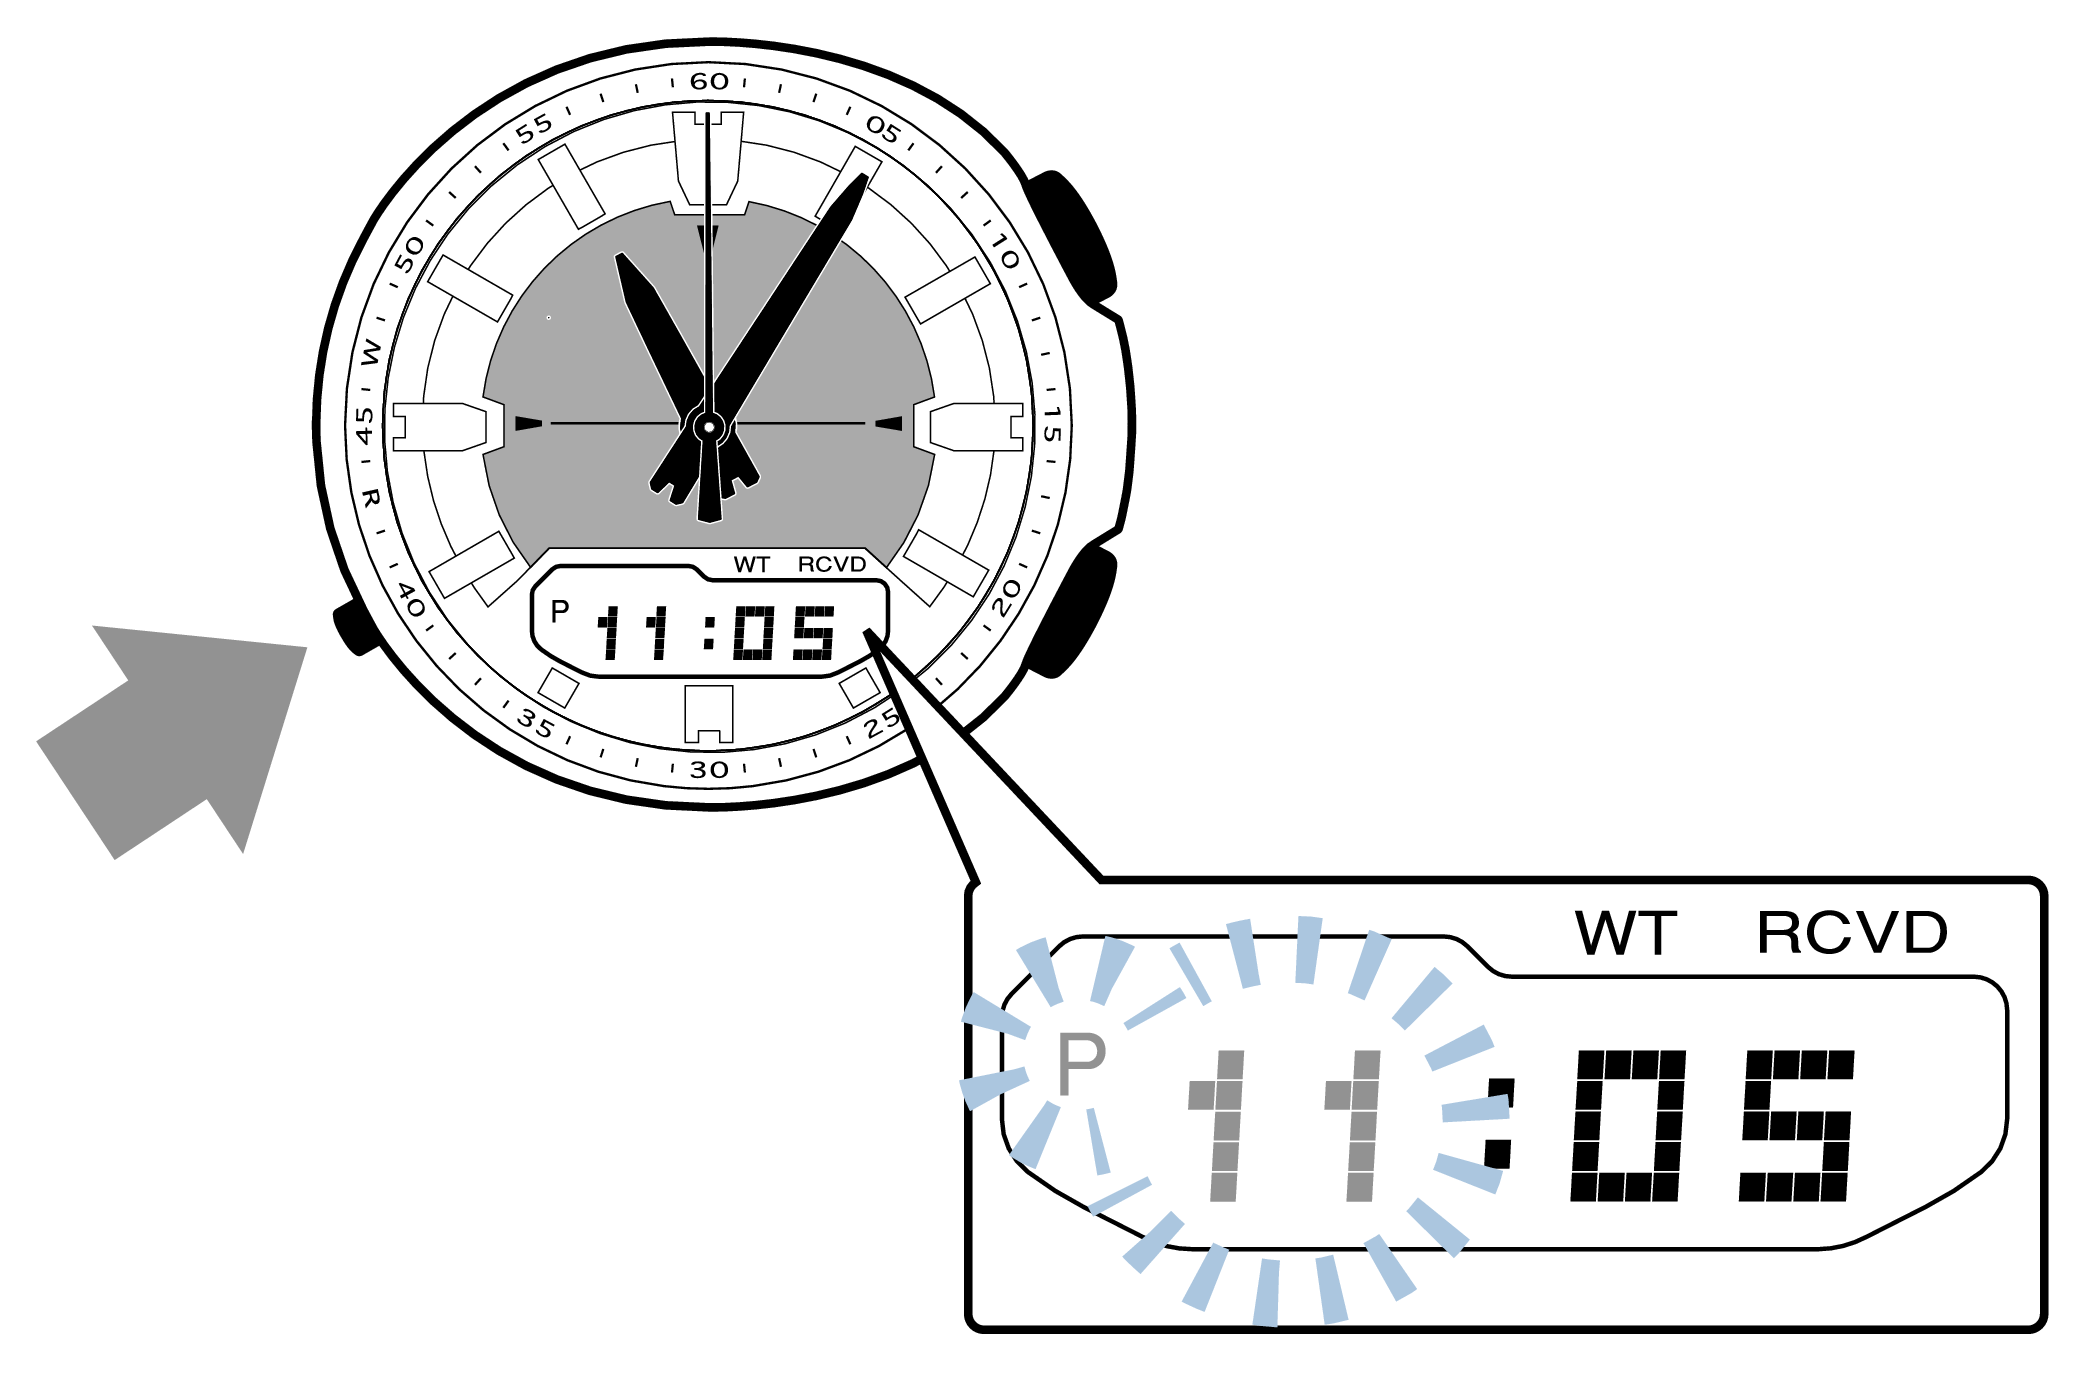
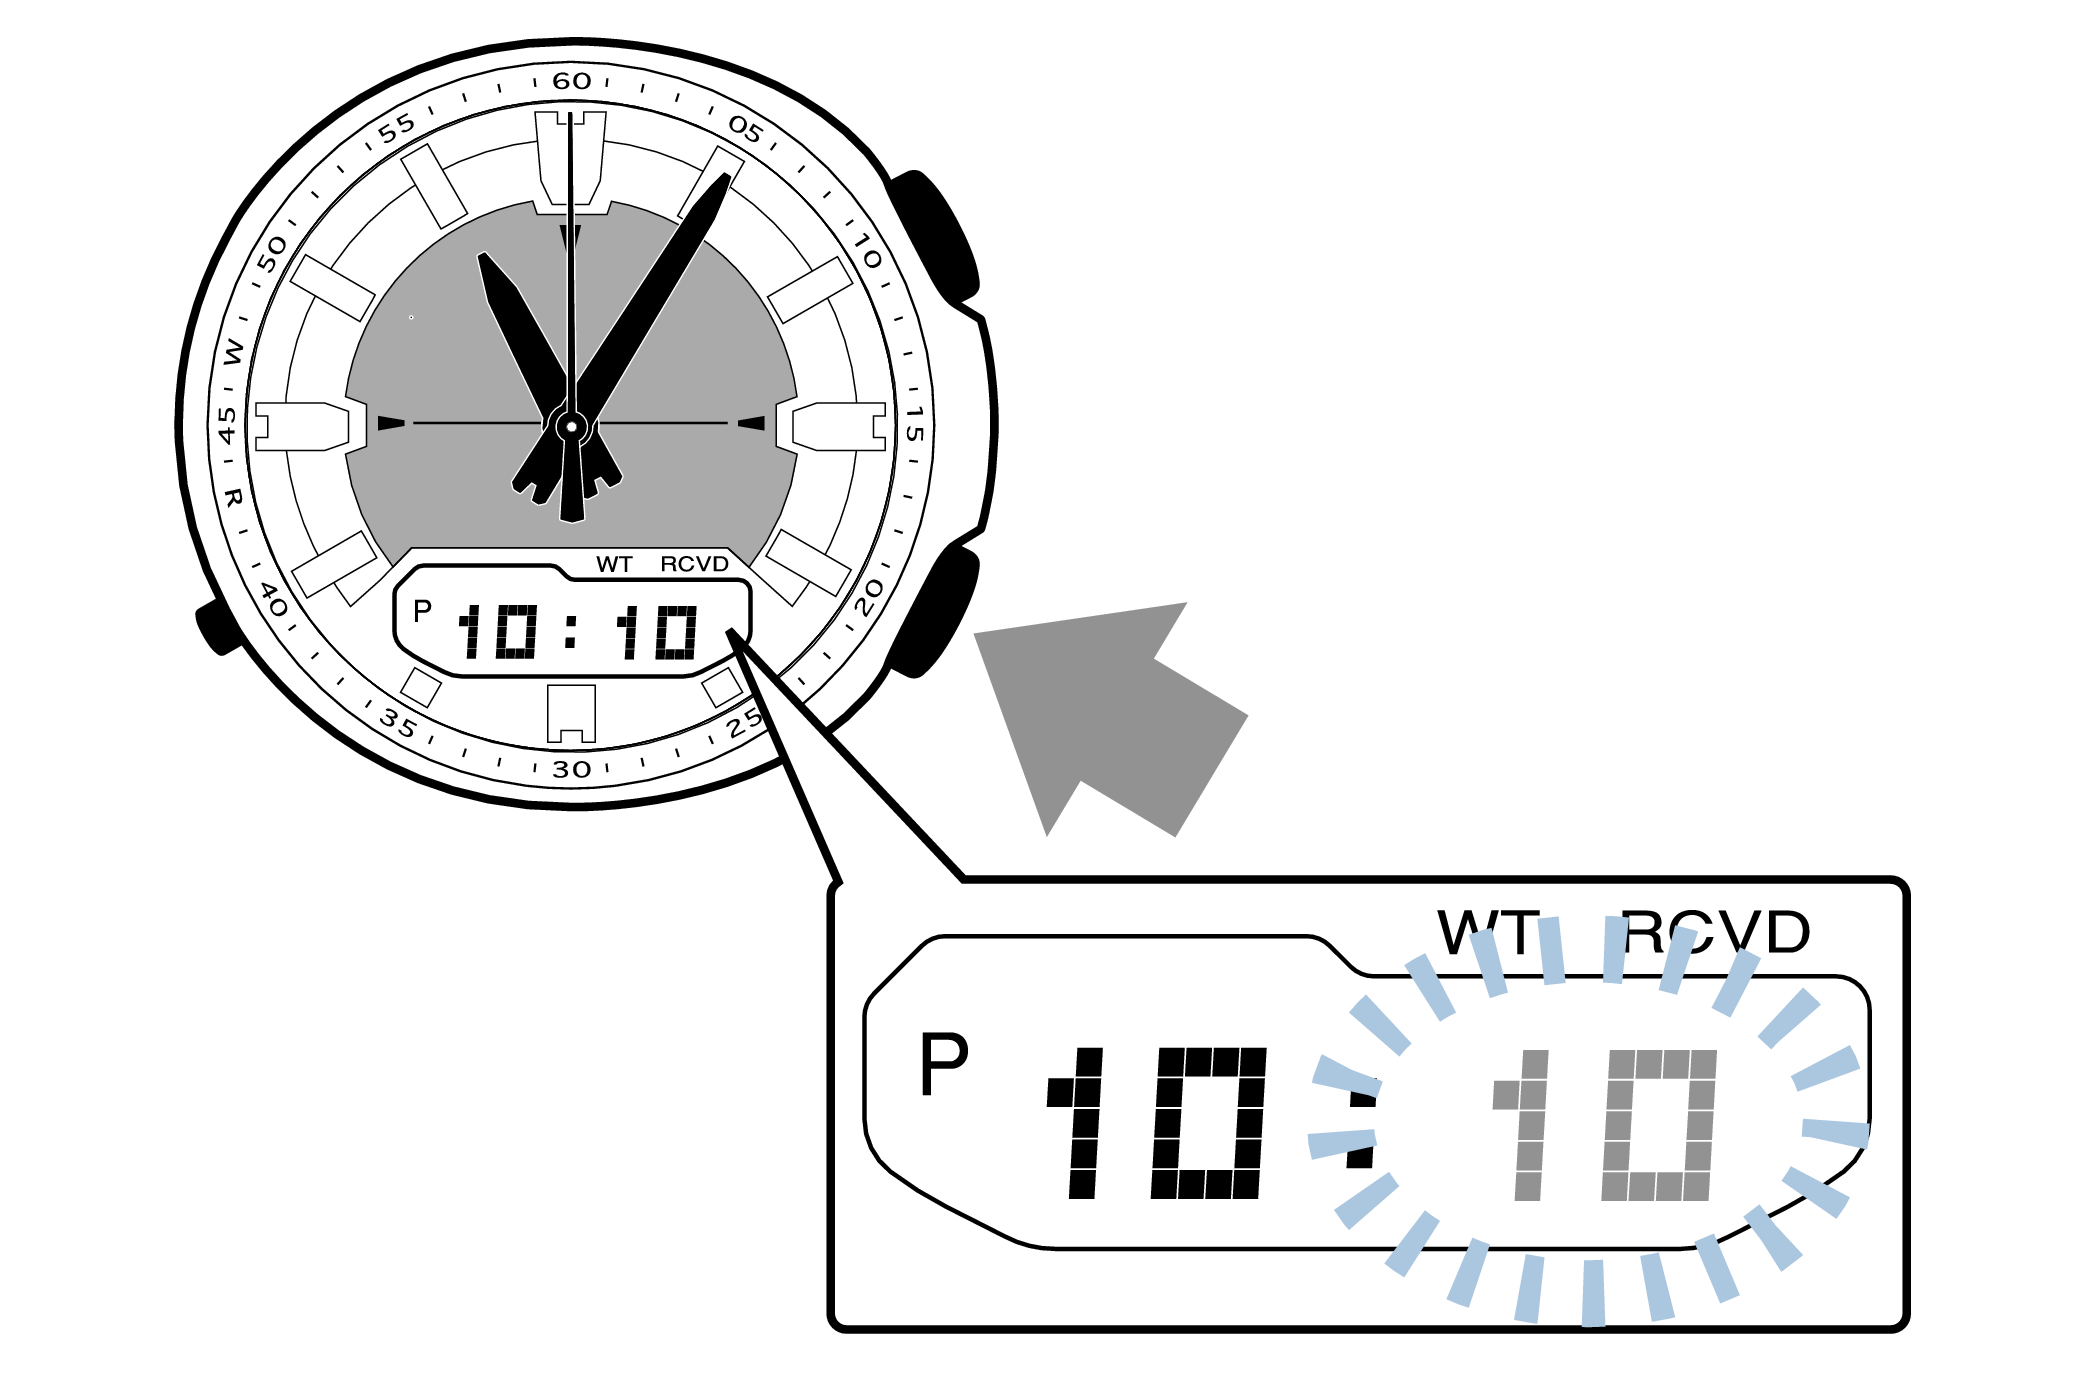
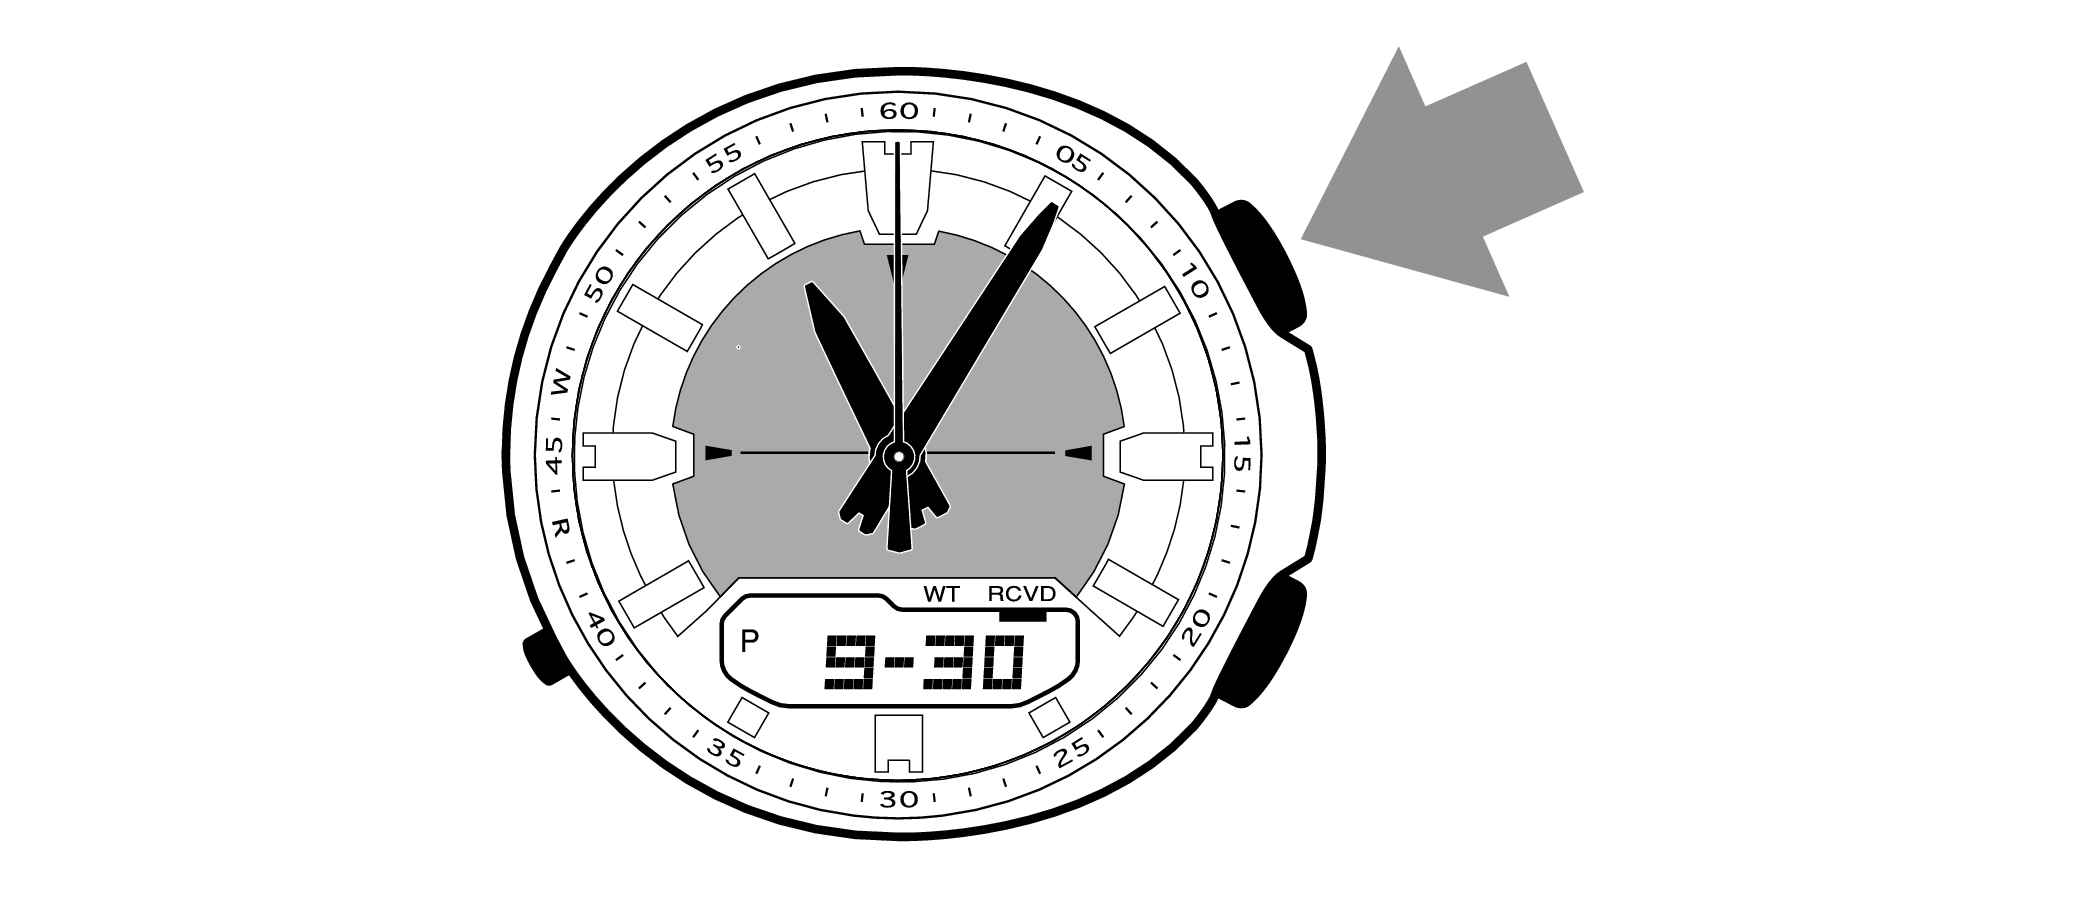
Example: If the correct time and date is Monday, September 30, 2019,
10:10:00 pm
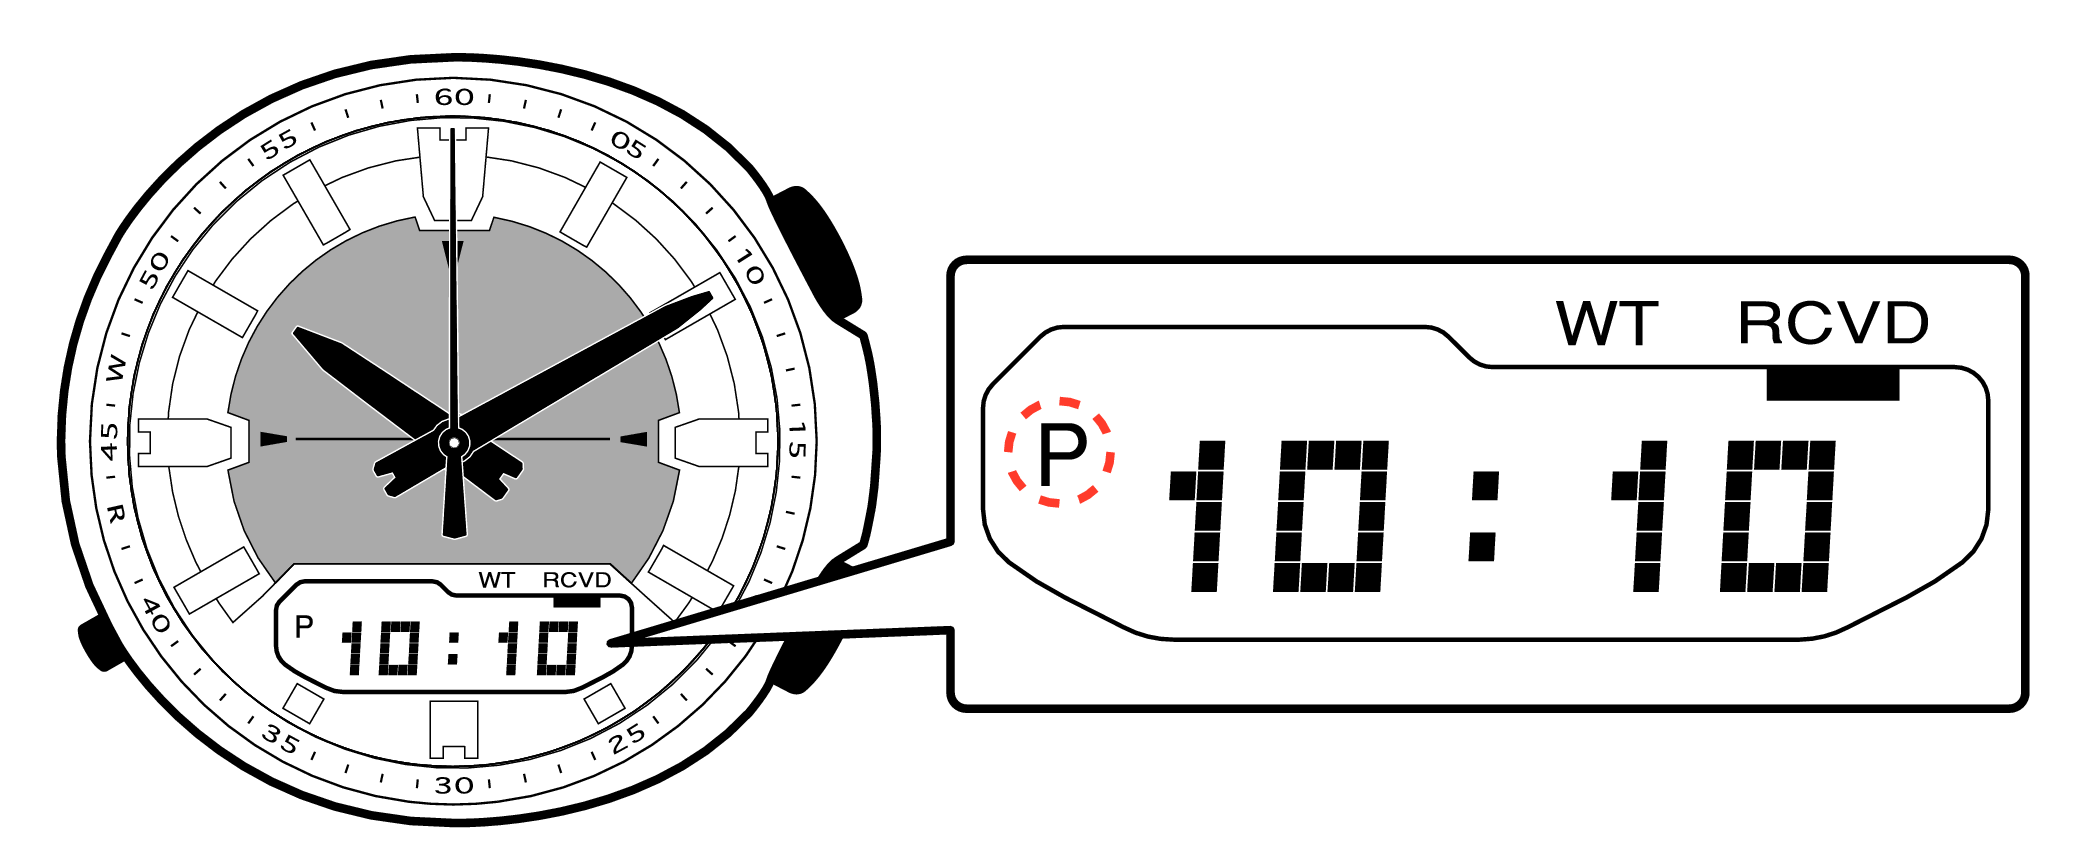
With the 12-hour format selected, the “P” indicator will appear in the afternoon.
Check if the City Code Setting is set to the region (city) you are using the watch in
-
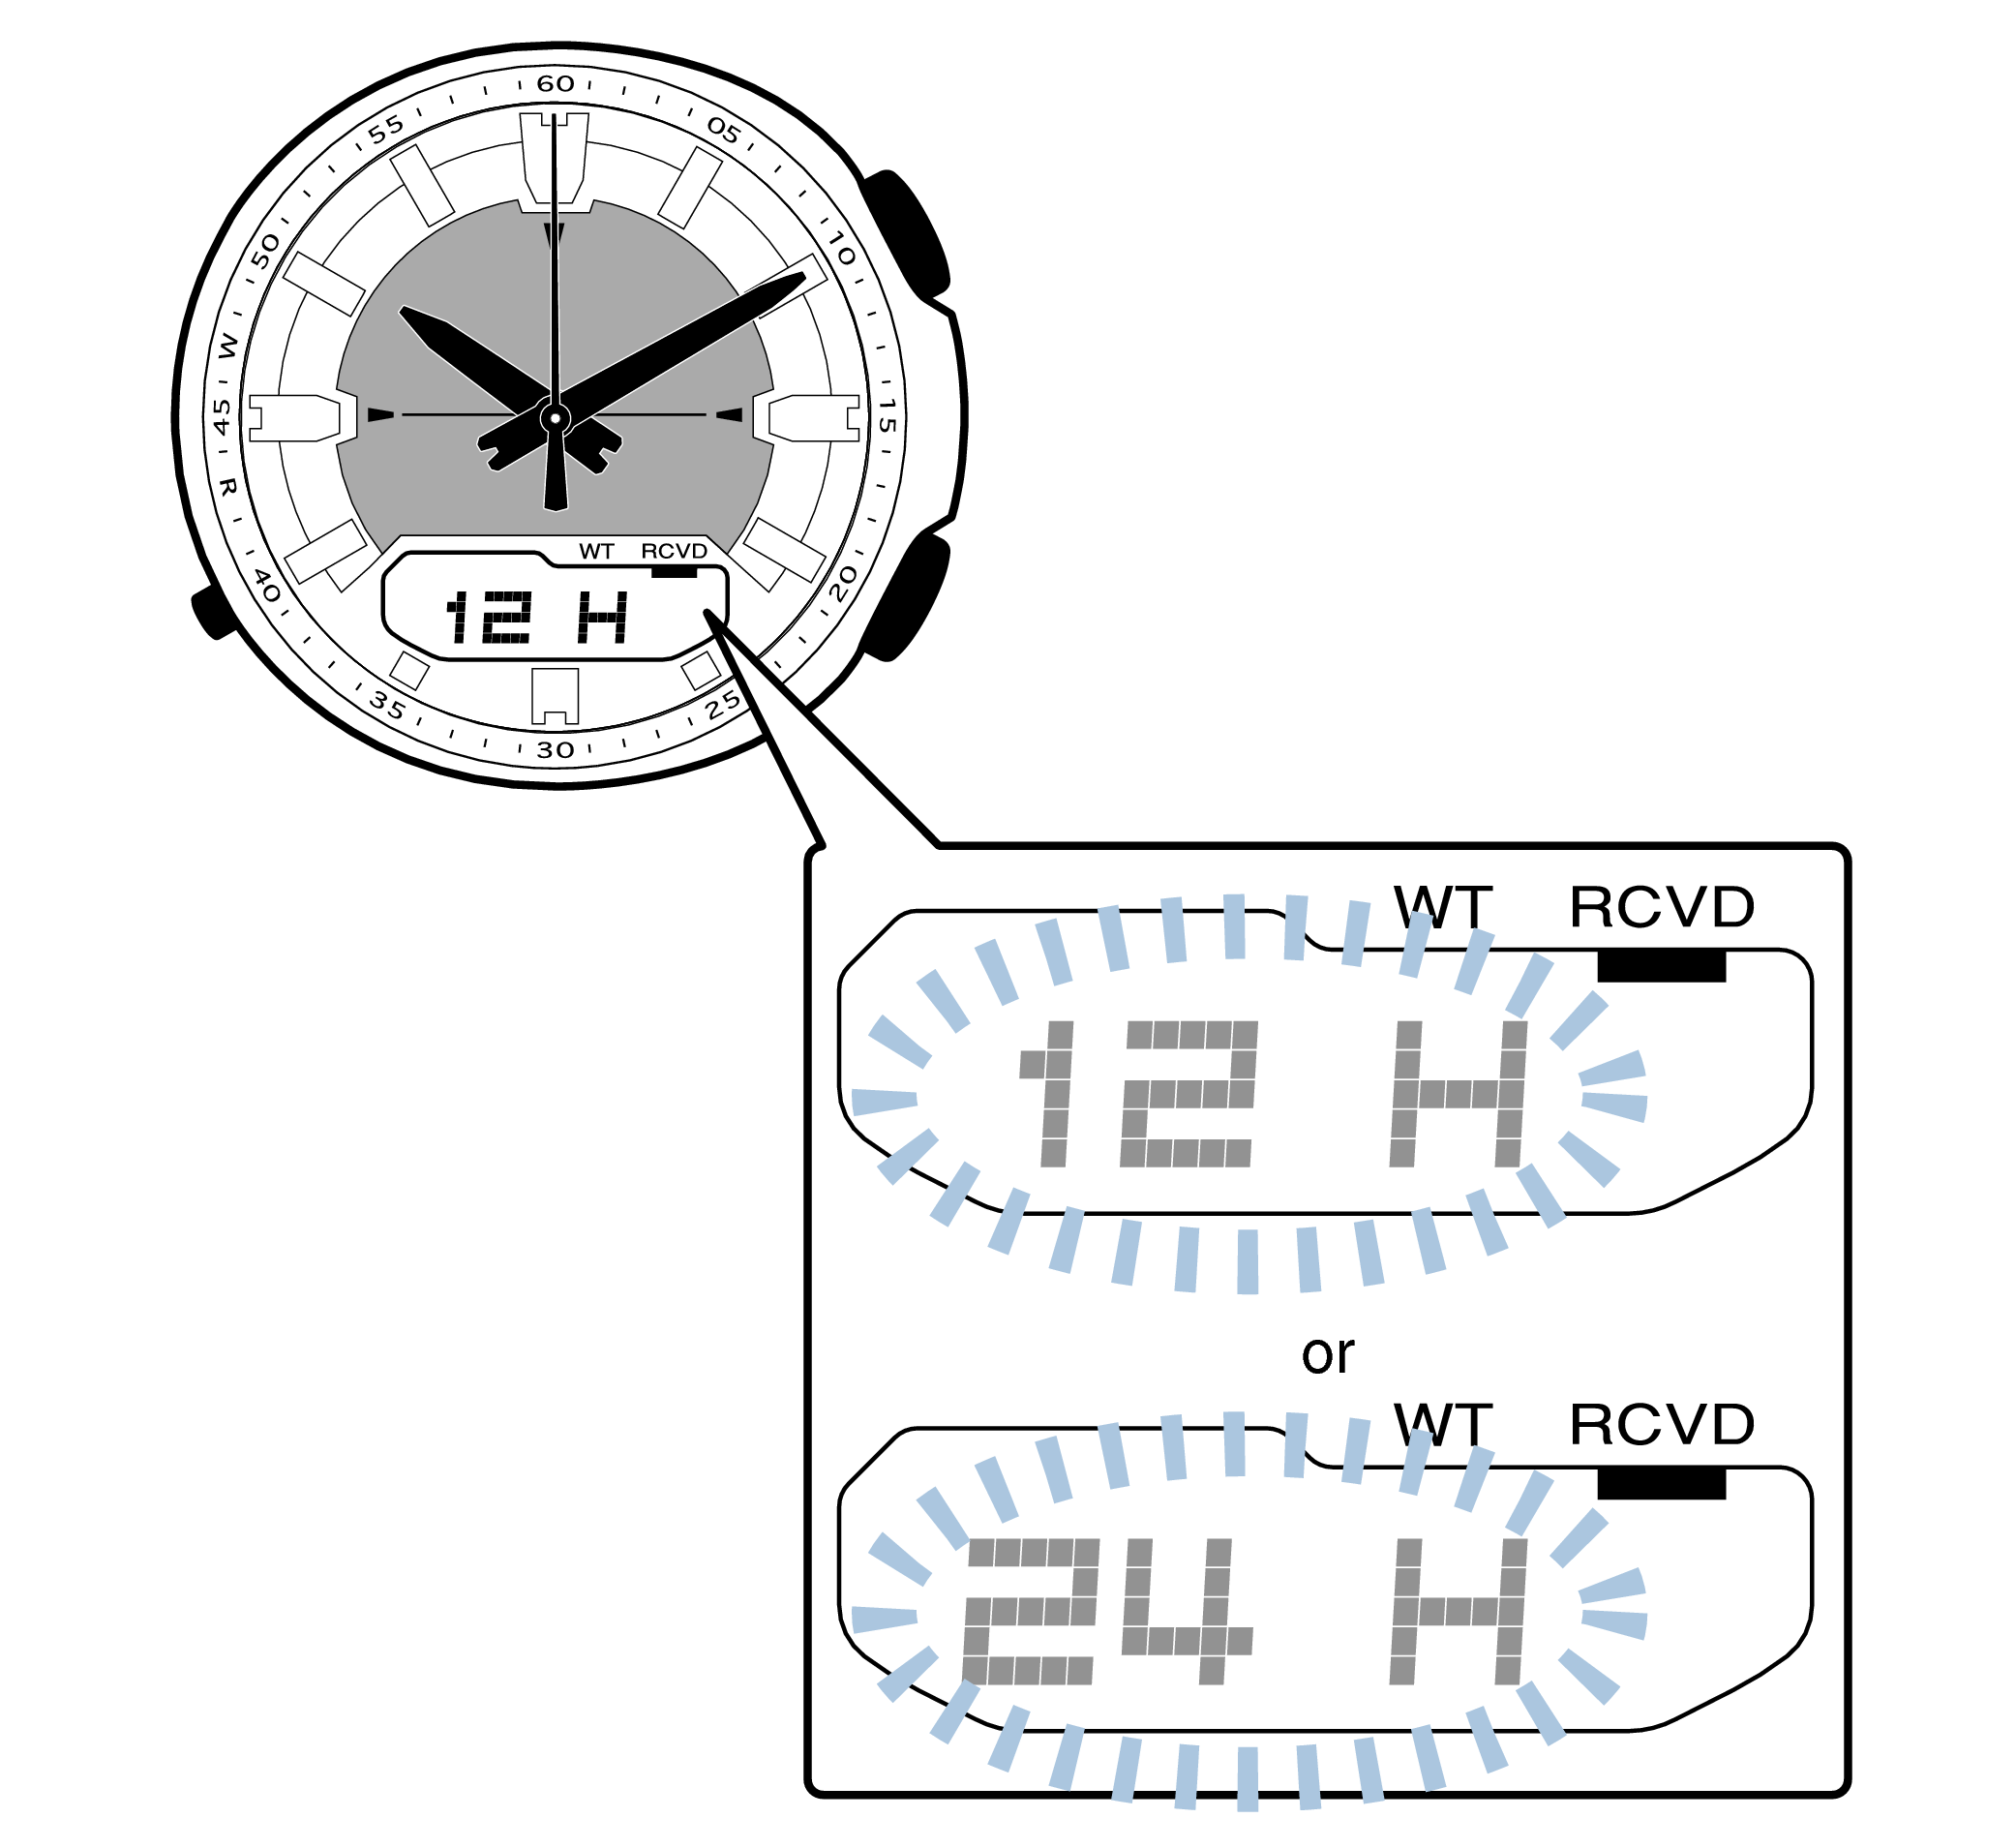
1.Hold down the upper right button for approximately 3 seconds until “ADJ” is displayed on the digital display.
-
If you continue to hold it down “H.SET” will display, and if you continue further it will return to Timekeeping Mode.
If you return to Timekeeping Mode, repeat this operation.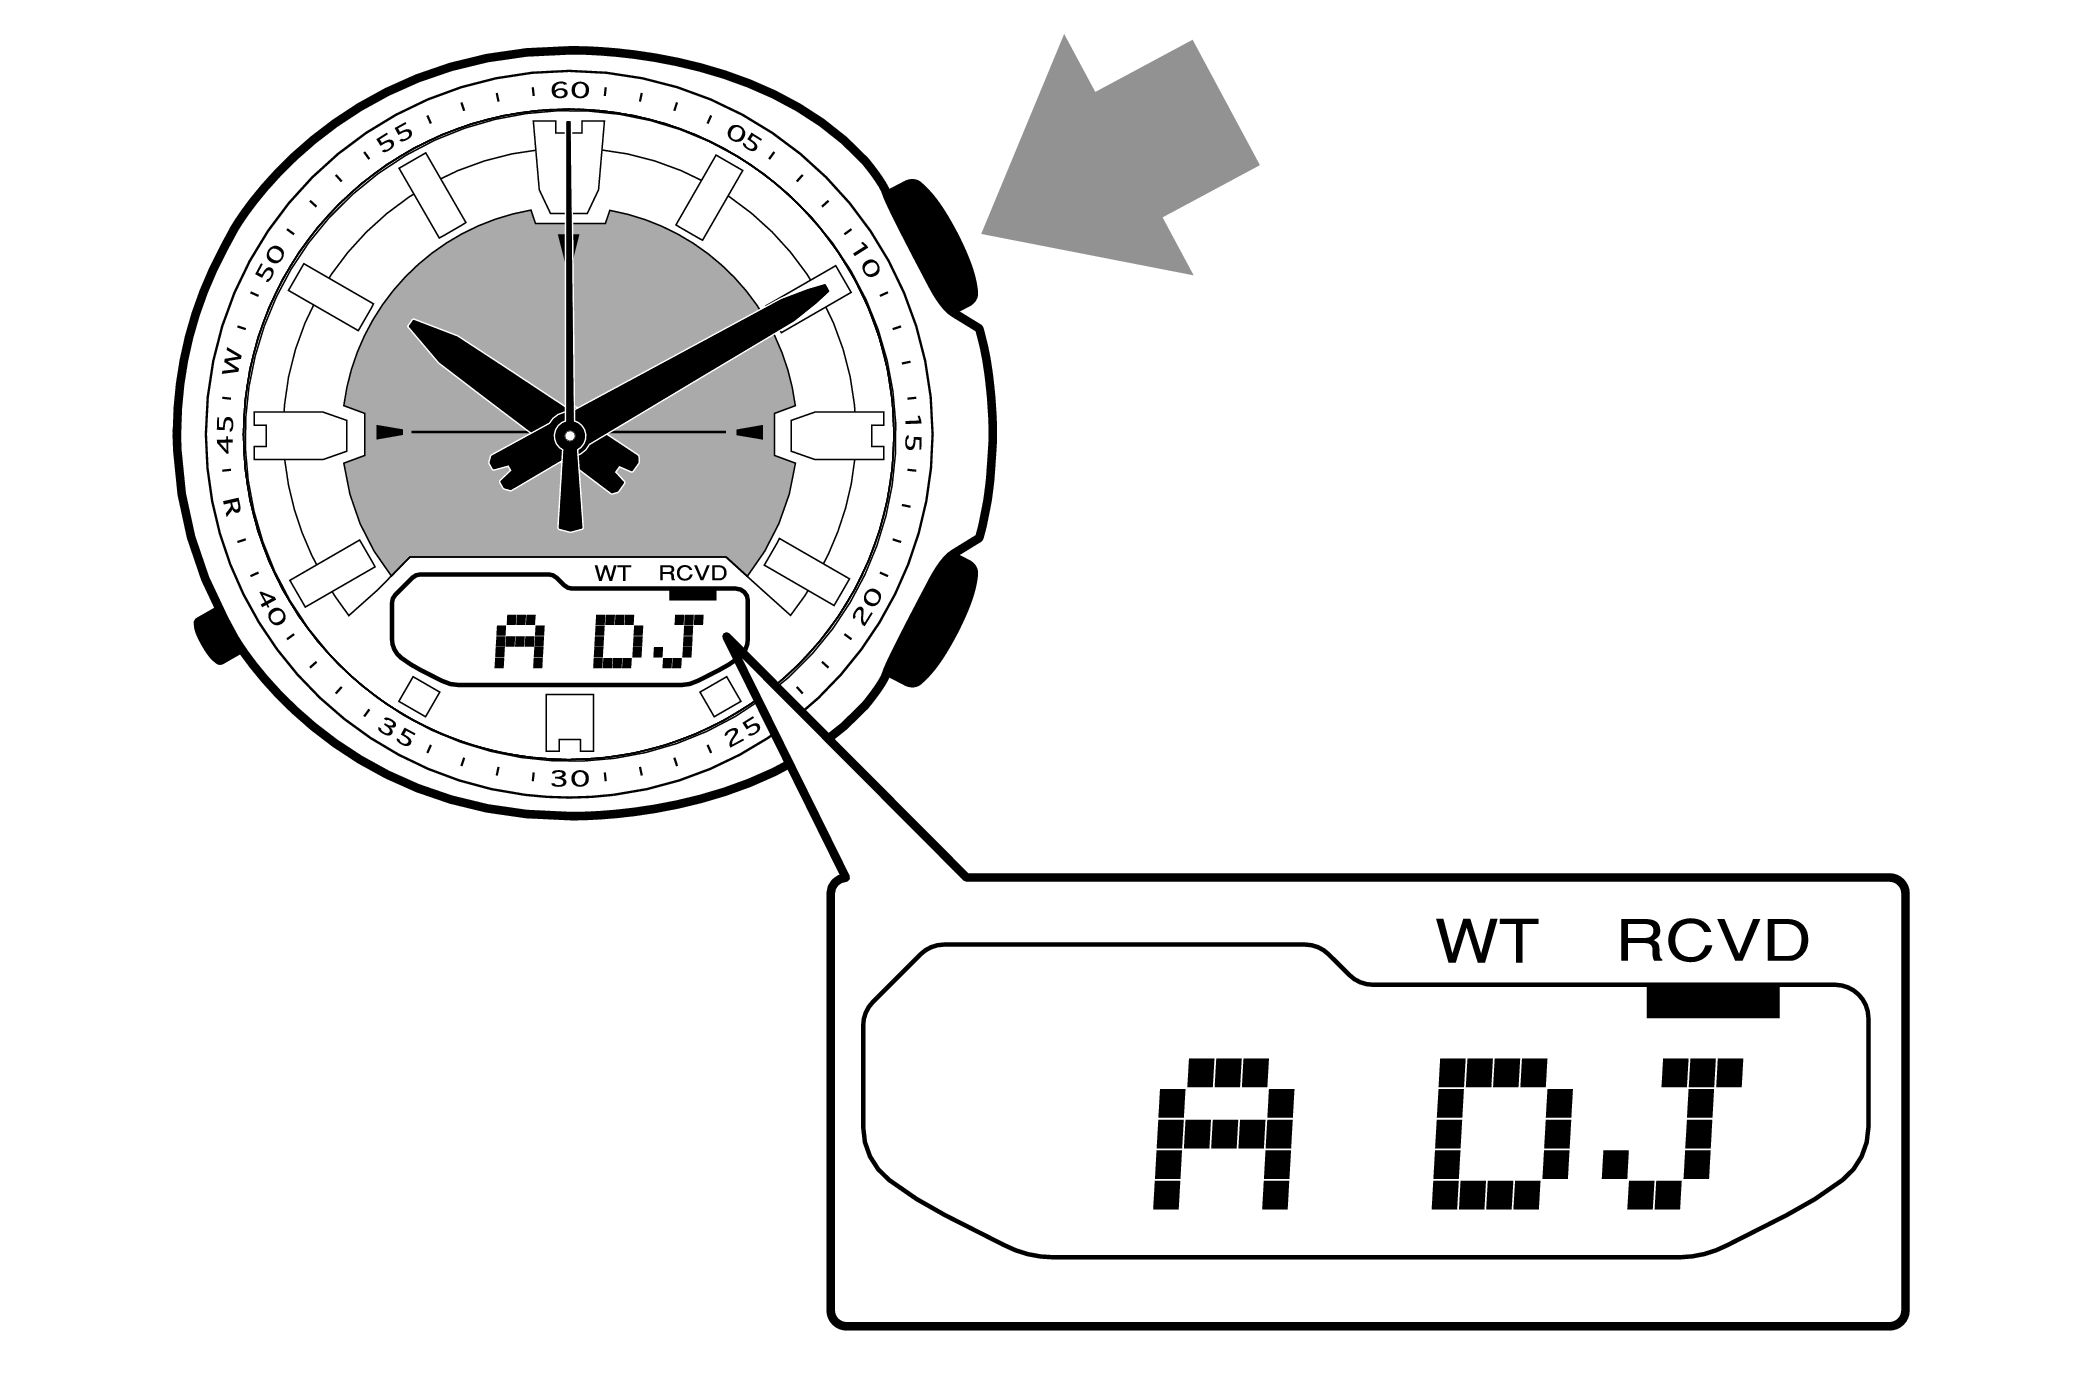
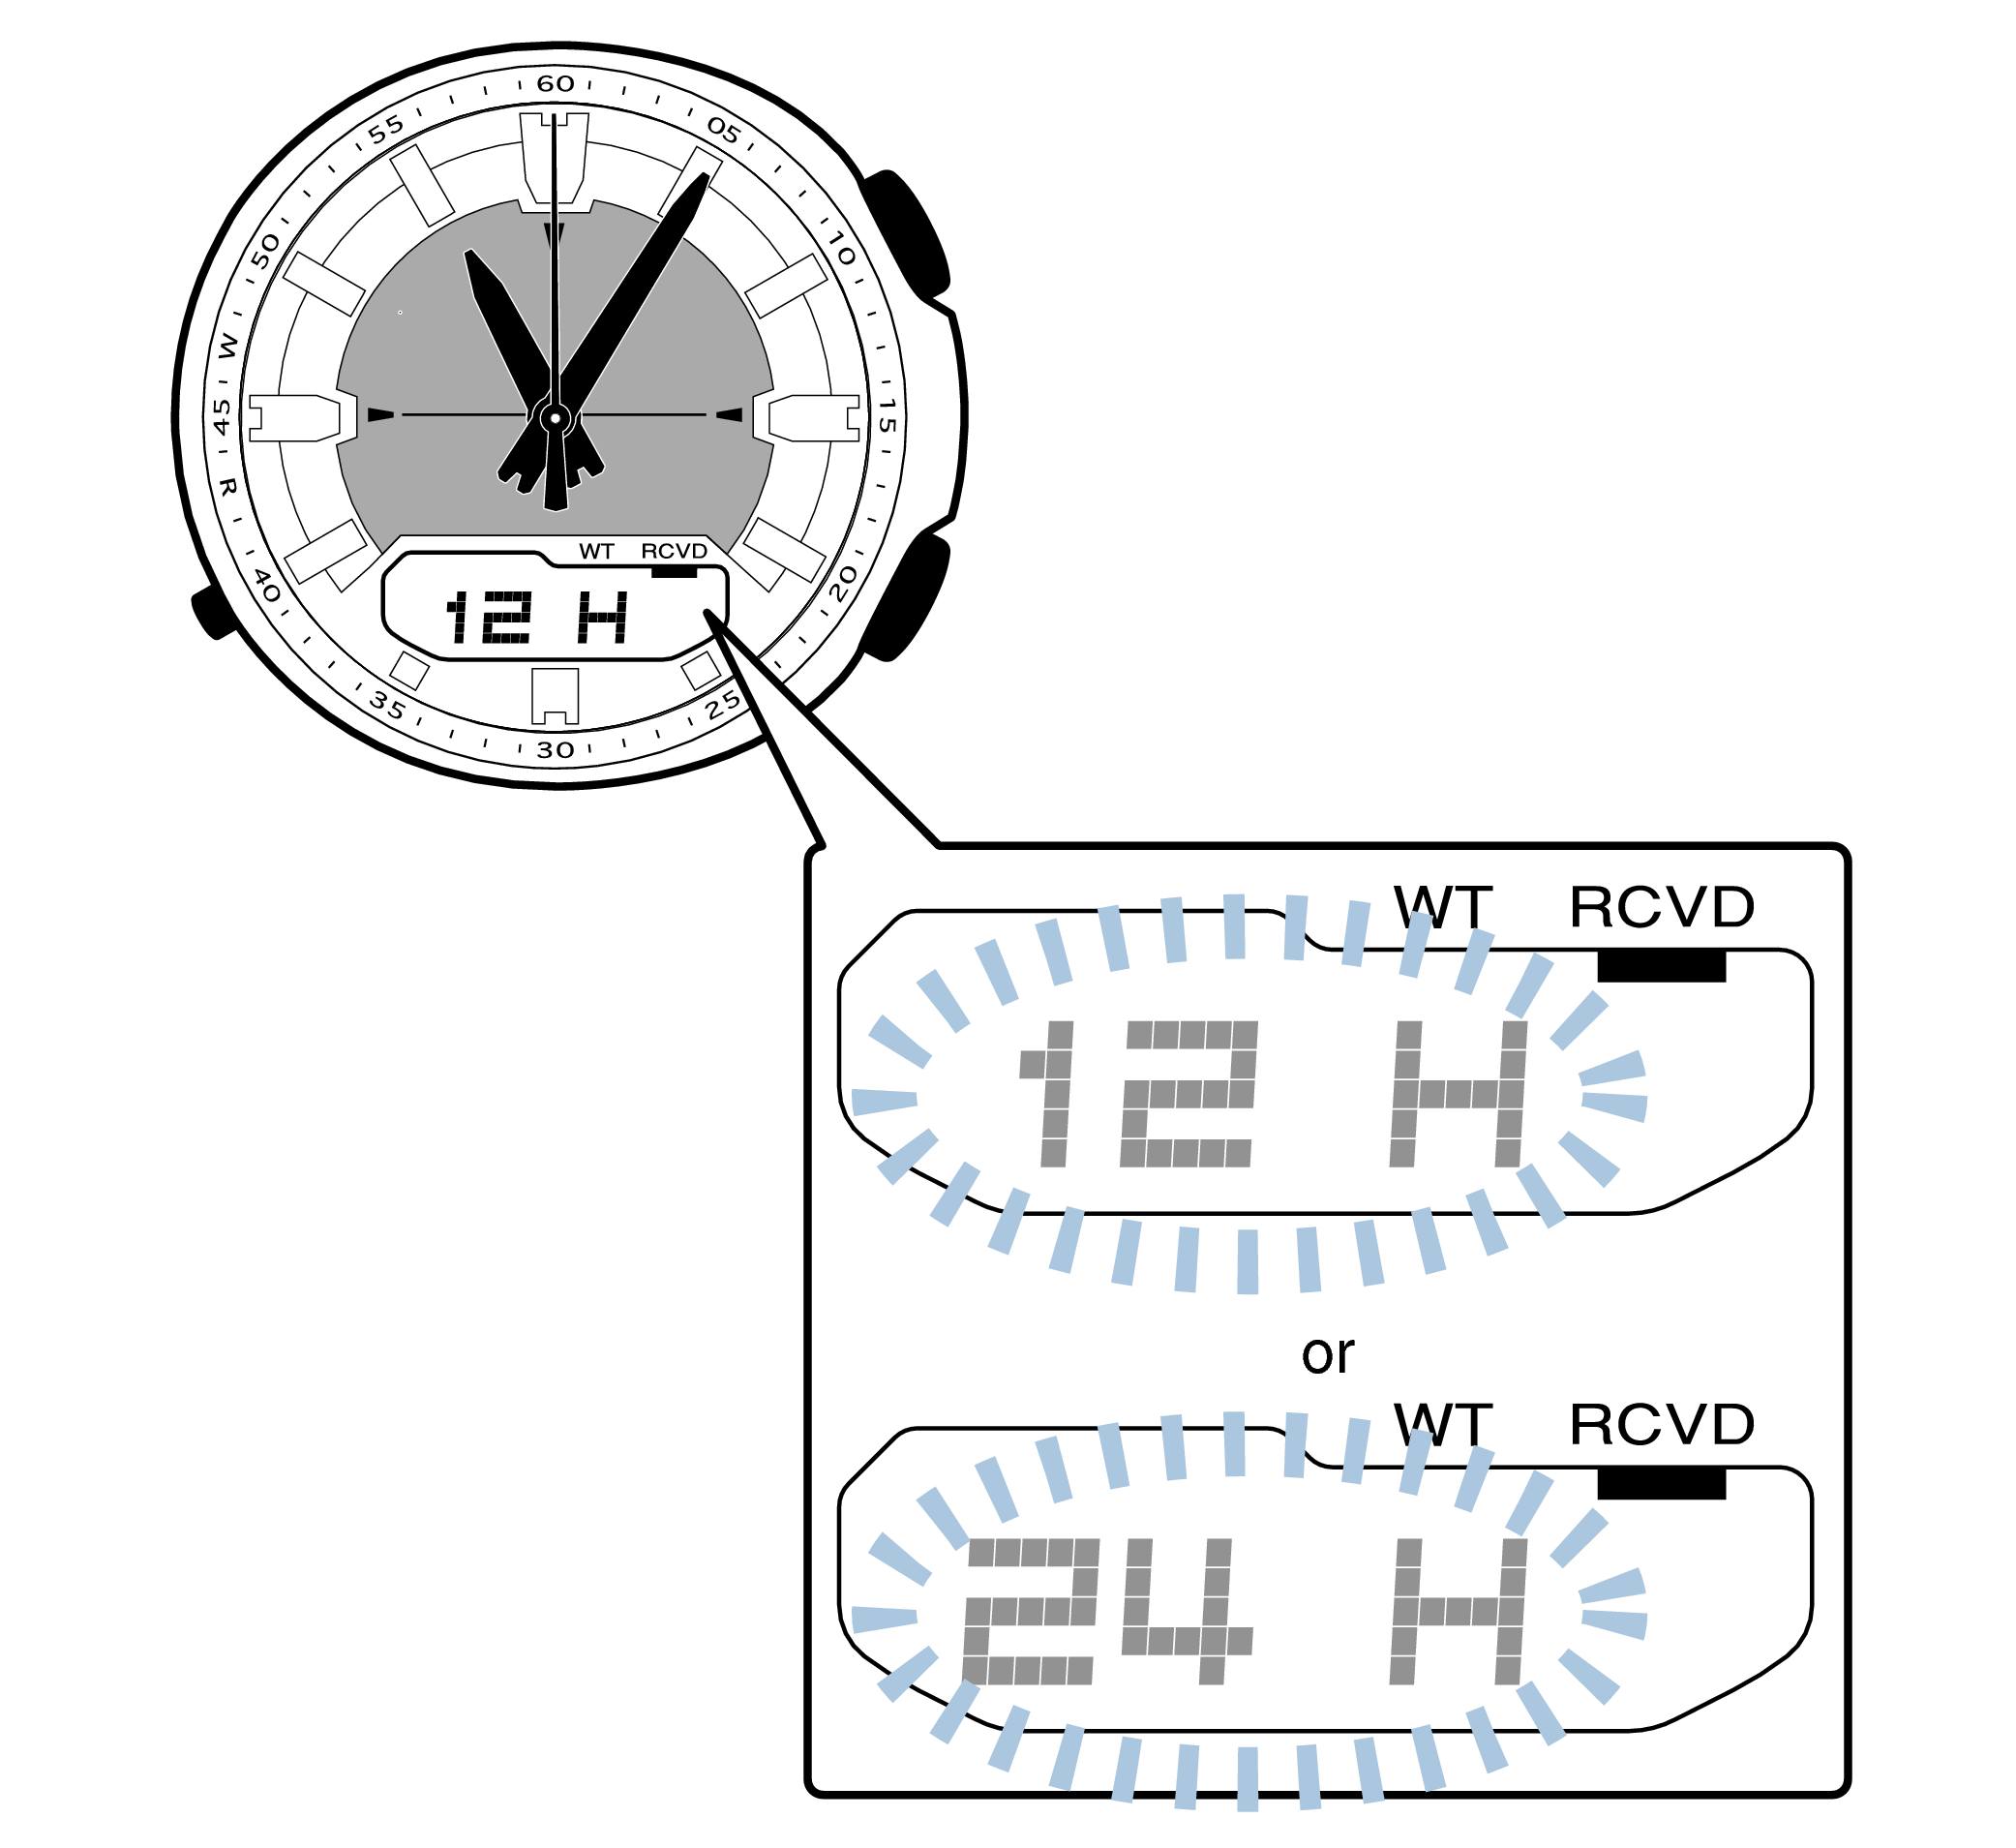
When you release the button after “ADJ” appears, “12H” or “24H” will flash.
-
2.Pressing the lower left button will switch to the “City Code Setting”.
-
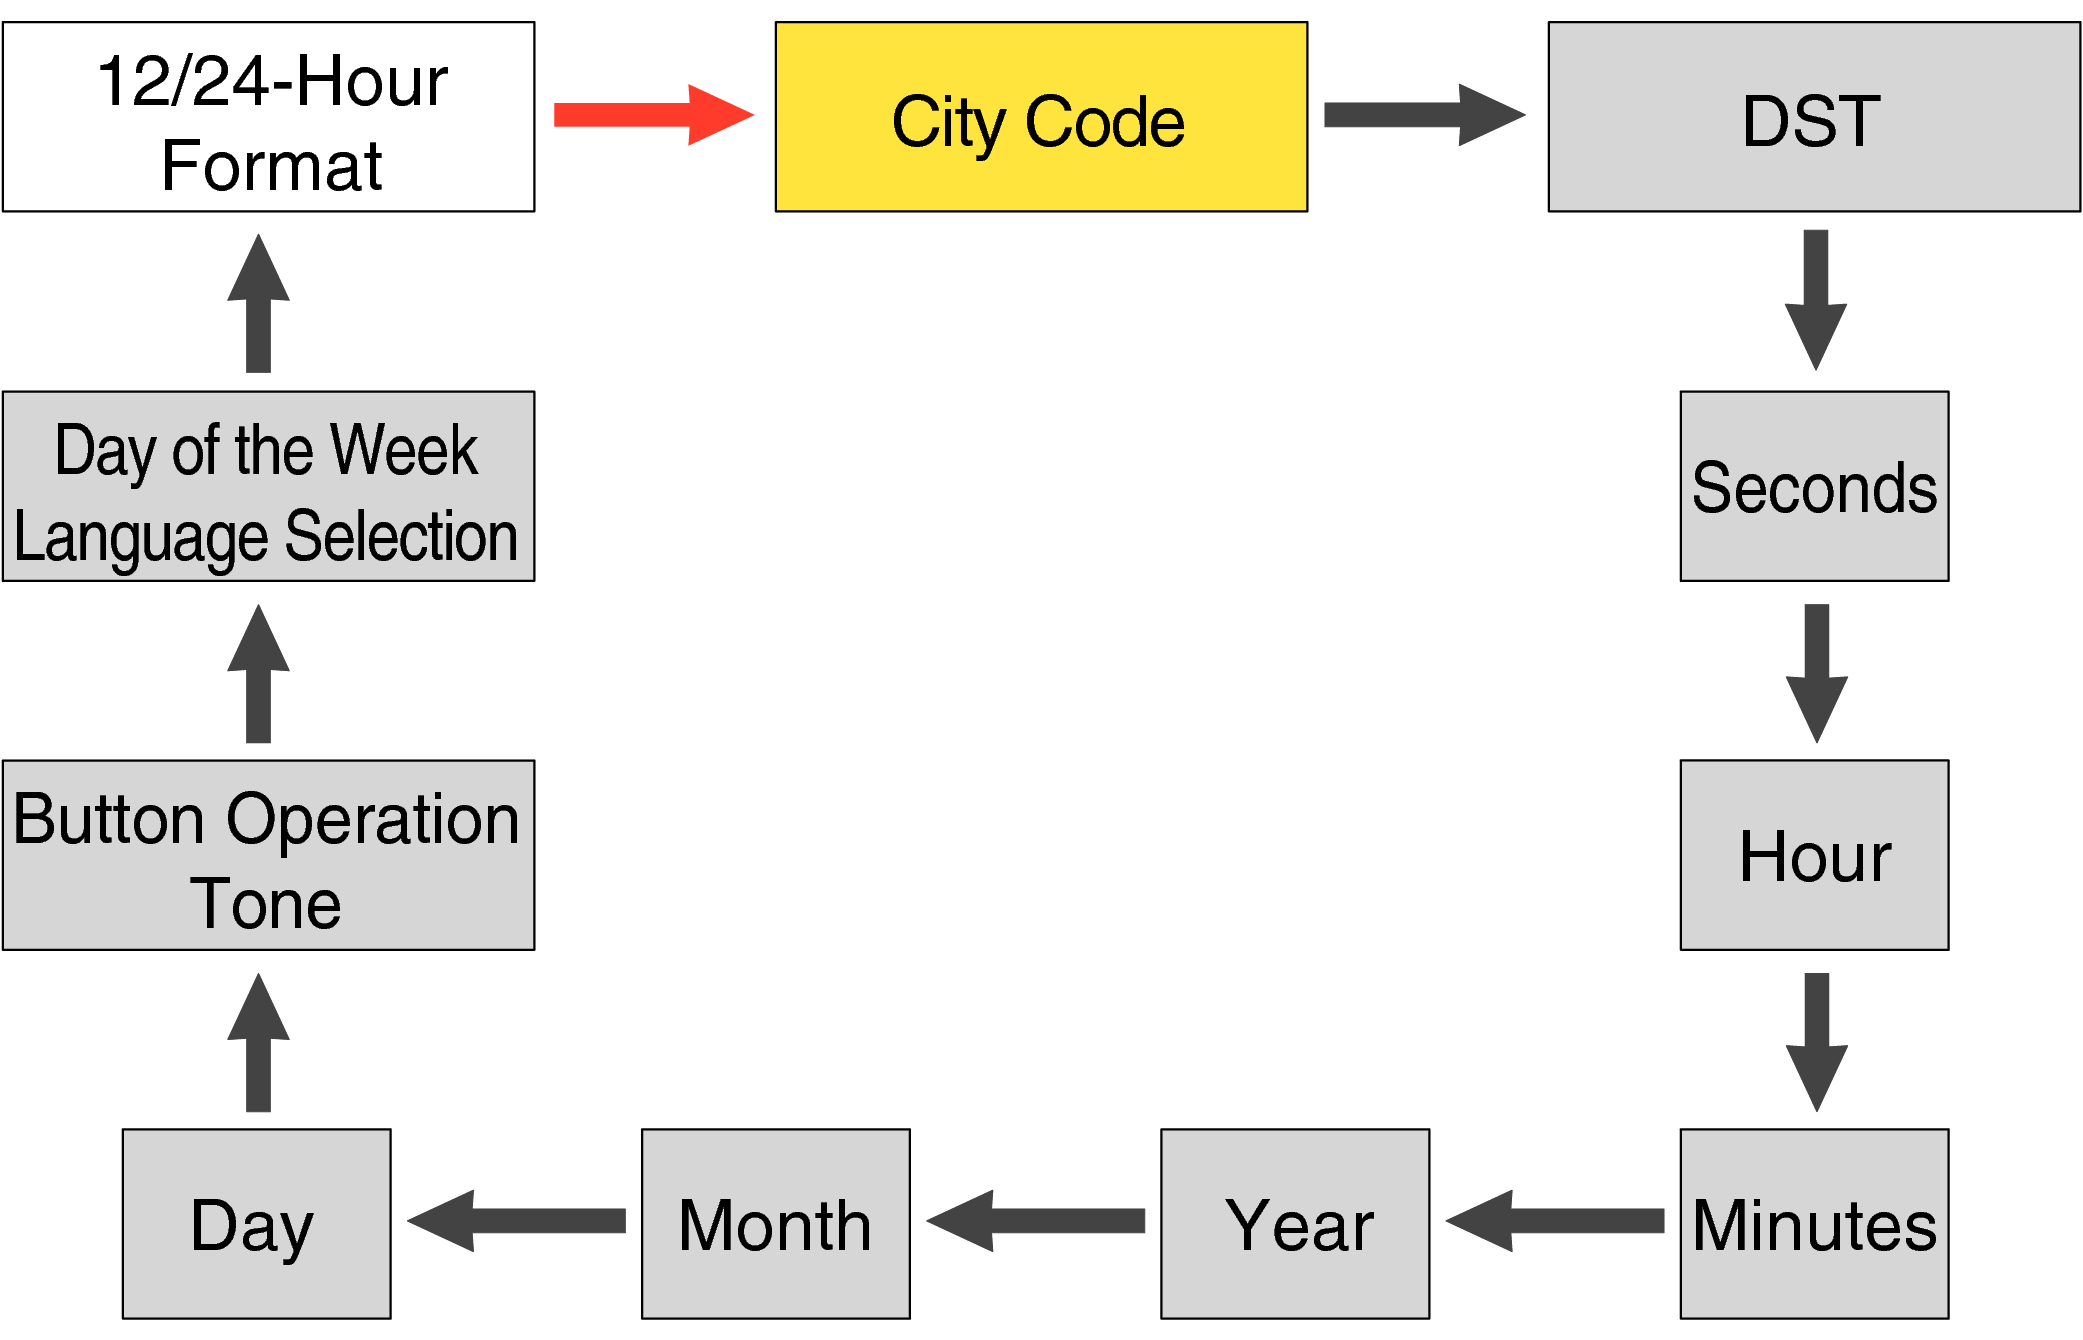
Each press of the lower left button will change the flashing part in the order of the chart above.
Is the City Code displayed on the digital display?
Check the Home City on the “City Code Table”.
If your city name is not there, please select a city from the same time zone.
City Code Table
|
City Code |
UTC Offset/GMT Differential |
City |
|---|---|---|
|
UTC |
0 |
|
|
LON |
0 |
London |
|
PAR |
+1 |
Paris |
|
ATH |
+2 |
Athens |
|
JED |
+3 |
Jeddah |
|
THR |
+3.5 |
Tehran |
|
DXB |
+4 |
Dubai |
|
KBL |
+4.5 |
Kabul |
|
KHI |
+5 |
Karachi |
|
DEL |
+5.5 |
Delhi |
|
KTM |
+5.75 |
Kathmandu |
|
DAC |
+6 |
Dhaka |
|
RGN |
+6.5 |
Yangon |
|
BKK |
+7 |
Bangkok |
|
HKG |
+8 |
Hong Kong |
|
City Code |
UTC Offset/GMT Differential |
City |
|---|---|---|
|
TYO |
+9 |
Tokyo |
|
ADL |
+9.5 |
Adelaide |
|
SYD |
+10 |
Sydney |
|
NOU |
+11 |
Nouméa |
|
WLG |
+12 |
Wellington |
|
PPG |
-11 |
Pago Pago |
|
HNL |
-10 |
Honolulu |
|
ANC |
-9 |
Anchorage |
|
LAX |
-8 |
Los Angeles |
|
DEN |
-7 |
Denver |
|
CHI |
-6 |
Chicago |
|
NYC |
-5 |
New York |
|
SCL |
-4 |
Santiago |
|
RIO |
-3 |
Rio De Janeiro |
|
RAI |
-1 |
Praia |
This table was created in December 2009.
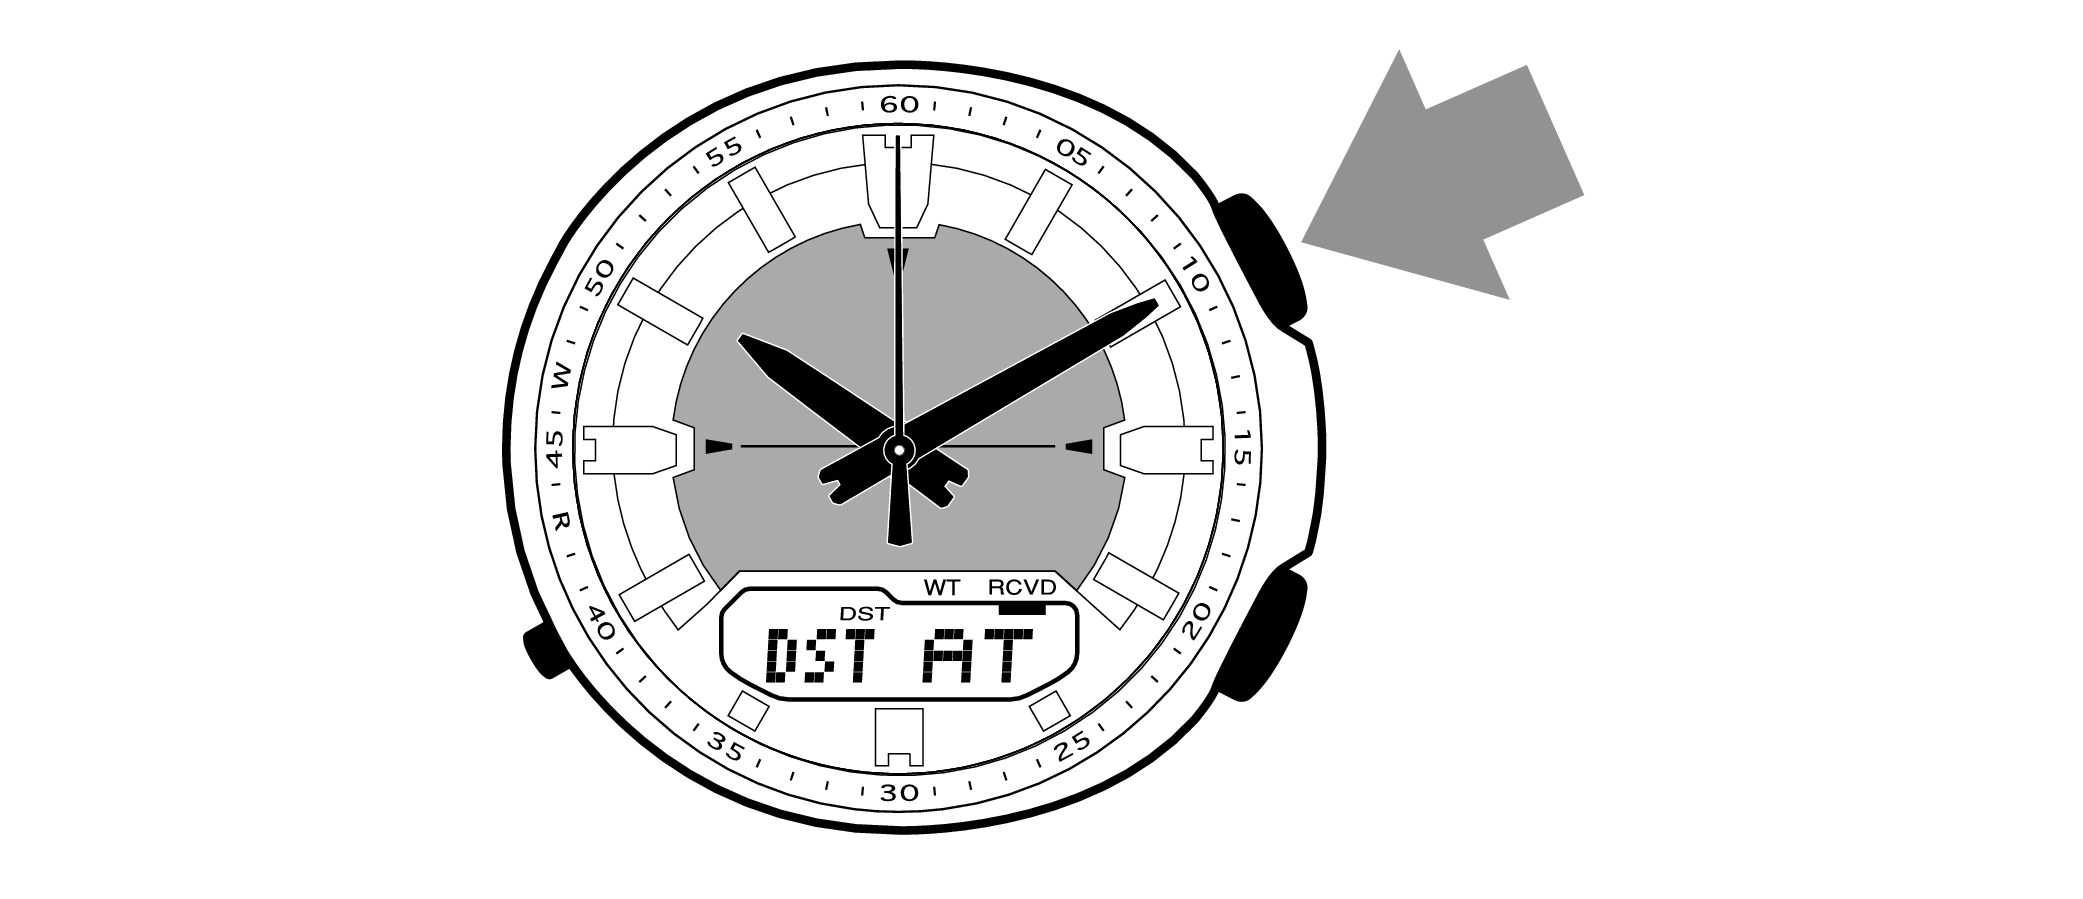
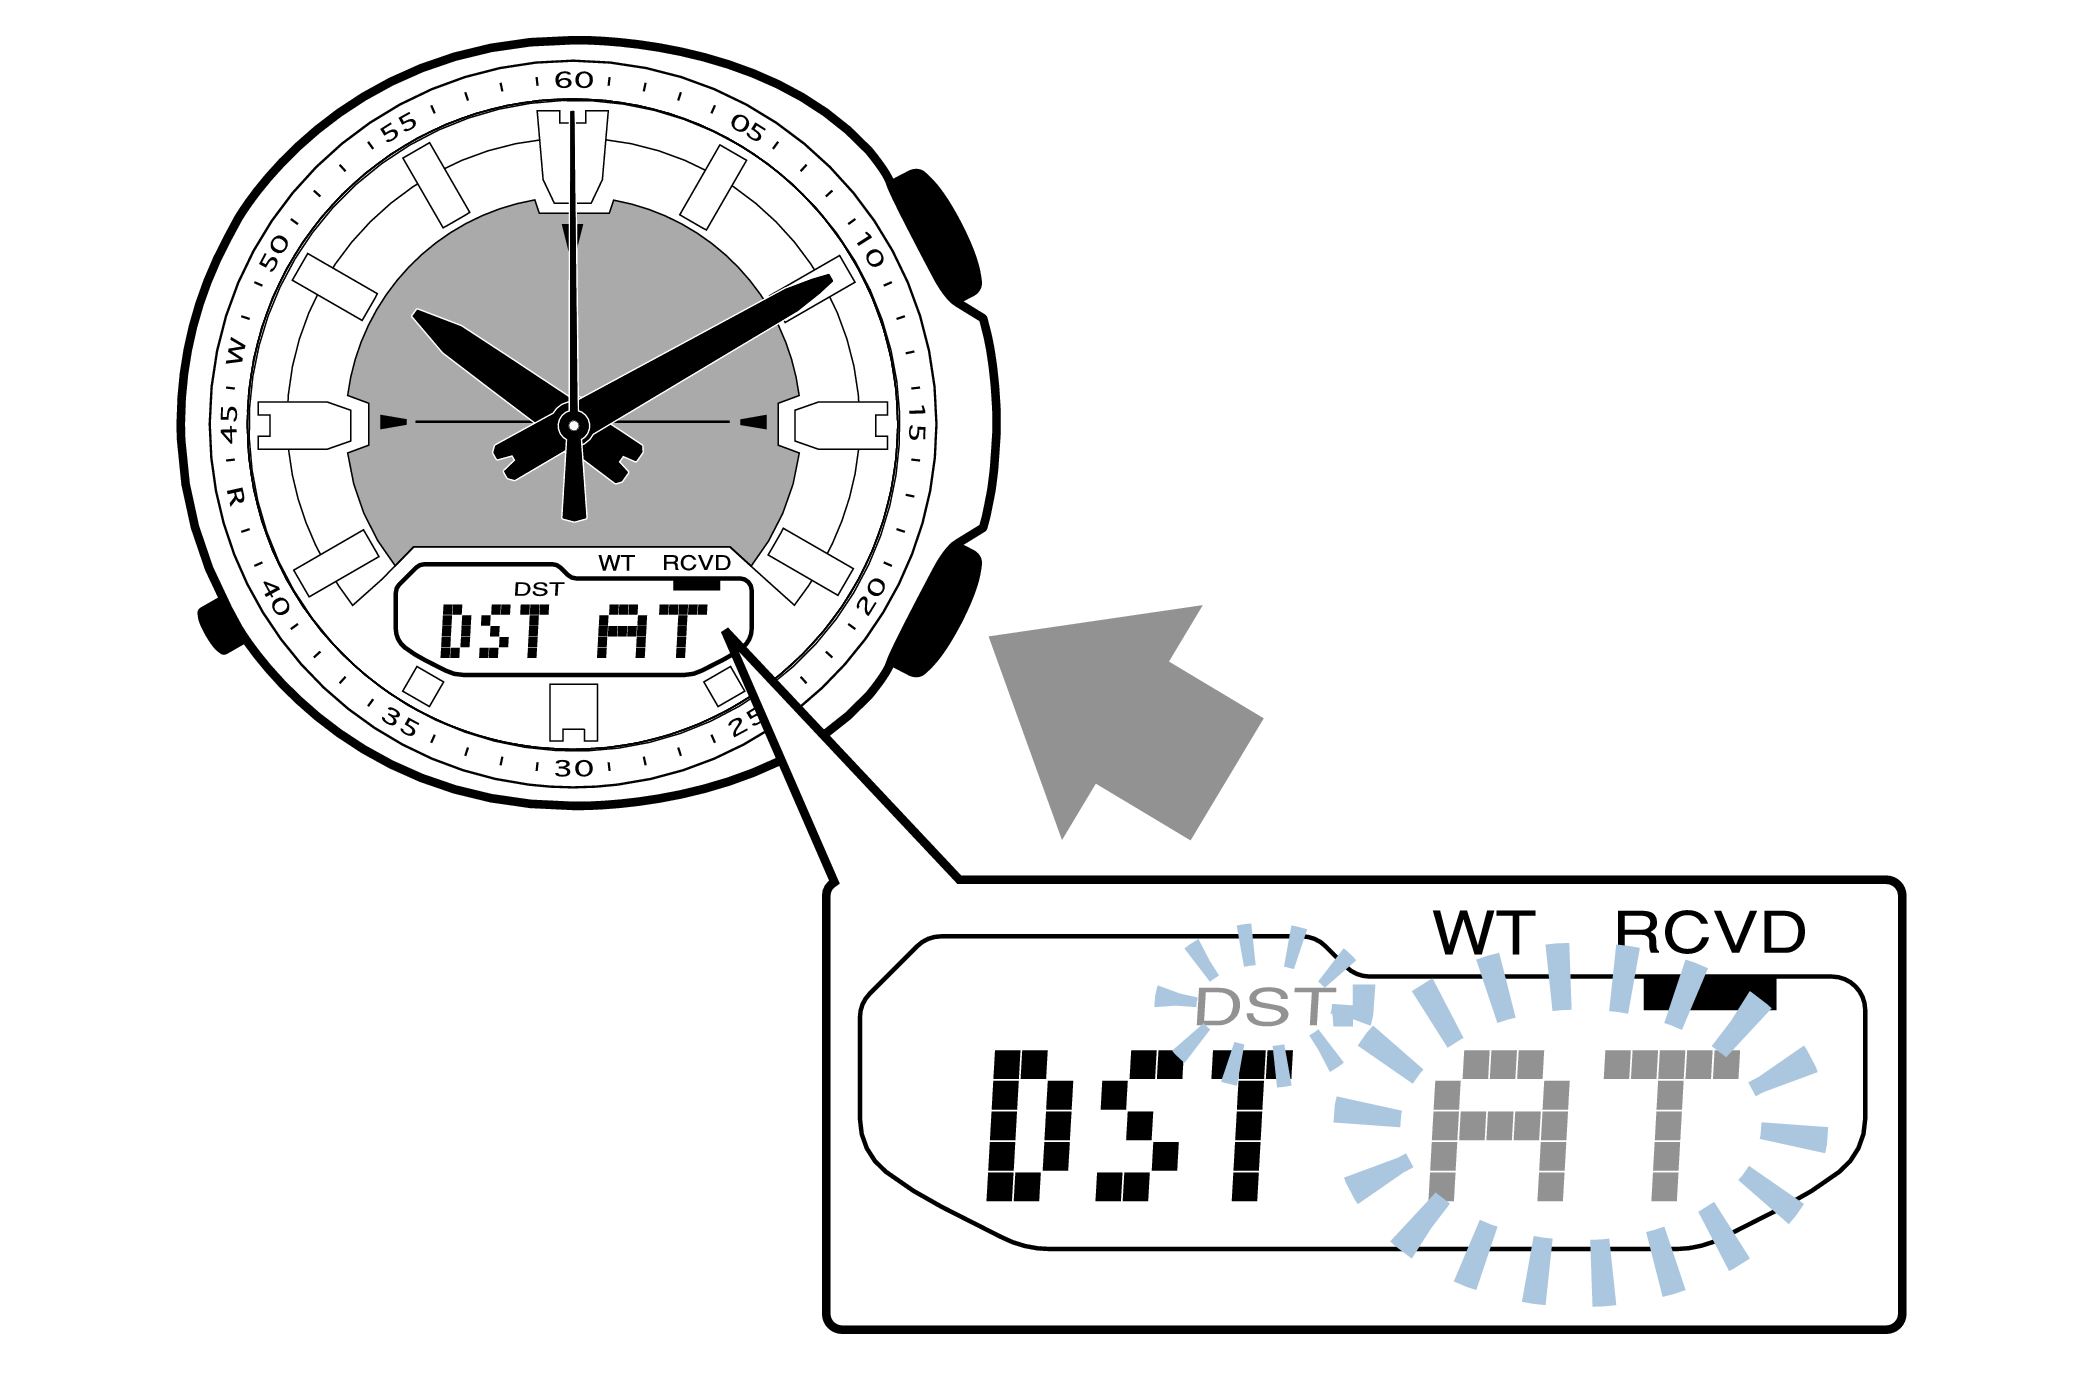
Check the Summer Time (DST) setting
-
1.Pressing the lower left button will switch to the “Summer Time (DST) setting”.
-
Each press of the lower left button will change the flashing part in the order of the chart above.
Is the Summer Time (DST) setting displayed on the digital display correct?
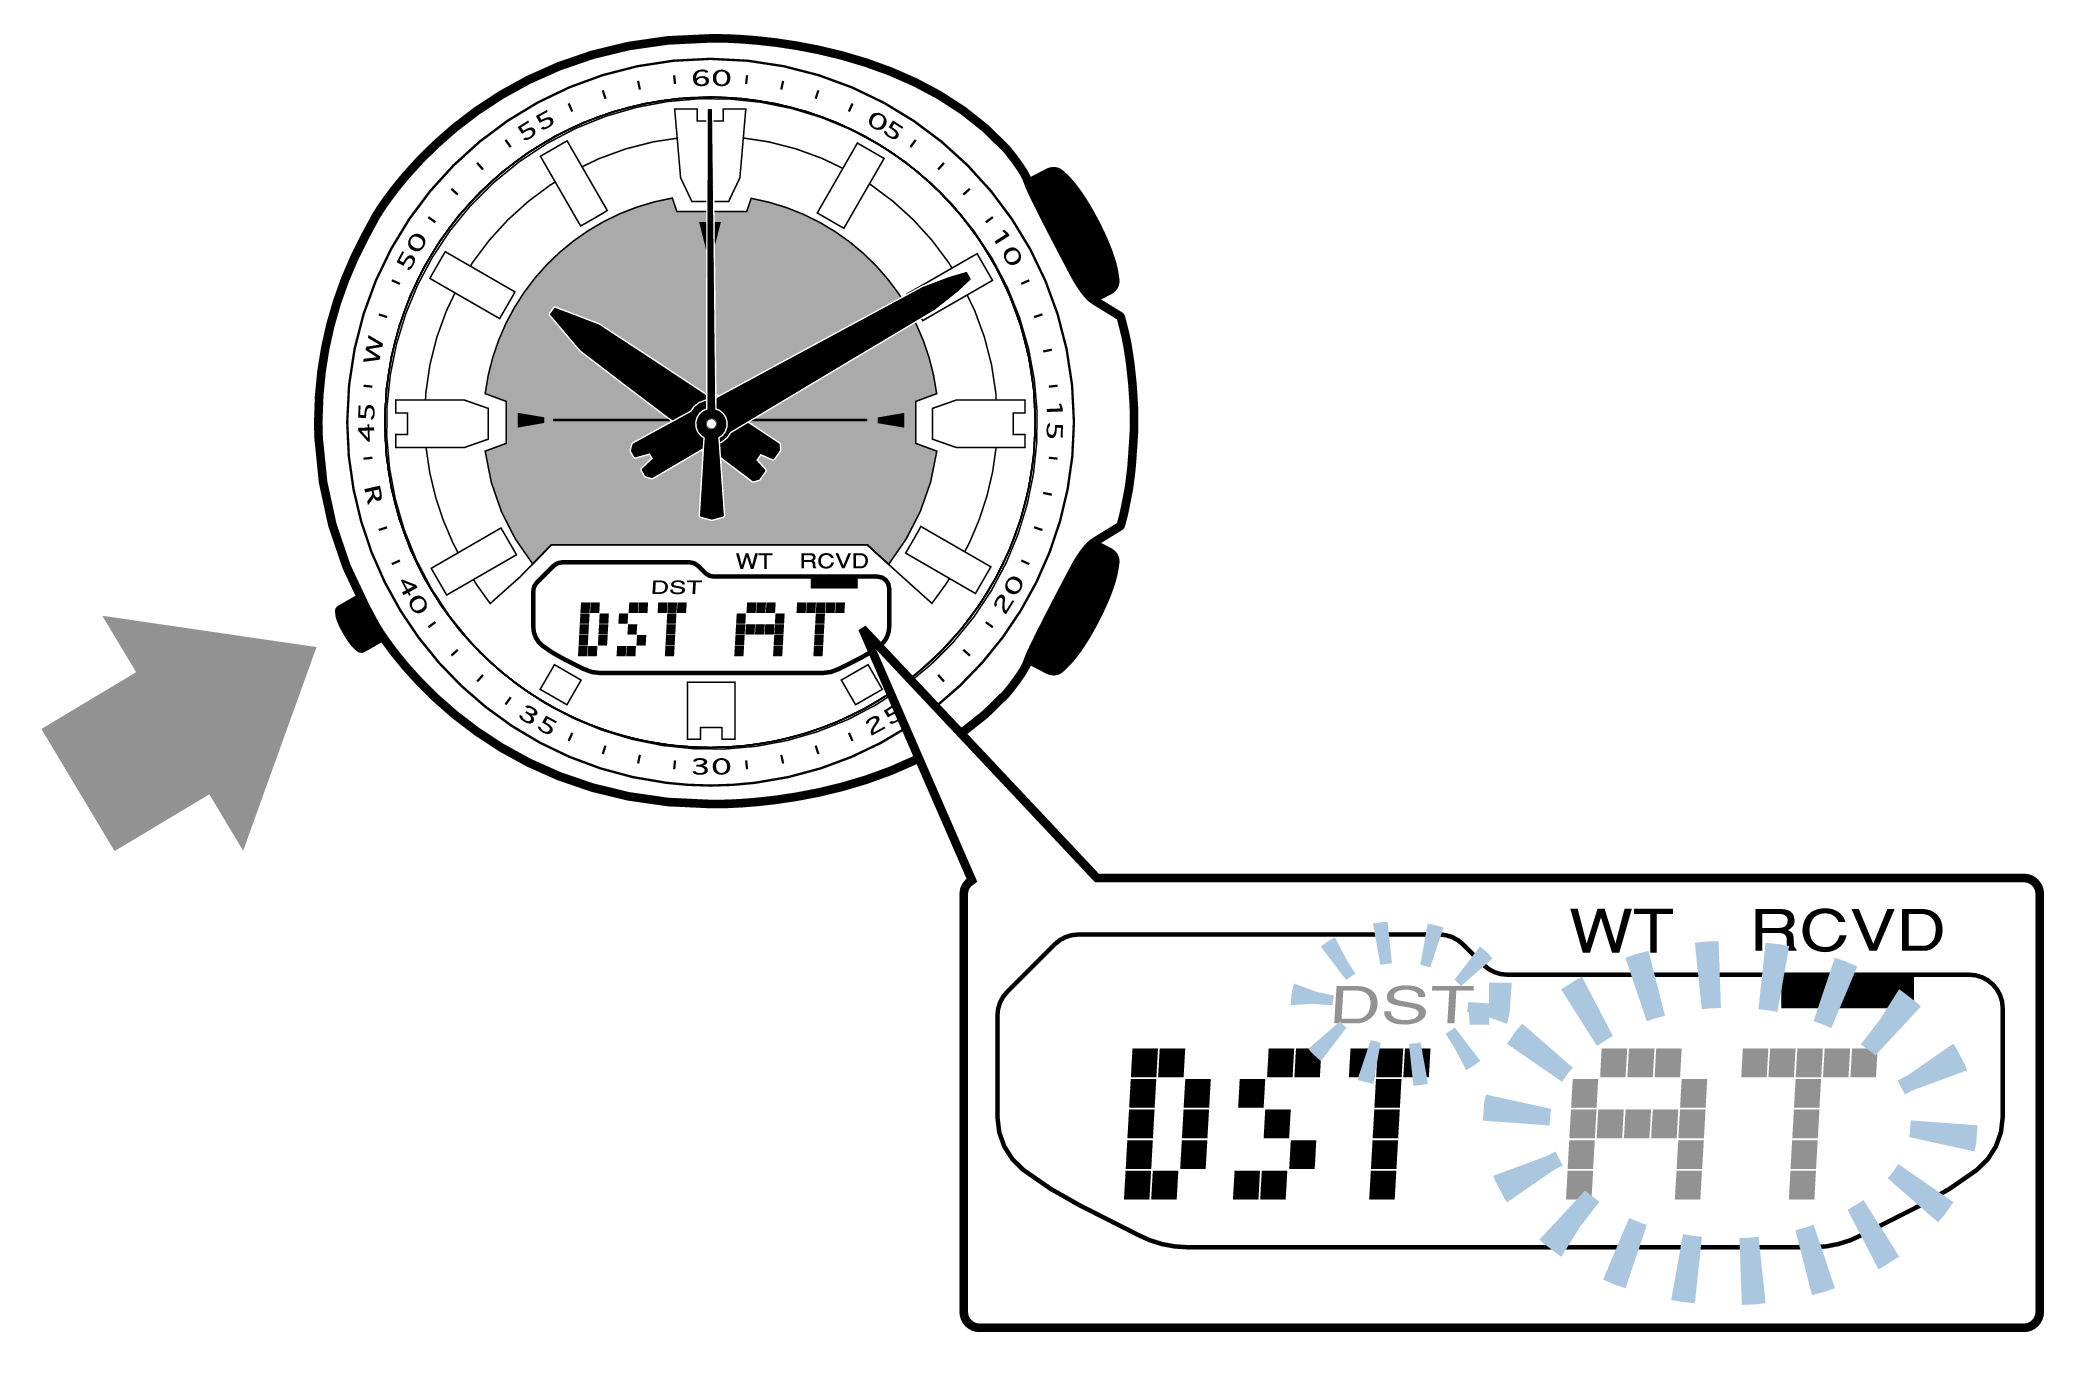
When the summer time (DST) setting is ON, time will be one hour ahead of Standard Time.
When the summer time (DST) setting is set to AT, Summer Time will be automatically switched between ON and OFF using radio signals.
-
2.Press the upper right button to complete the configuration.
-
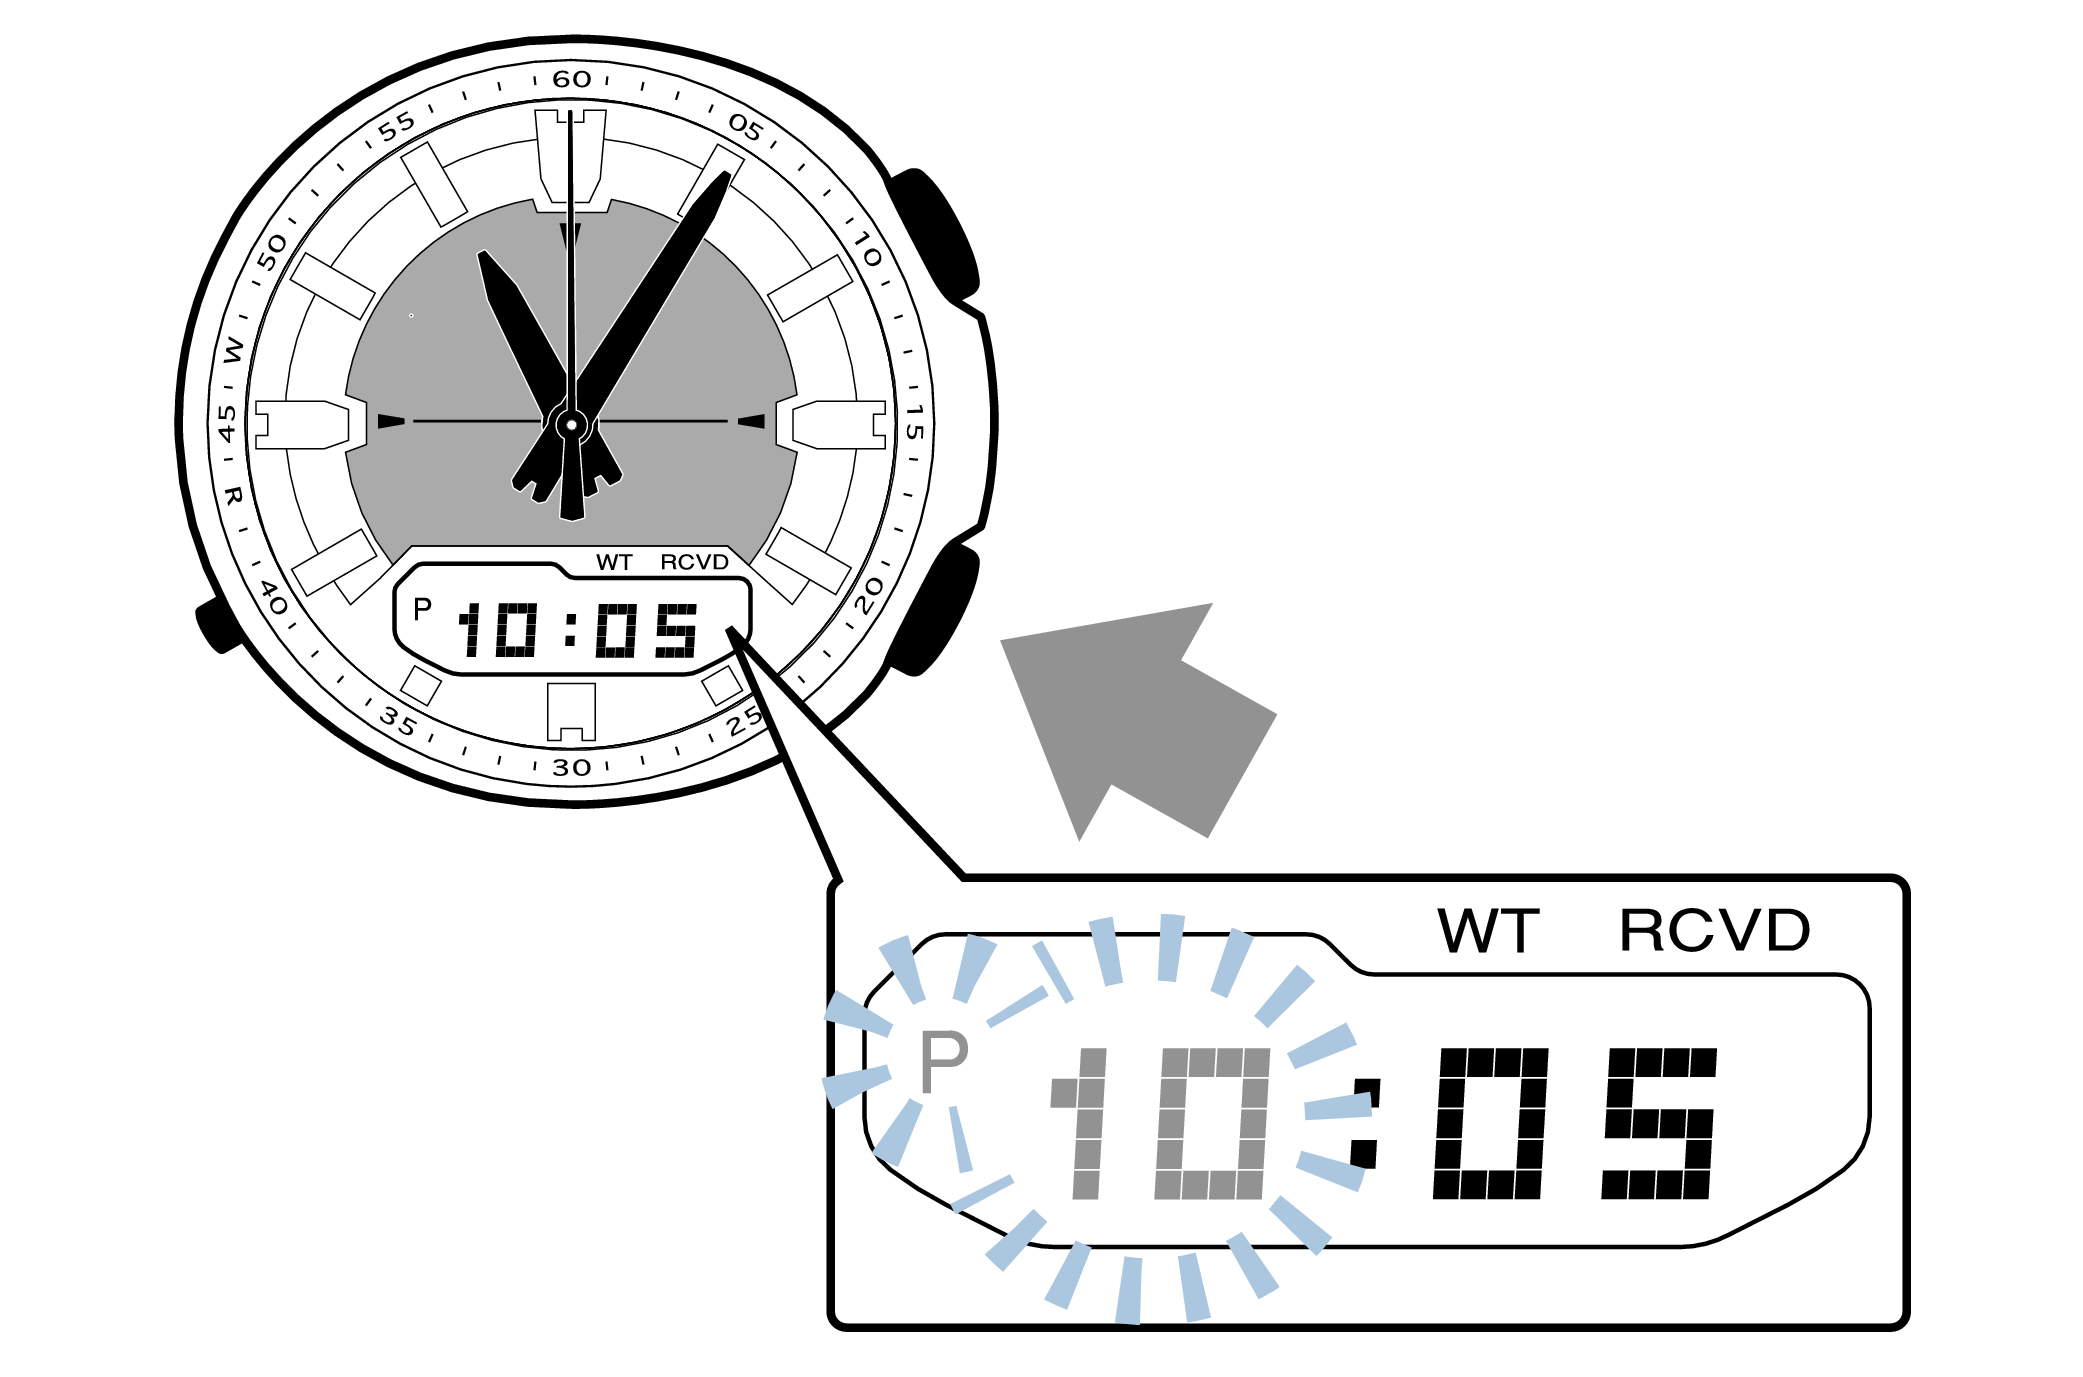
Is the digital display set to the correct time?
Are the hands correct?
Time Adjustment is completed
Correct the hand home position
-
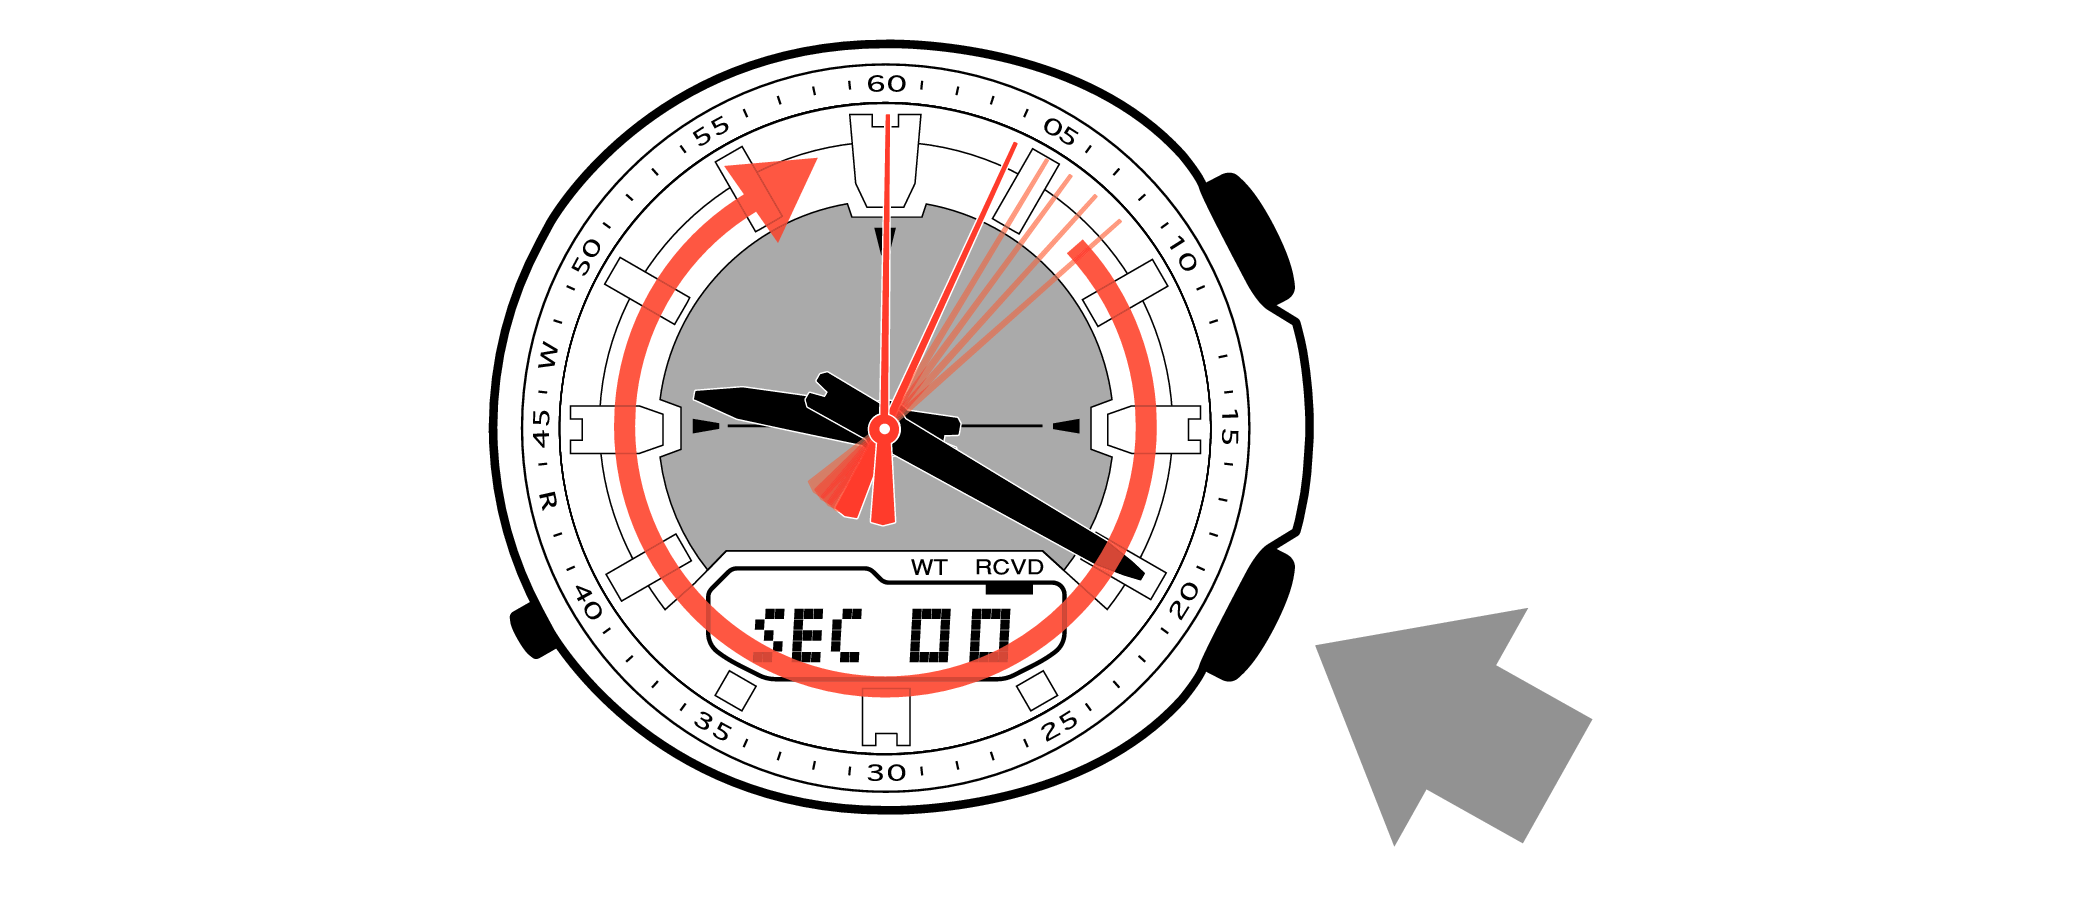
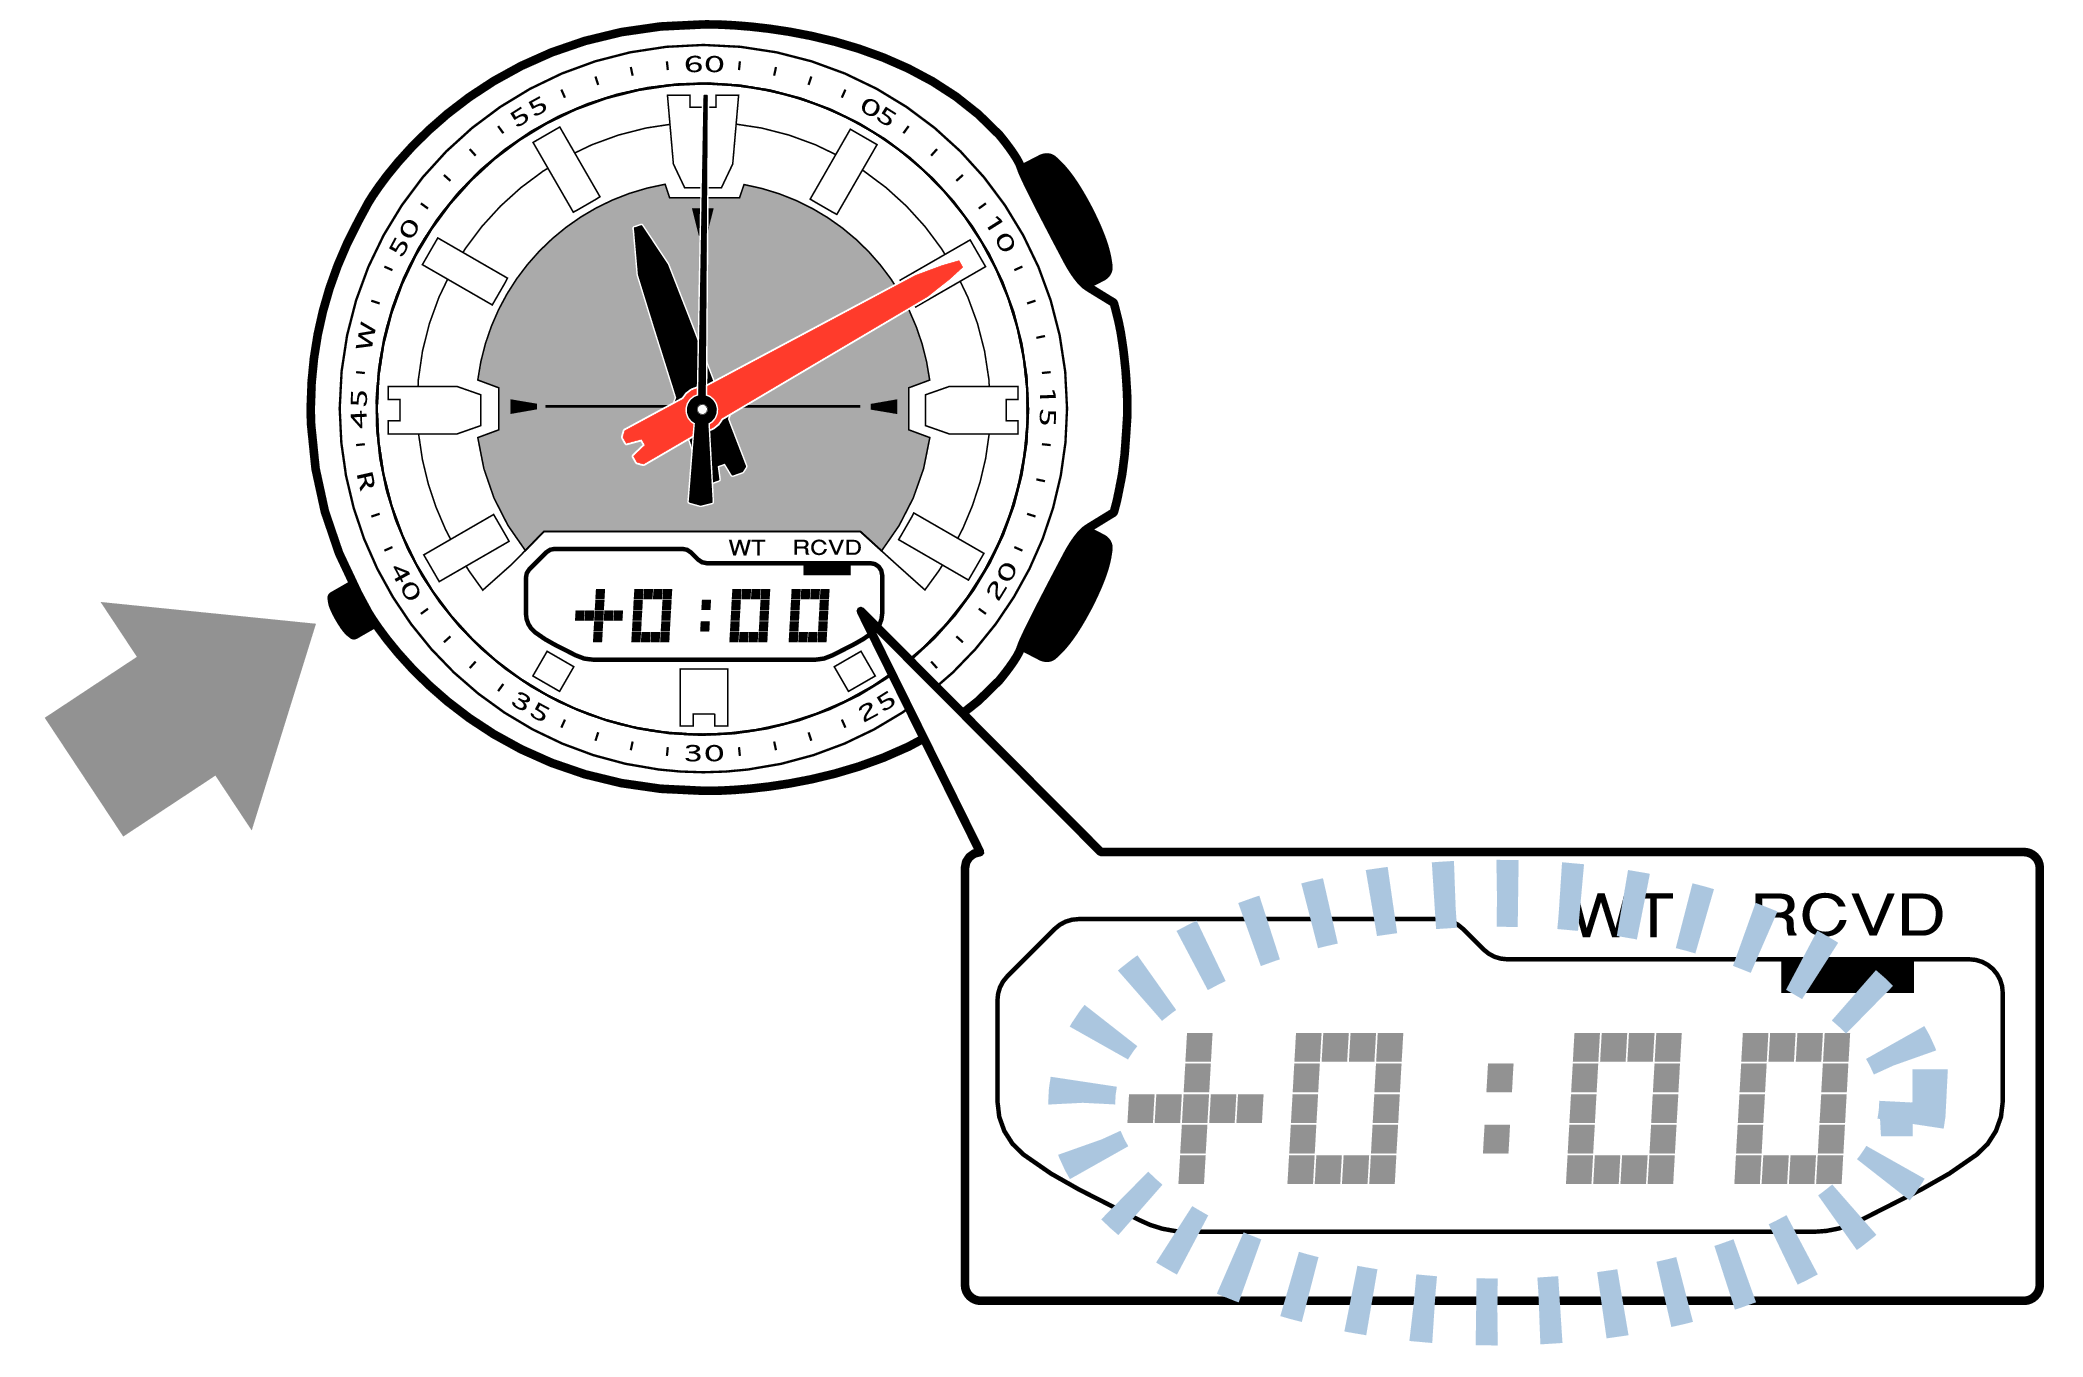
1.Hold down the upper right button for approximately 6 seconds until “H.SET” is displayed on the digital display.
-
If the button is released when “H.SET” is displayed, “SEC 00” will flash on the digital display.
After holding down the button for approximately 3 seconds “ADJ” will appear, but continue to hold down the button.
“H.SET” will display, and if you continue to hold down the button it will return to Timekeeping Mode.
If you return to Timekeeping Mode, repeat this operation.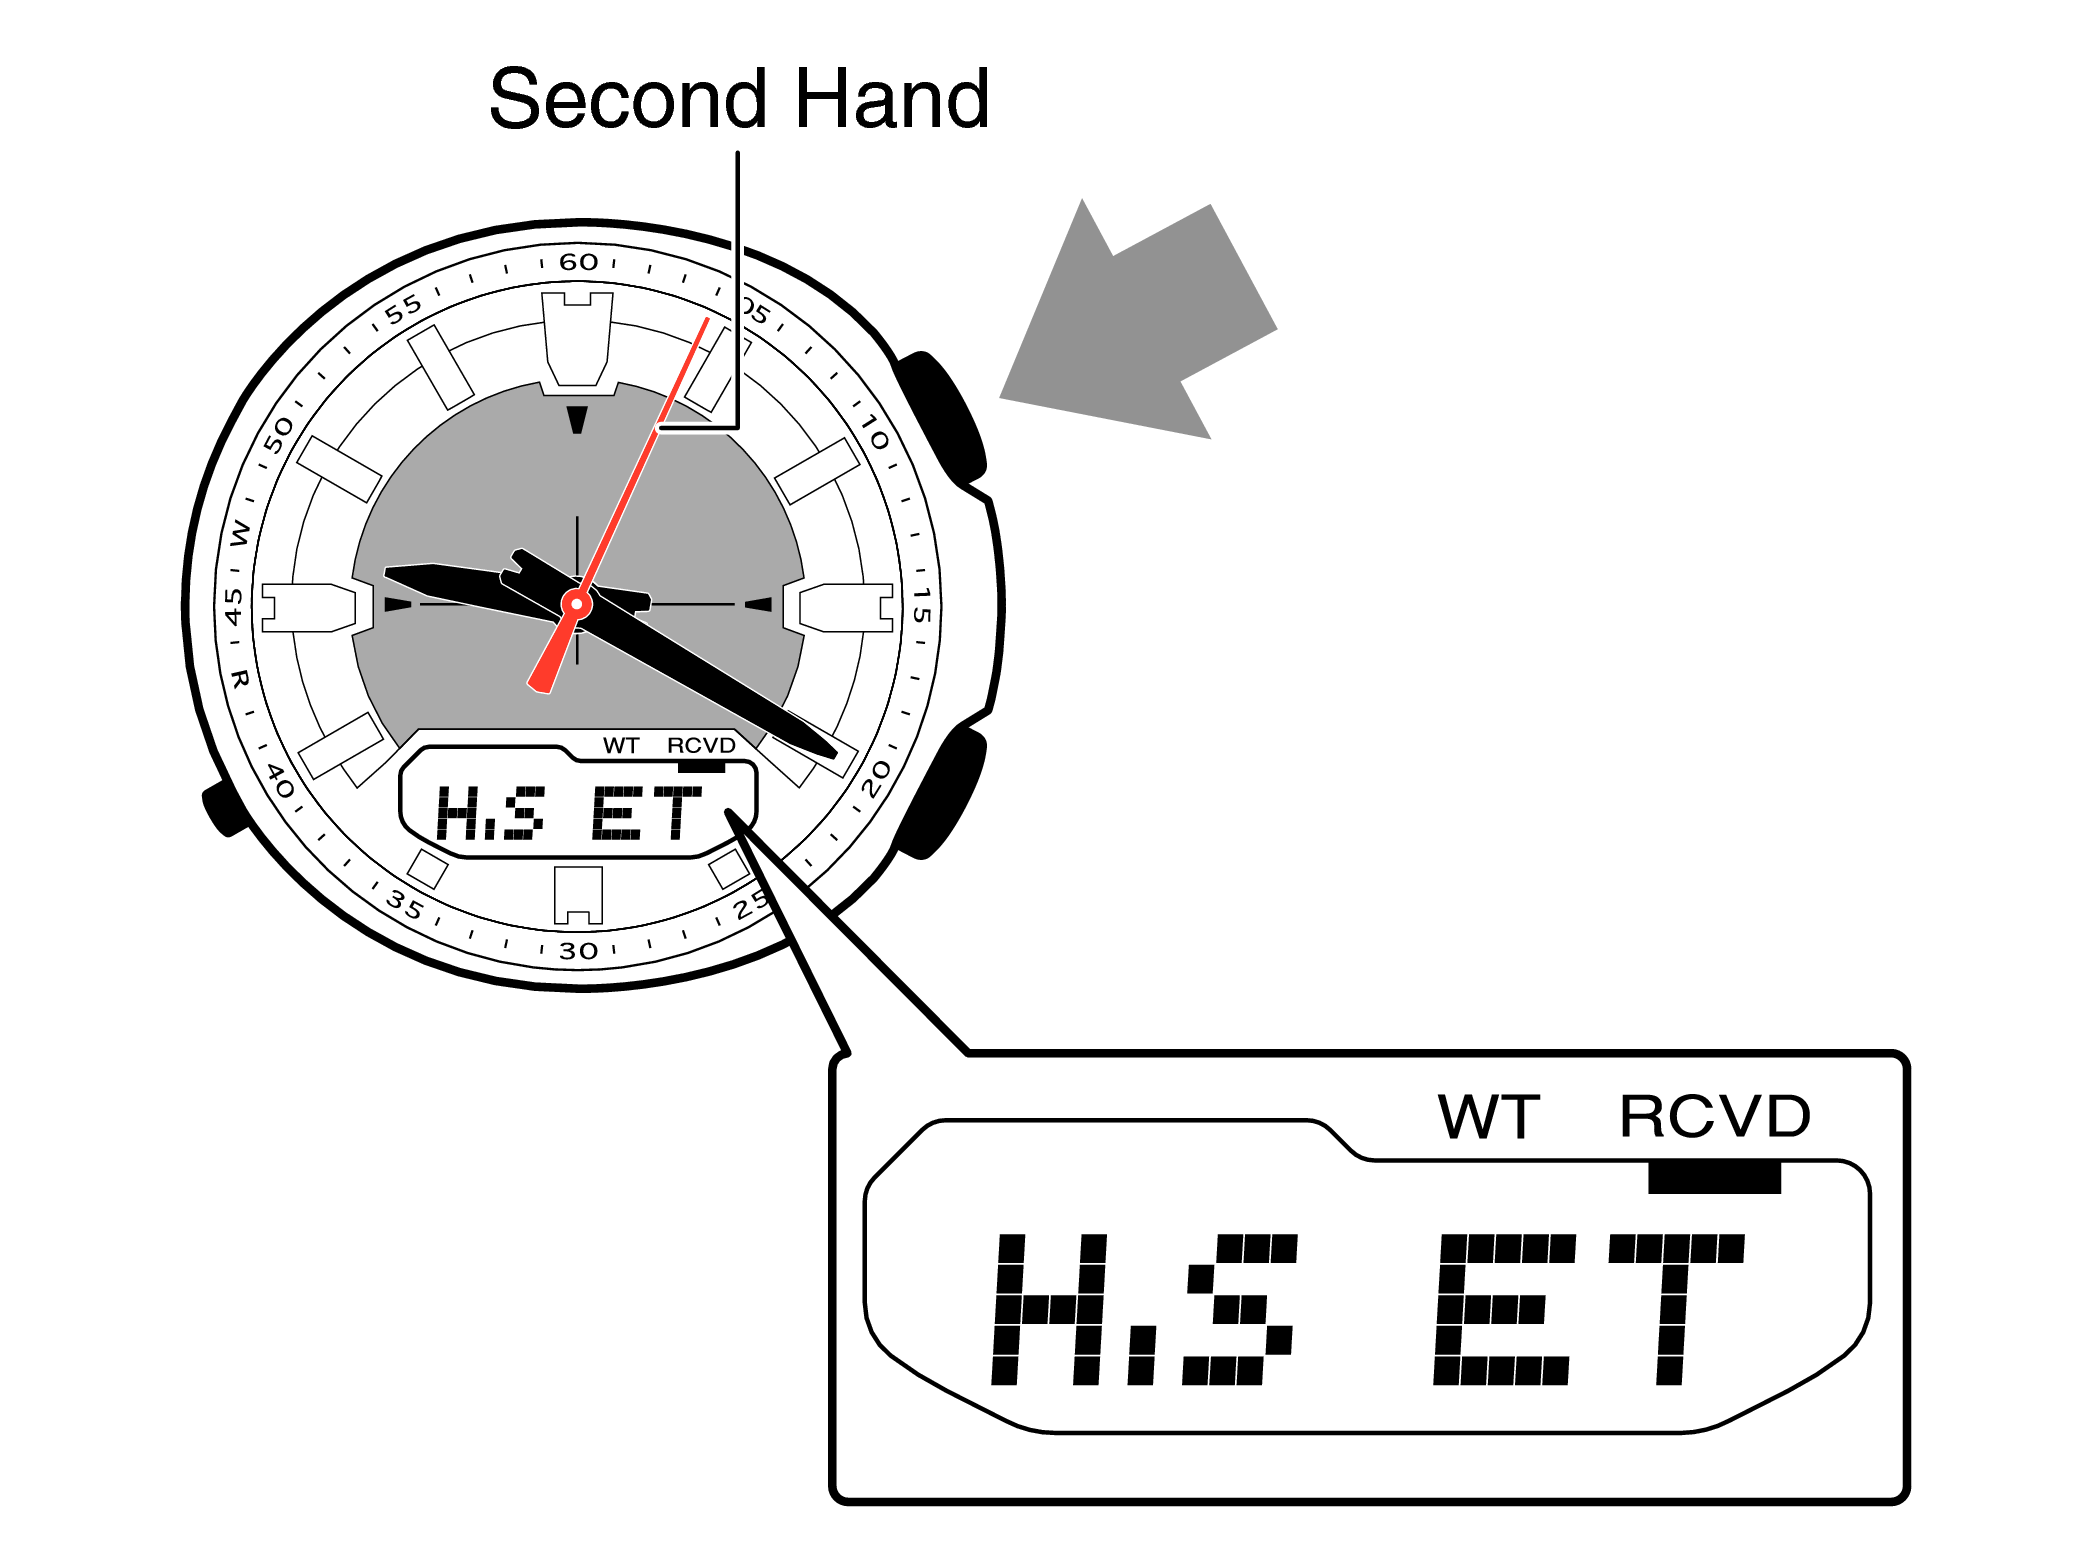
-
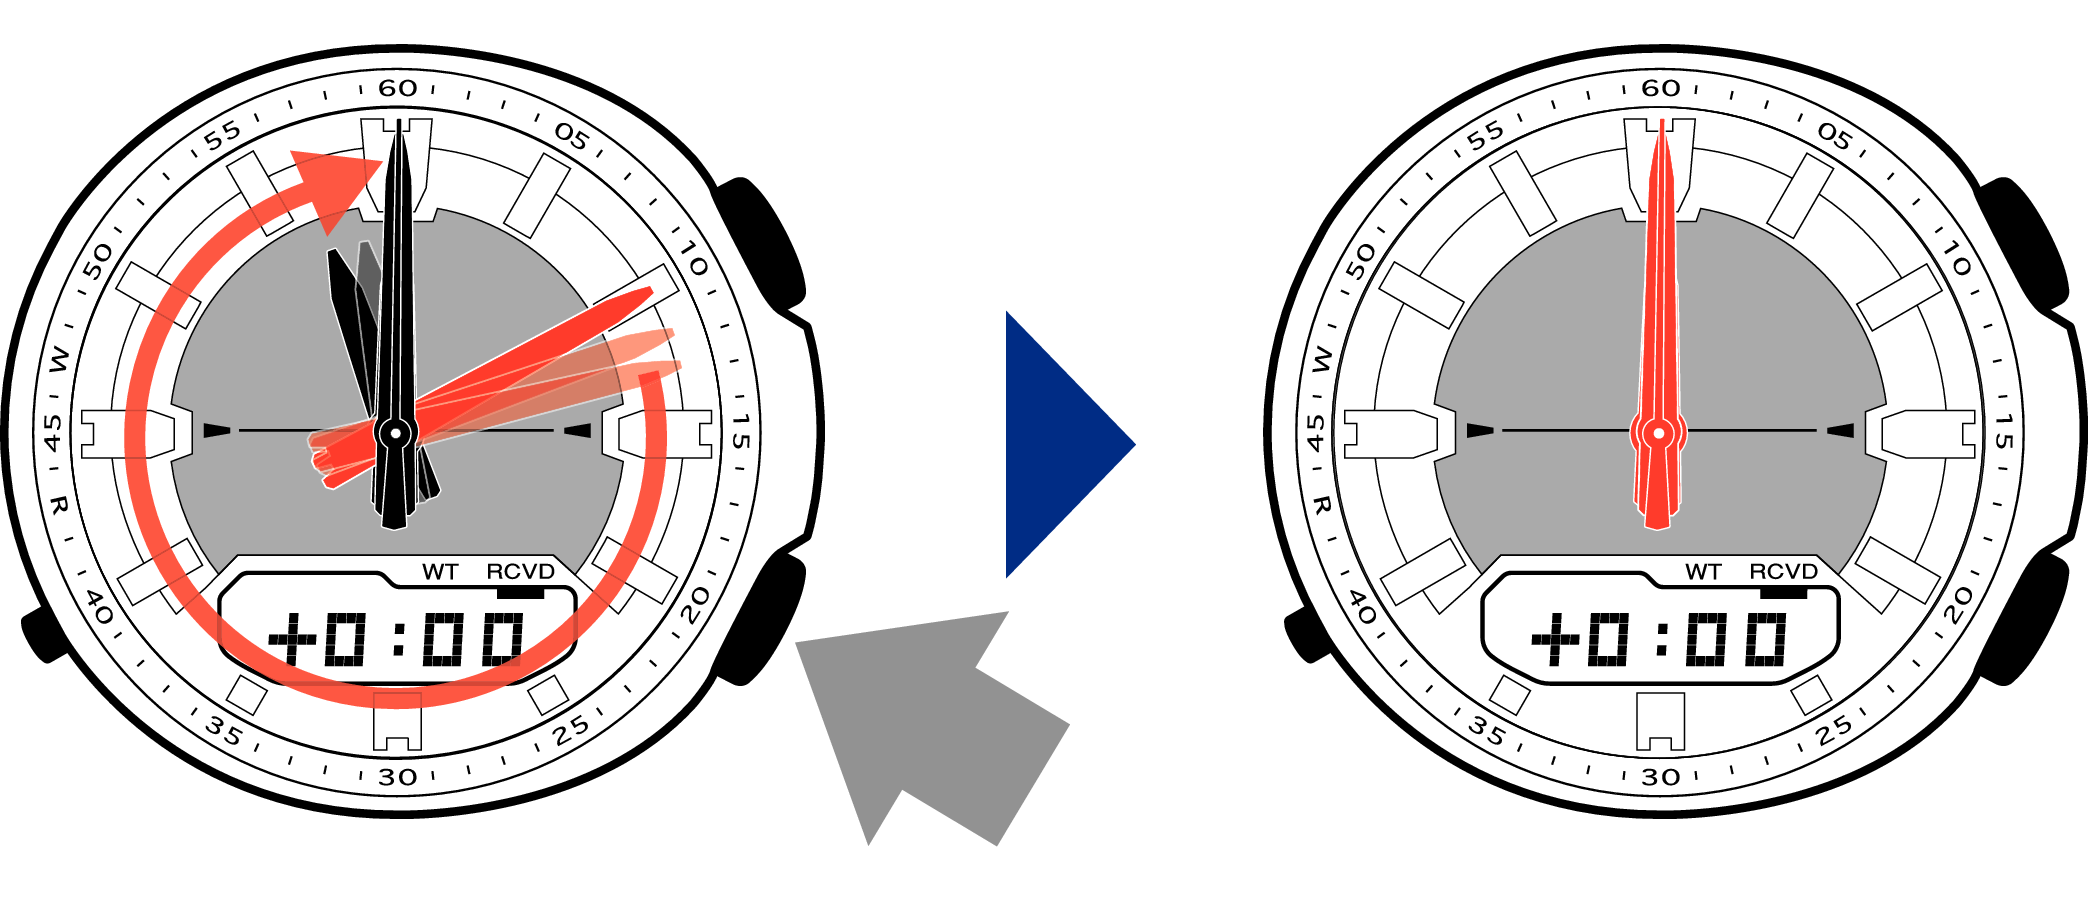
2.If the second hand stops at any point other than 12 o’clock, press the lower right button to align it with 12 o’clock.
-
Pressing the button will advance the second hand by one second.
Holding down the button will quickly advance the hands, and pressing any button will make them stop.
-
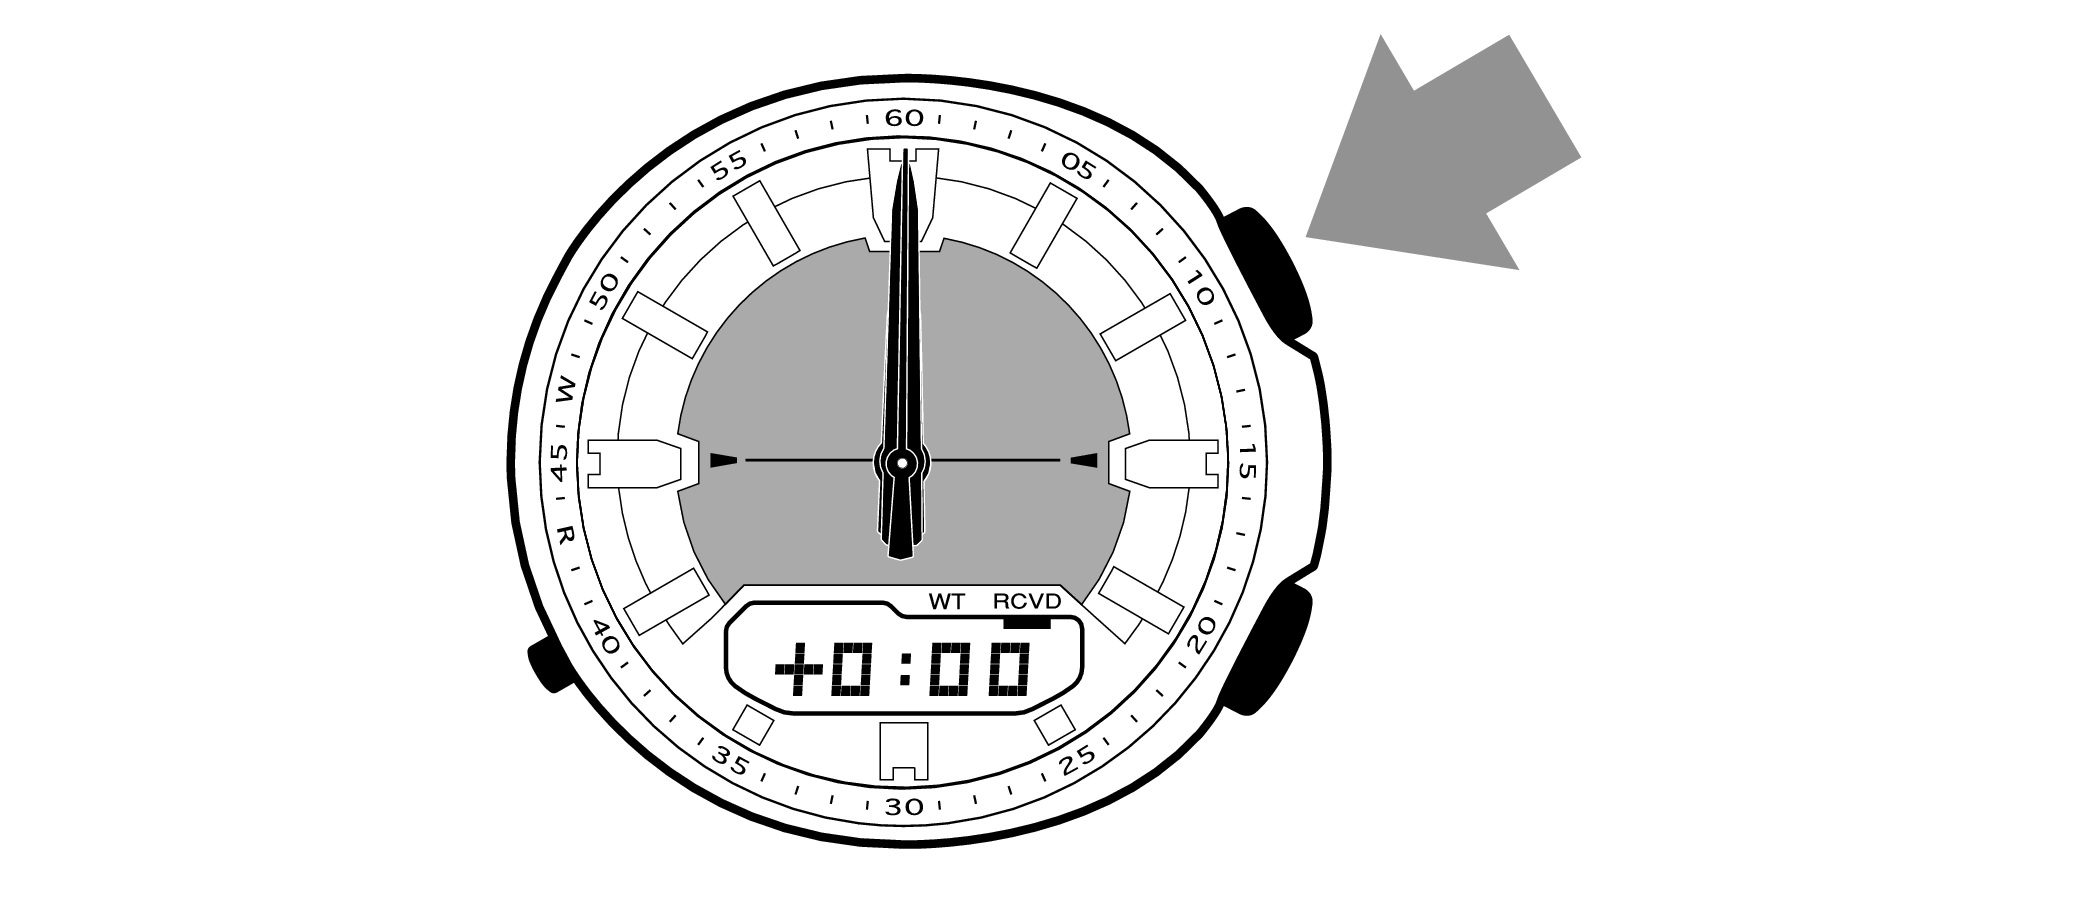
3.Pressing the lower left button will switch to adjusting the hour and minute hands.
-
The hour and minute hands will move automatically, so please wait until the hands have stopped.
-
4.If the hour and minute hands stop at any point other than 12 o’clock, press the lower right button to align them with 12 o’clock.
-
Each press of the button will advance the hands.
The hour and minute hands will move at the same time.
Holding down the button will quickly advance the hands, and pressing any button will make them stop.
[Tip for adjusting the hands]
When advancing the hands, quickly pause them momentarily when they are near to 12 o’clock, and then set the hands to 12 o’clock using small increments.
-
5.Press the upper right button to complete the configuration.
-
Return to Timekeeping Mode, then the hands will advance to the current time and start to move.
When finished setting to the home position, check if the time shown by the hands in Timekeeping Mode and the time on the digital display match.
Time Adjustment is completed
Correct the time and date on the digital display
Set to the correct time (hours, minutes, seconds) and date (year, month, day).
-
1.Hold down the upper right button for approximately 3 seconds until “ADJ” is displayed on the digital display.
-
If you continue to hold it down “H.SET” will display, and if you continue further it will return to Timekeeping Mode.
If you return to Timekeeping Mode, repeat this operation.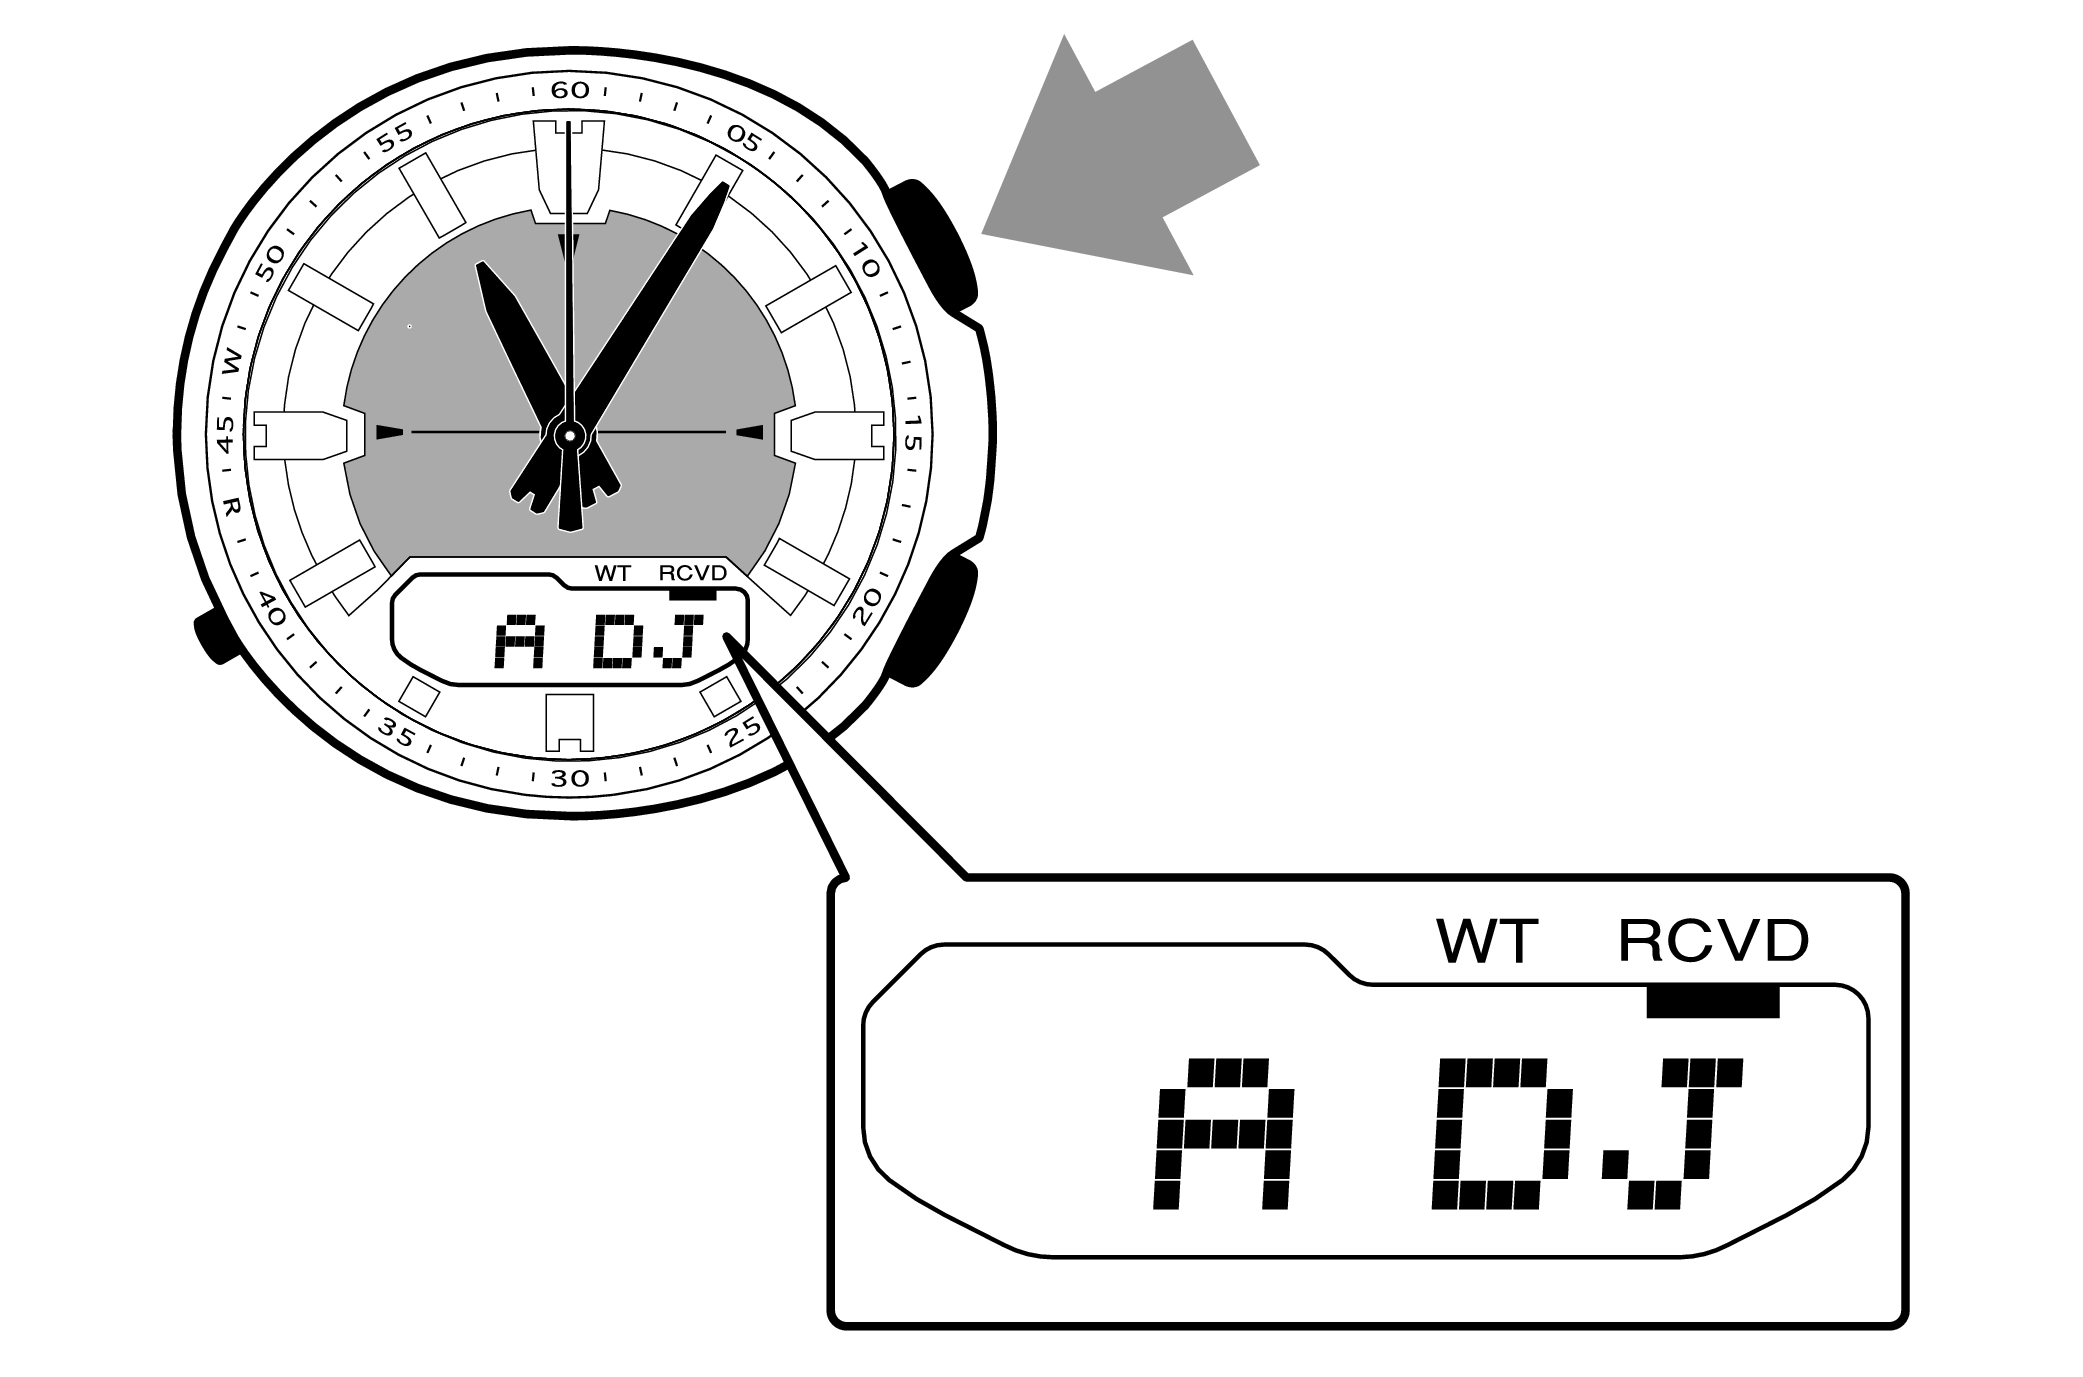
When you release the button after “ADJ” appears, “12H” or “24H” will flash.
-
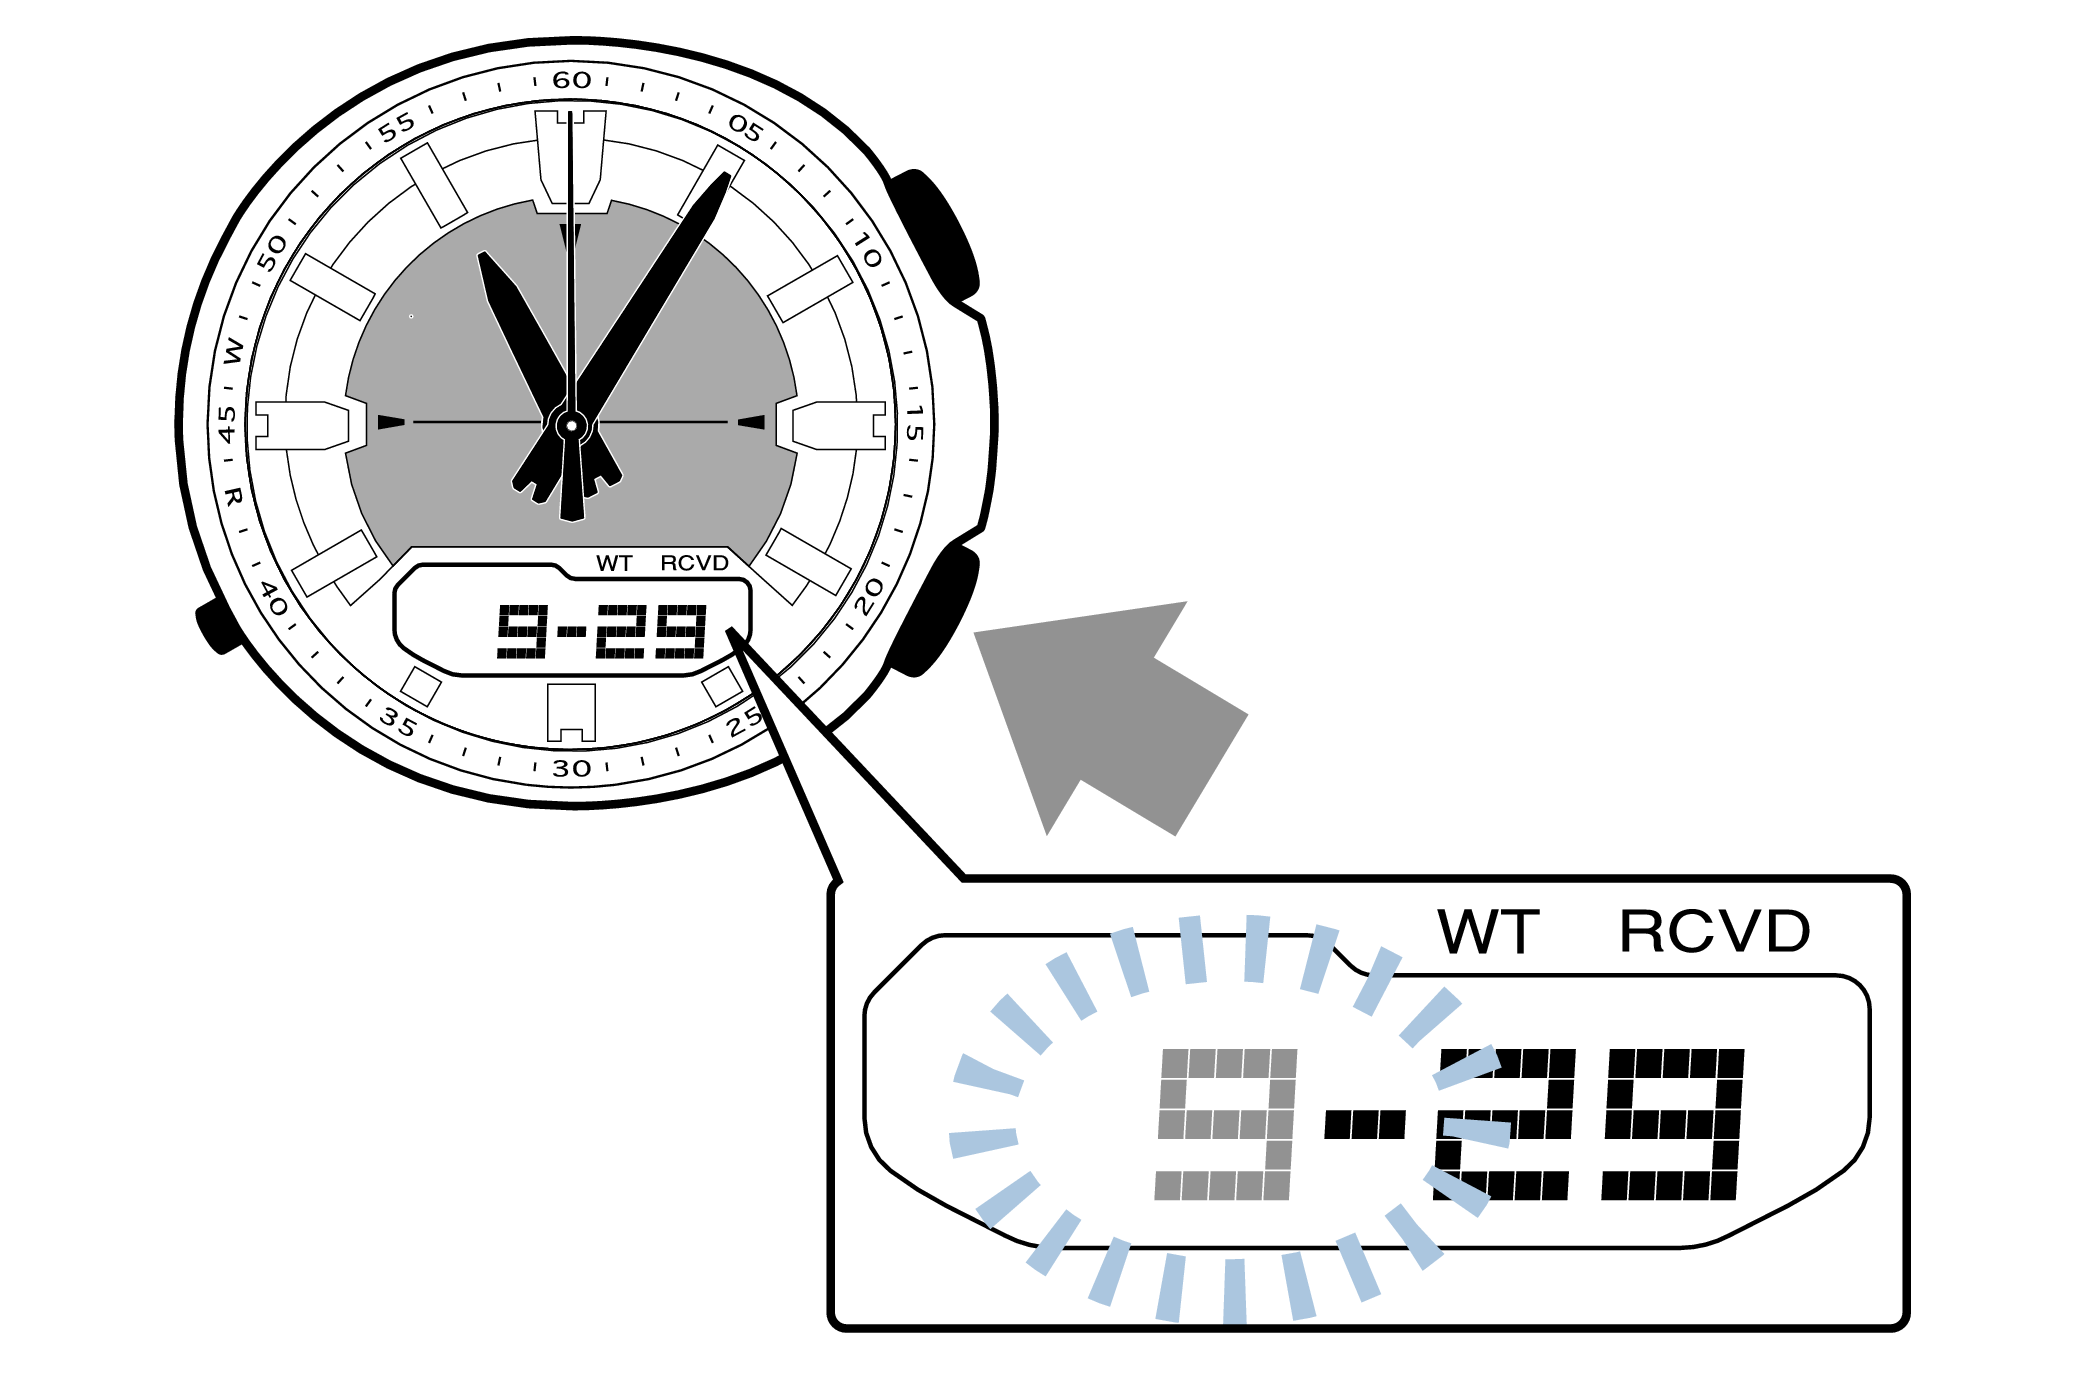
2.Pressing the lower left button three times will switch to the “seconds” setting.
-
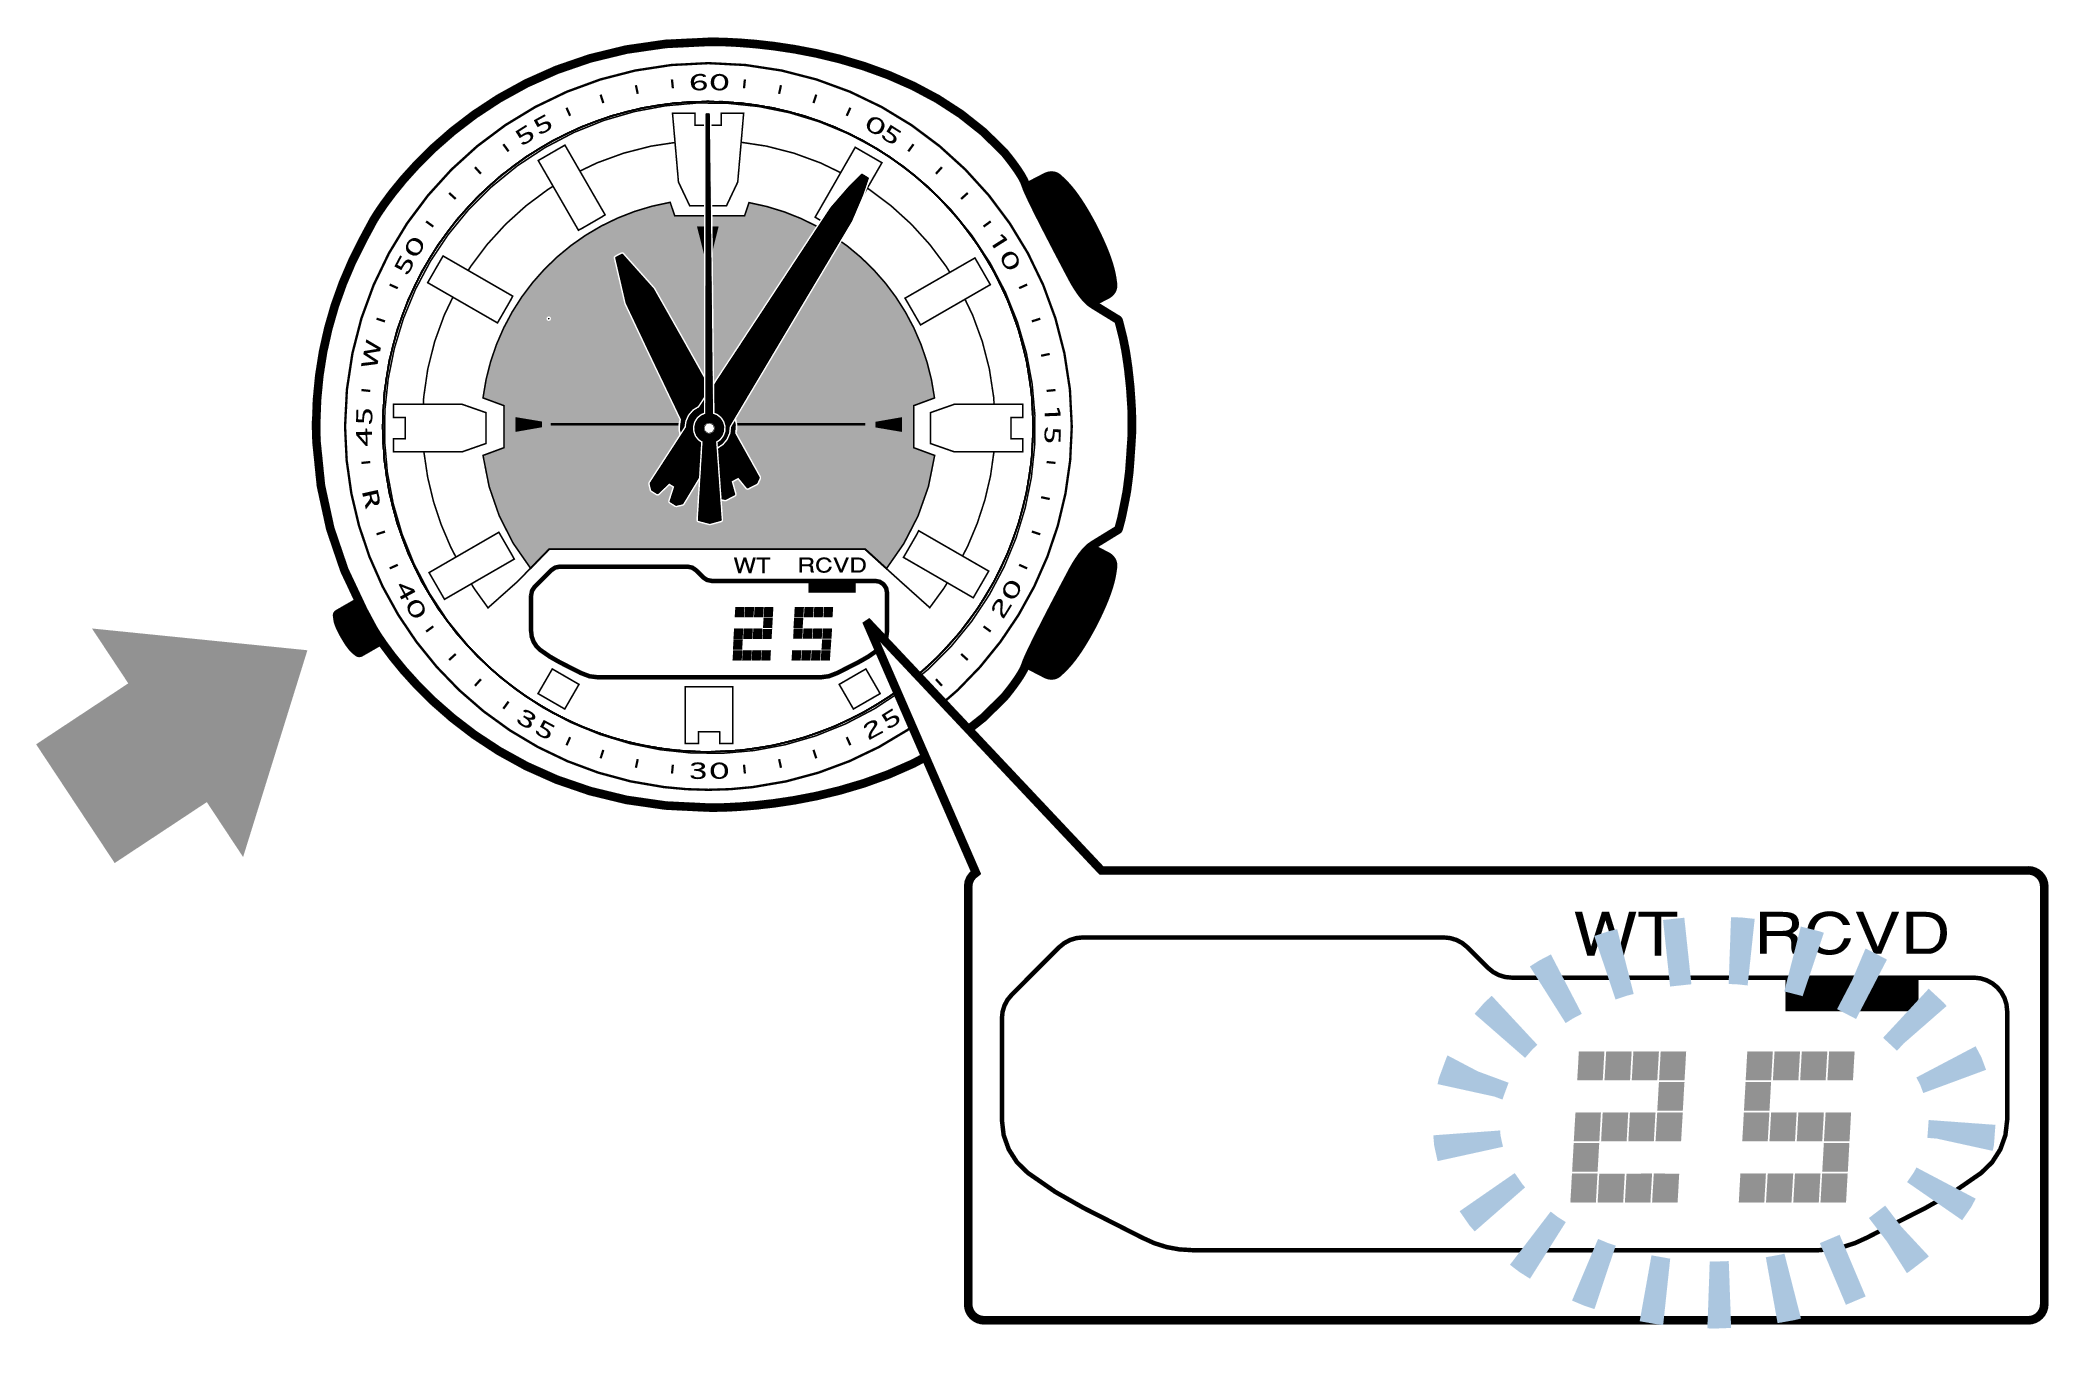
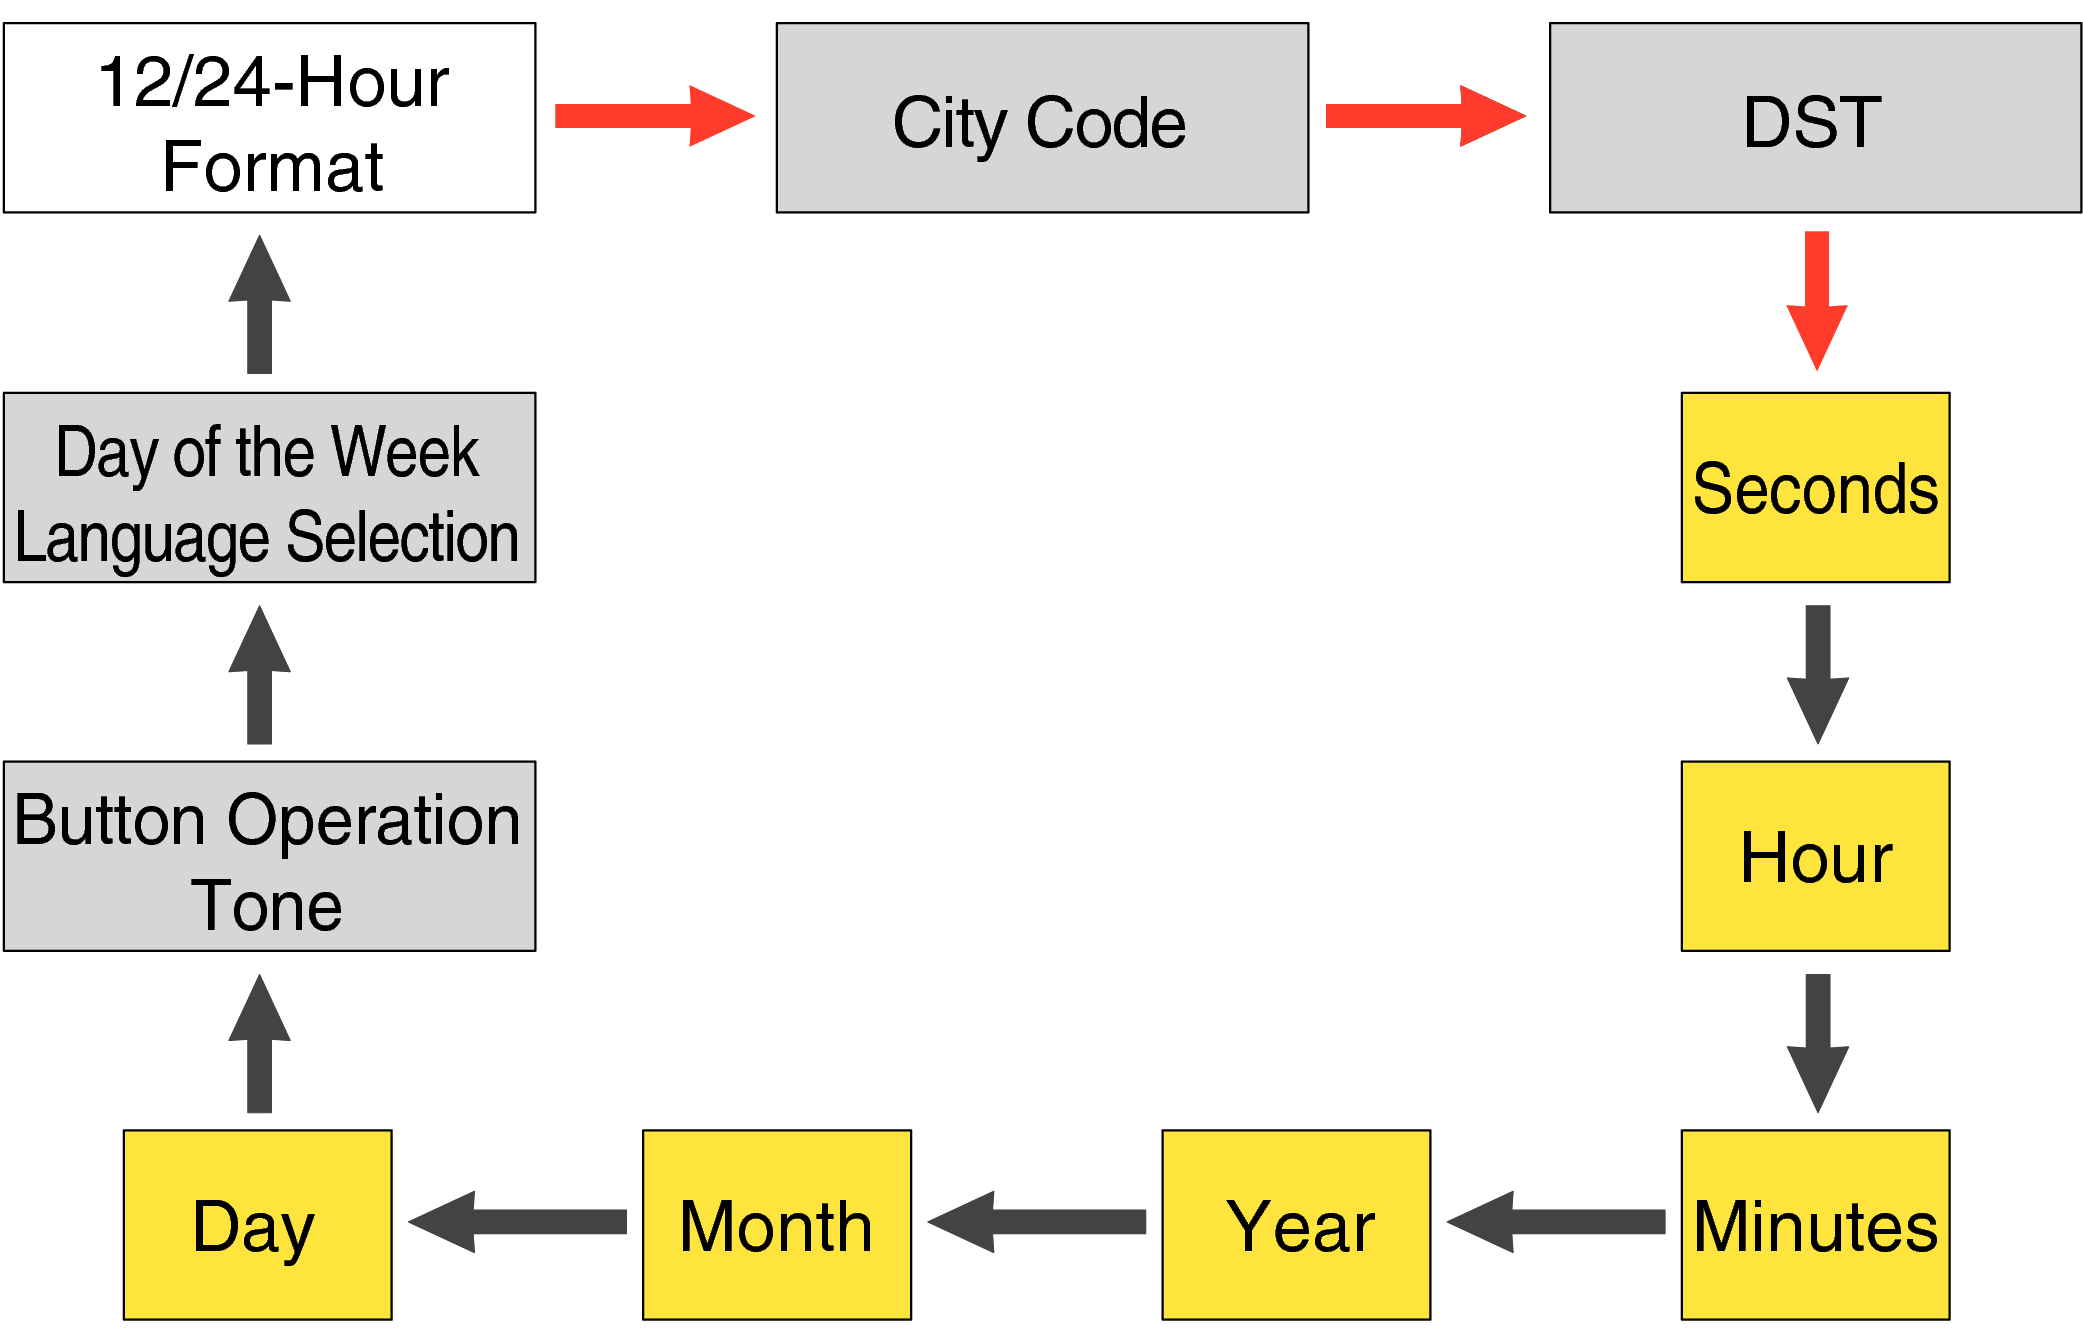
Each press of the lower left button will change the flashing part in the order of the chart above.
-
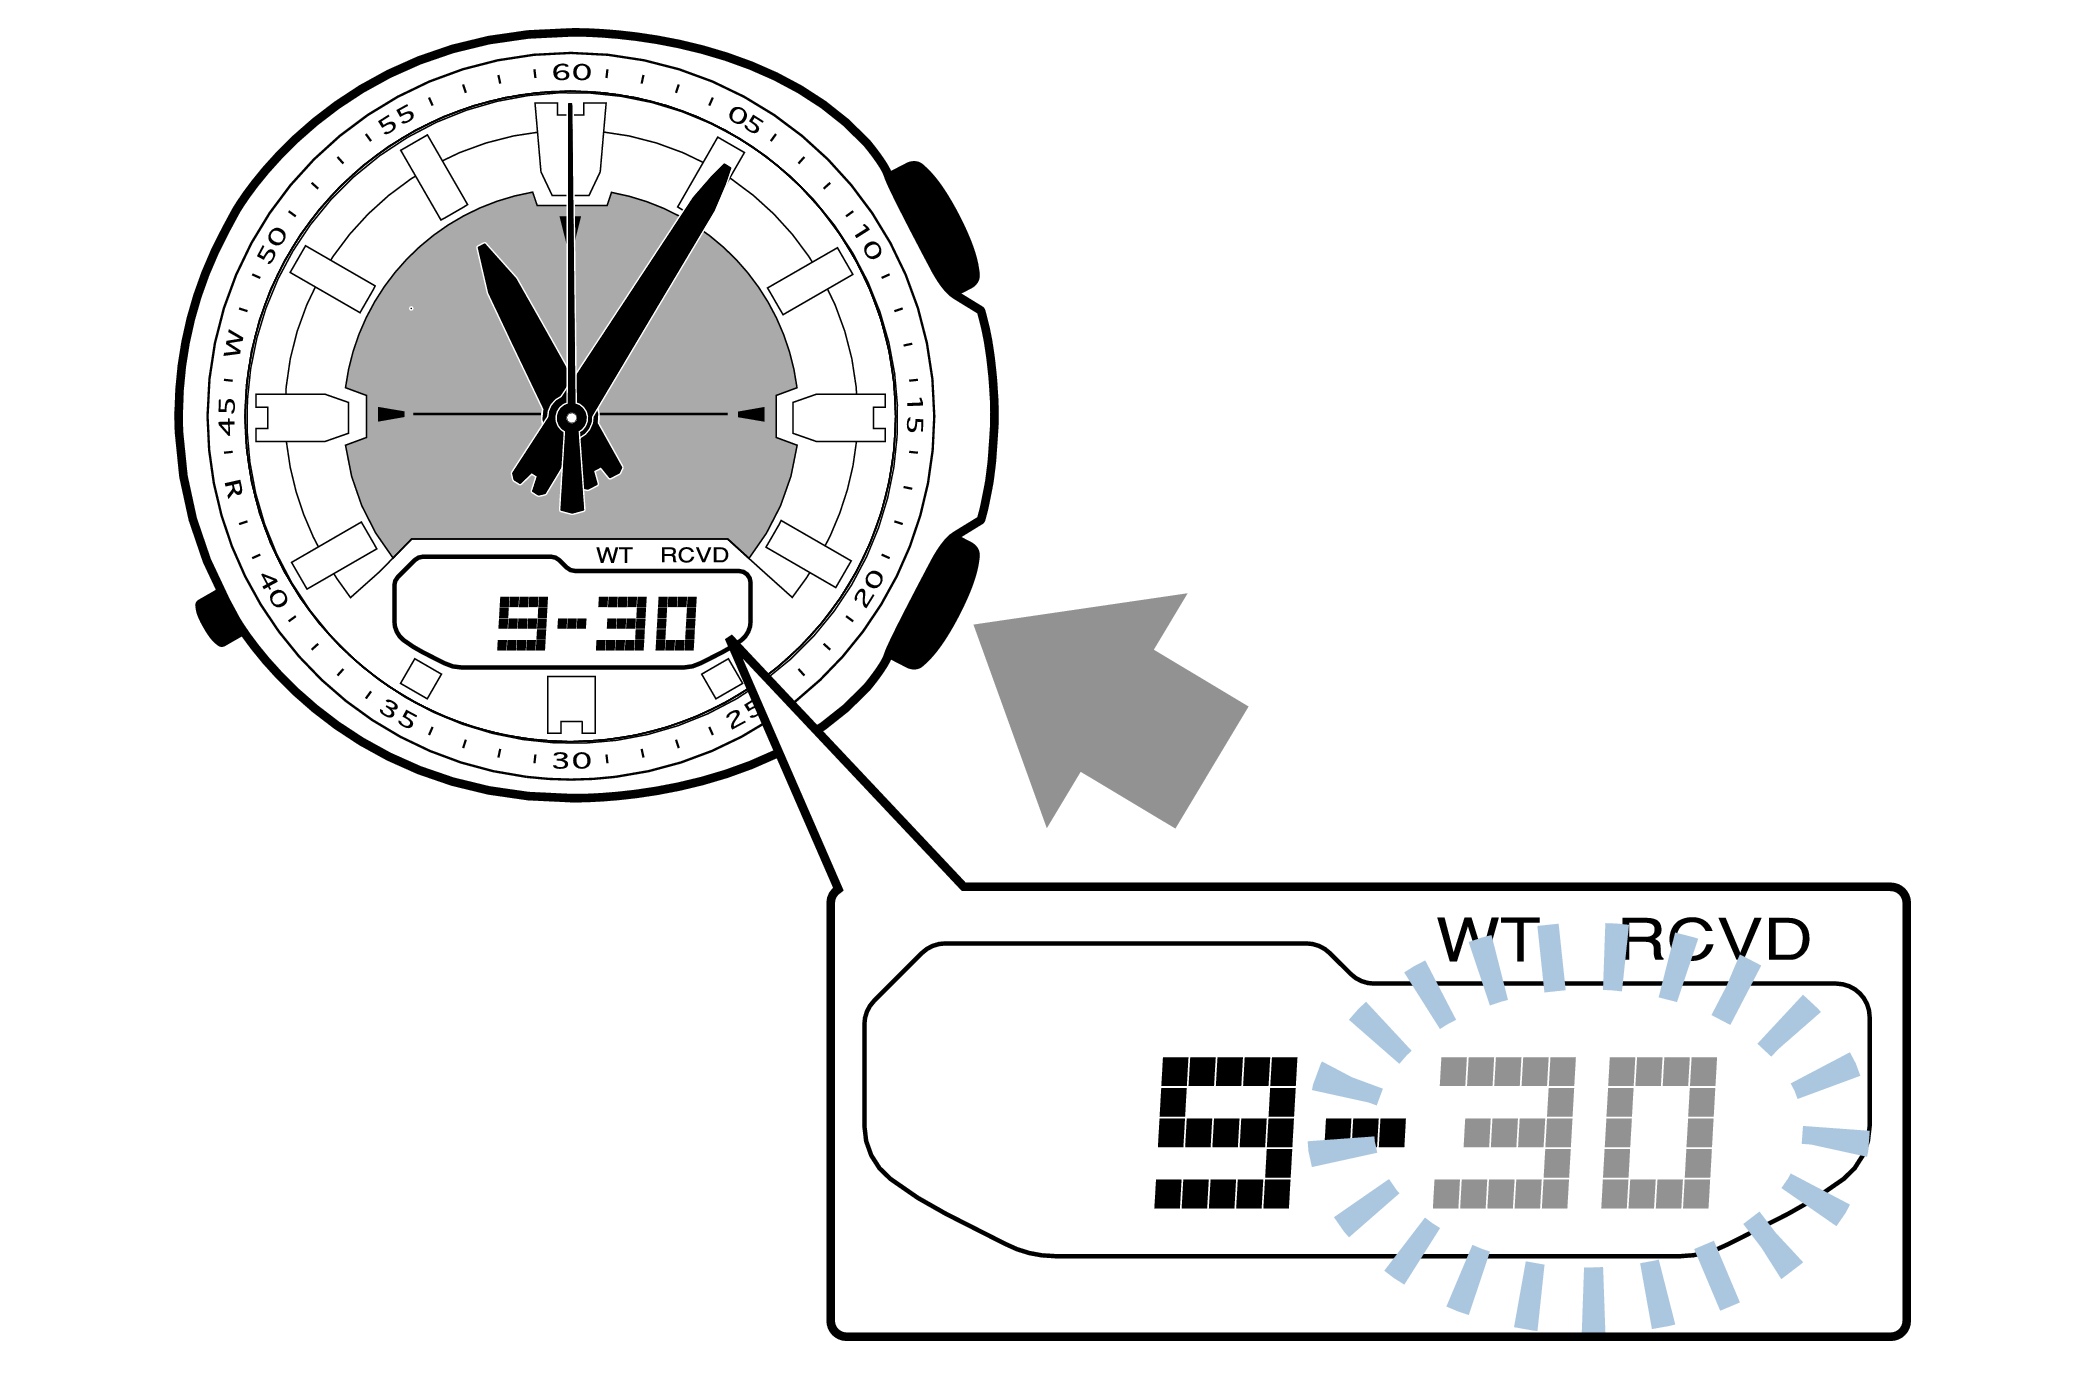
3.Press the lower right button and set the “seconds”.
-
Set the correct seconds based on a time signal service, etc.
-
4.Pressing the lower left button will switch to the “hour” setting.
-
With the 12-hour format selected, the “P” indicator will appear in the afternoon.
-
5.Press the lower right button and set the correct “hour”.
-
Each press of the button will advance it by one.
Holding down the button will quickly advance the hours, and releasing the button will make it stop.
-
6.Pressing the lower left button will switch to the “minute” setting.
-
-
7.Press the lower right button to set the correct “minutes”.
-
-
8.Pressing the lower left button will switch to the “year” setting.
-
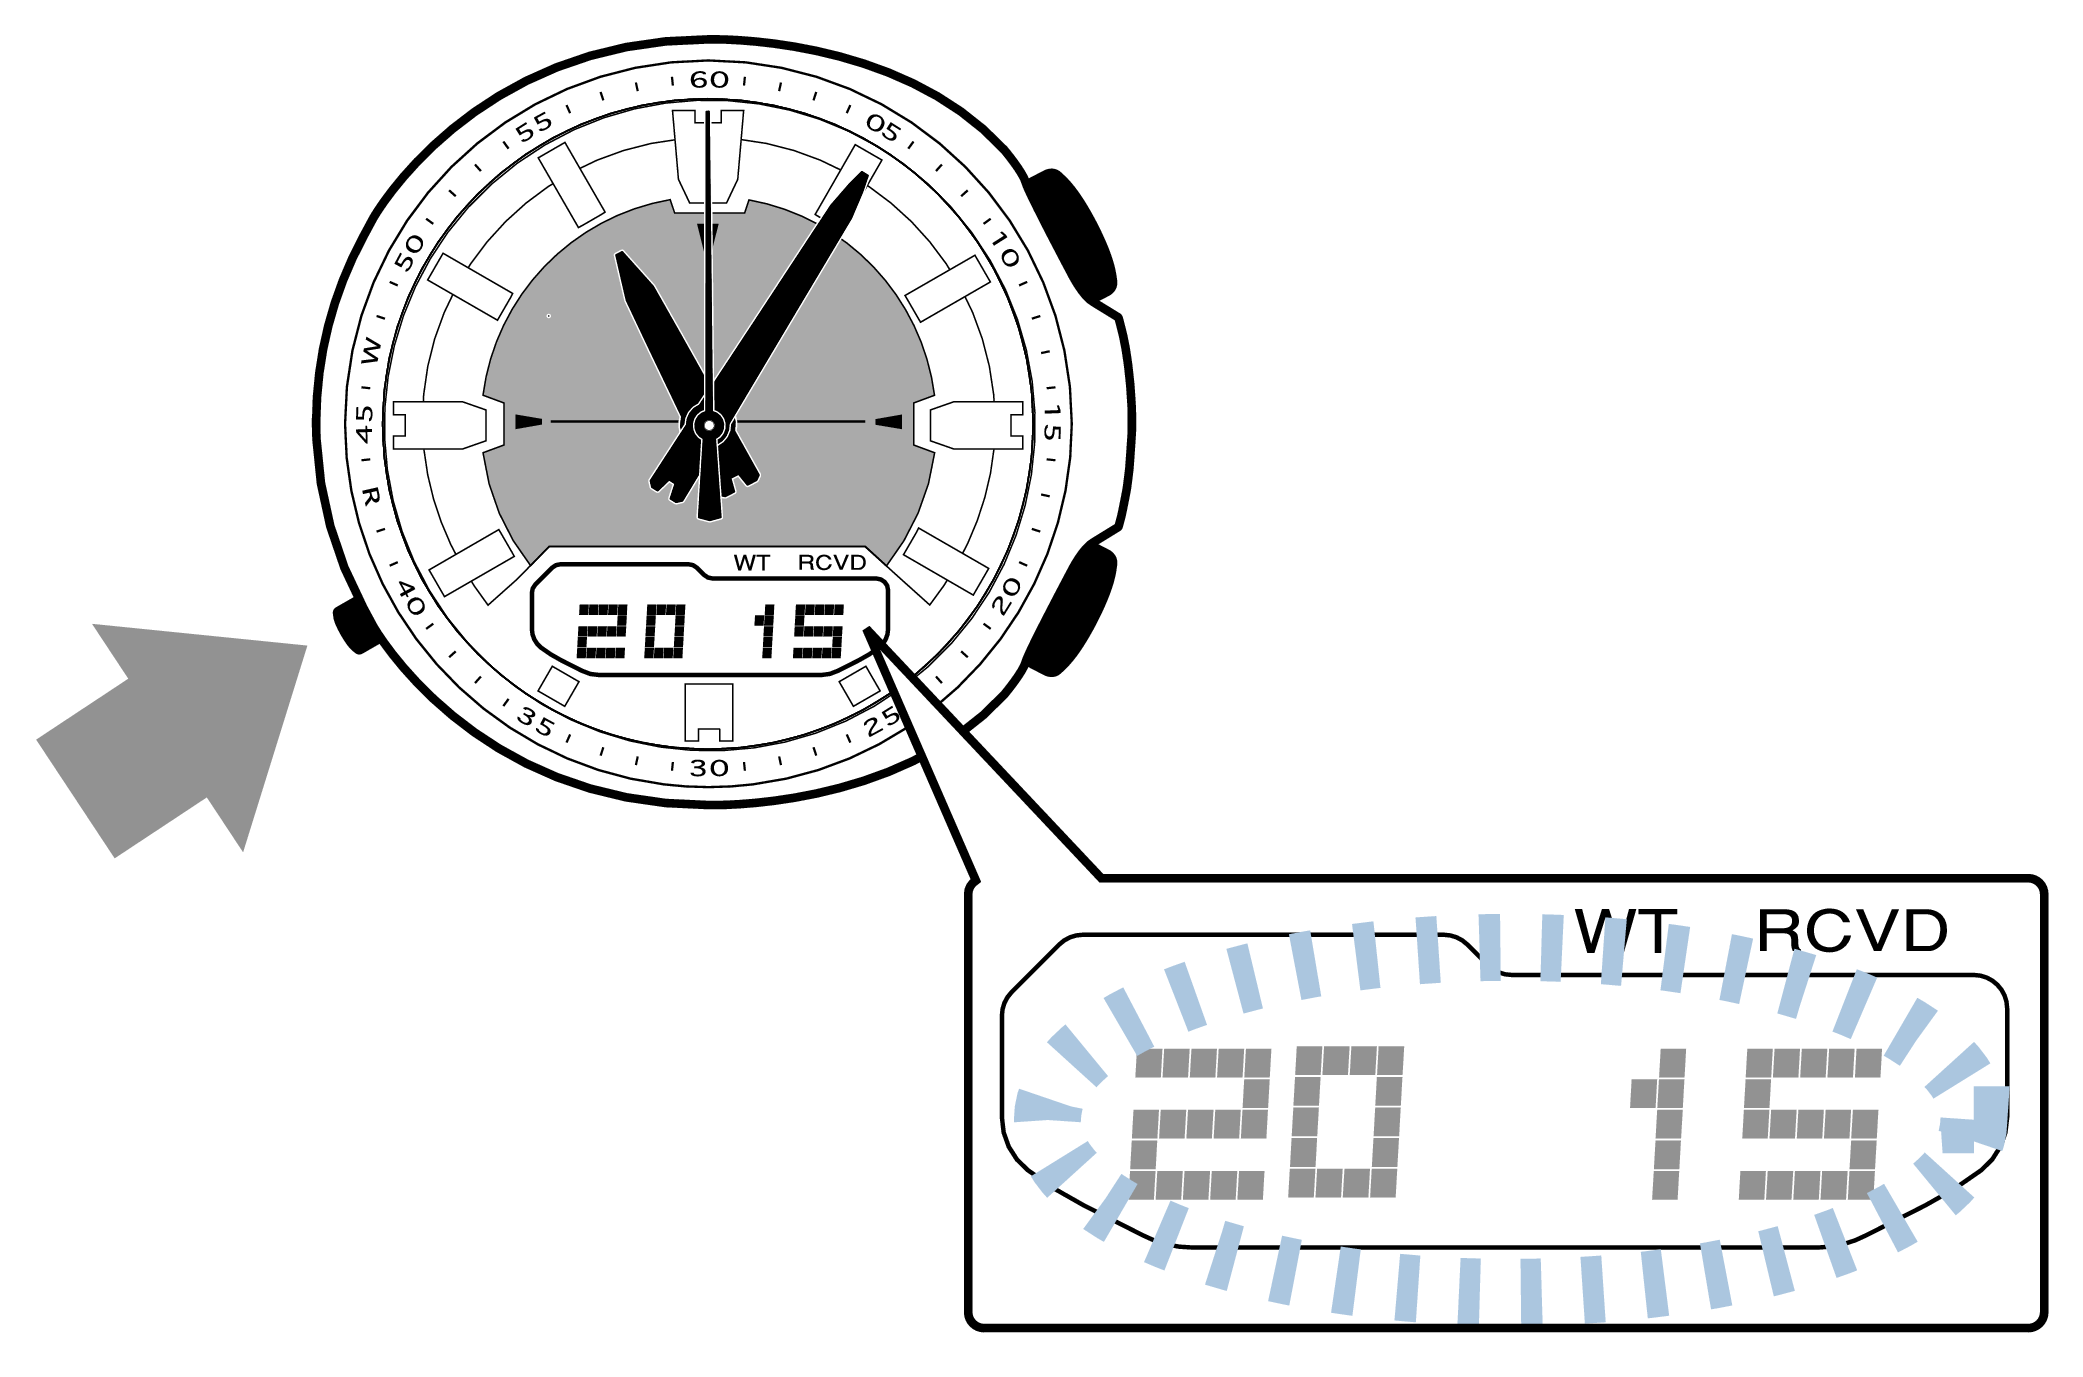
-
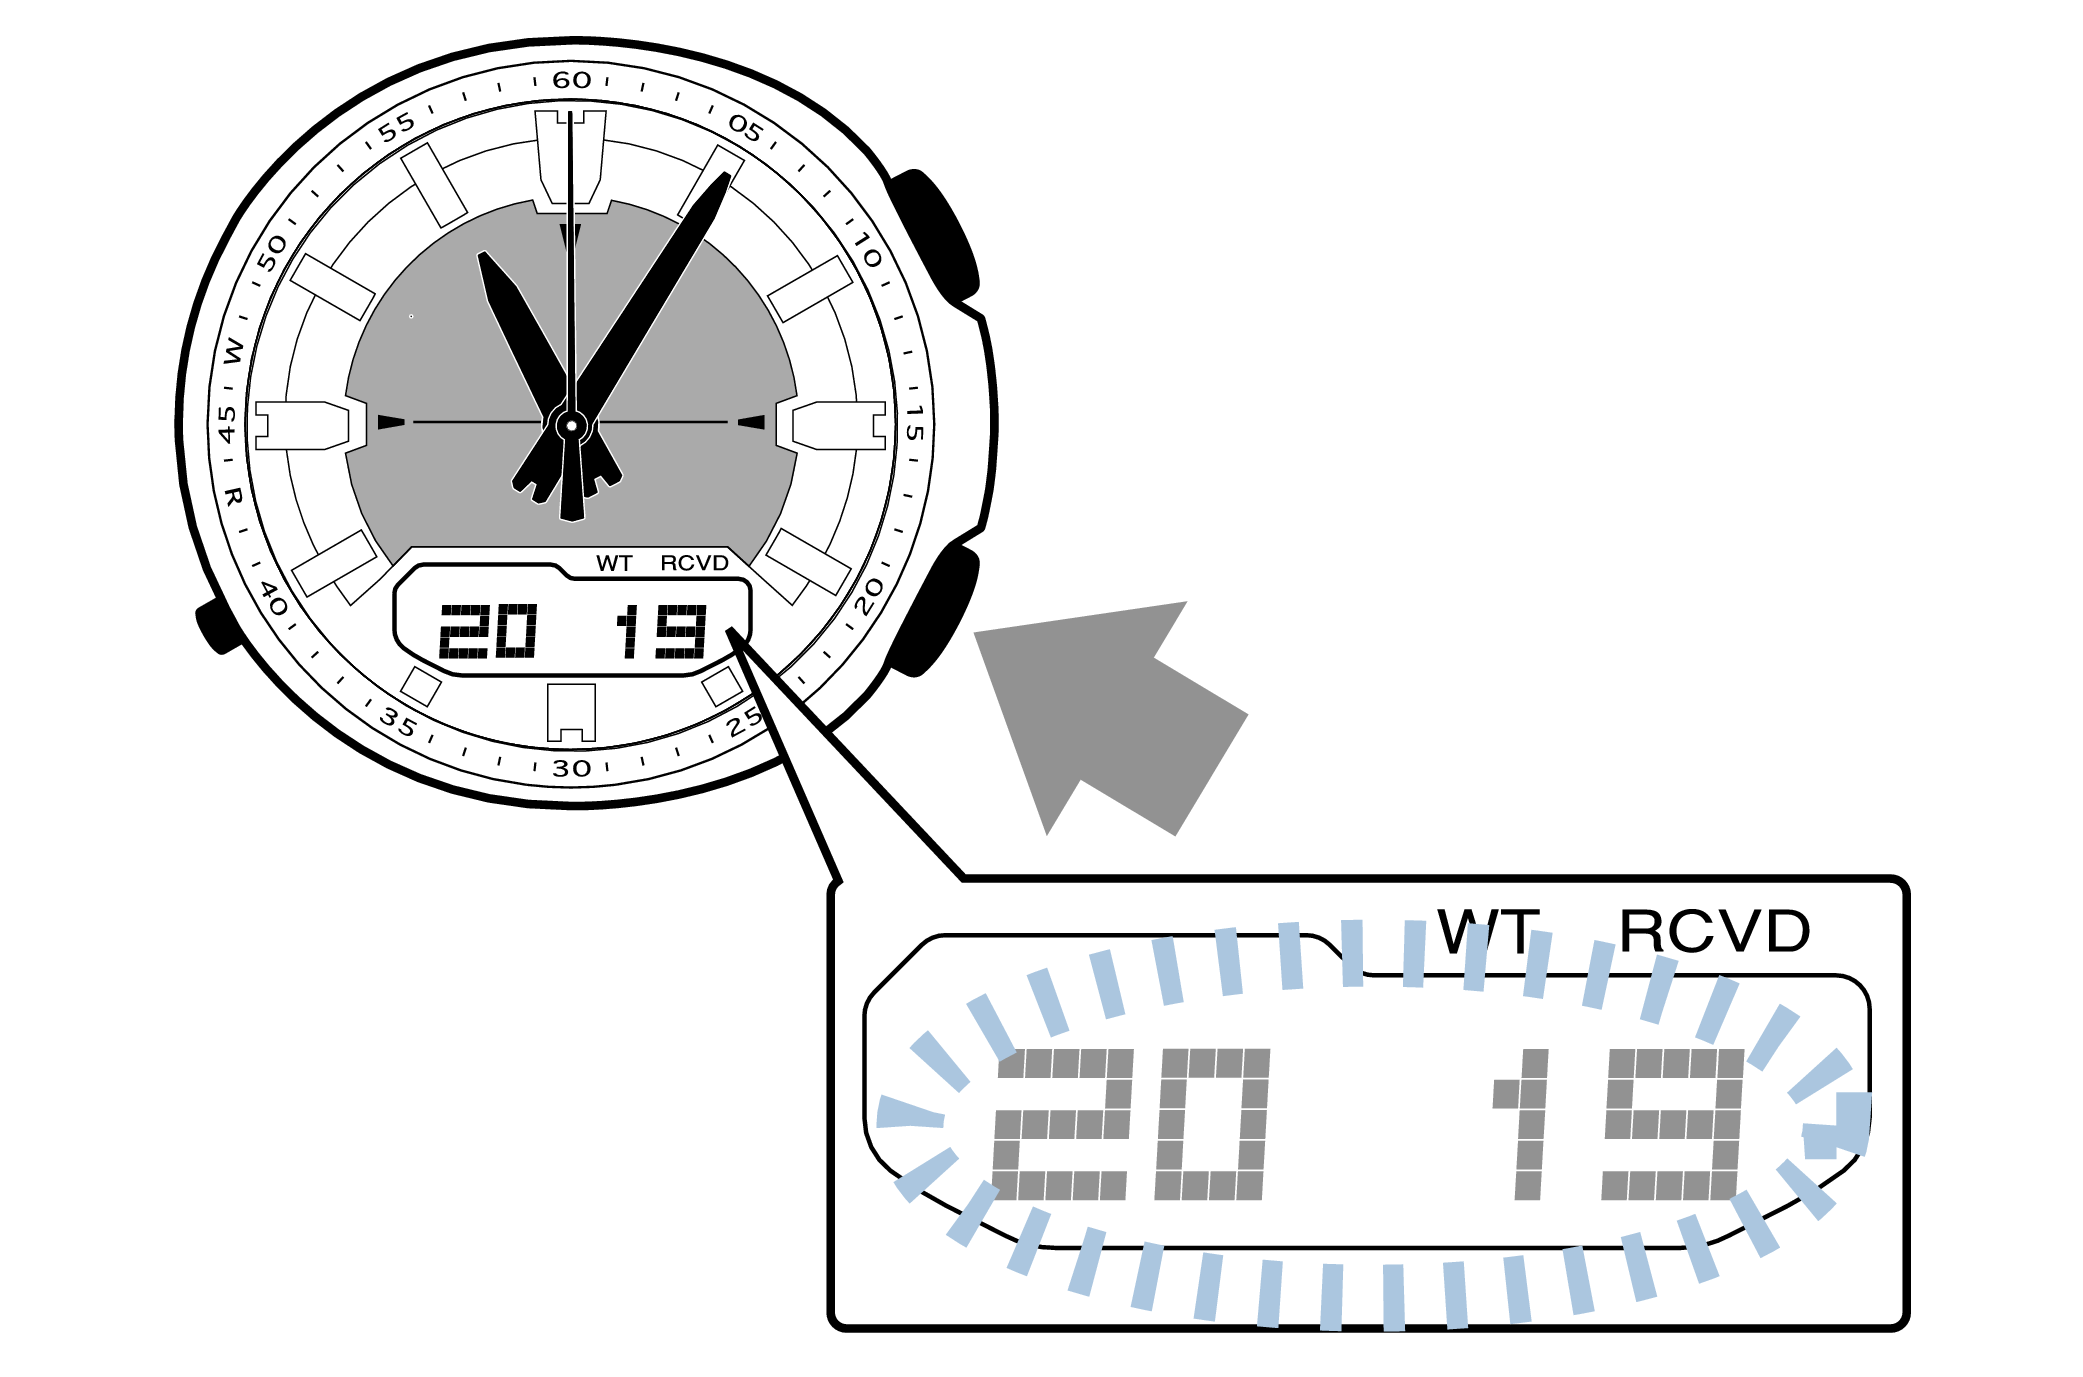
9.Press the lower right button to set the correct “year”.
-
The “year” can be set between 2000 and 2099. When the “year, month and day” are set correctly, the day of the week will be automatically calculated.
The calendar is a fully automatic calendar that will automatically determine leap years along with the number of days in a month.
-
10.Pressing the lower left button will switch to the “month” setting.
-
-
11.Press the lower right button to set the correct “month”.
-
-
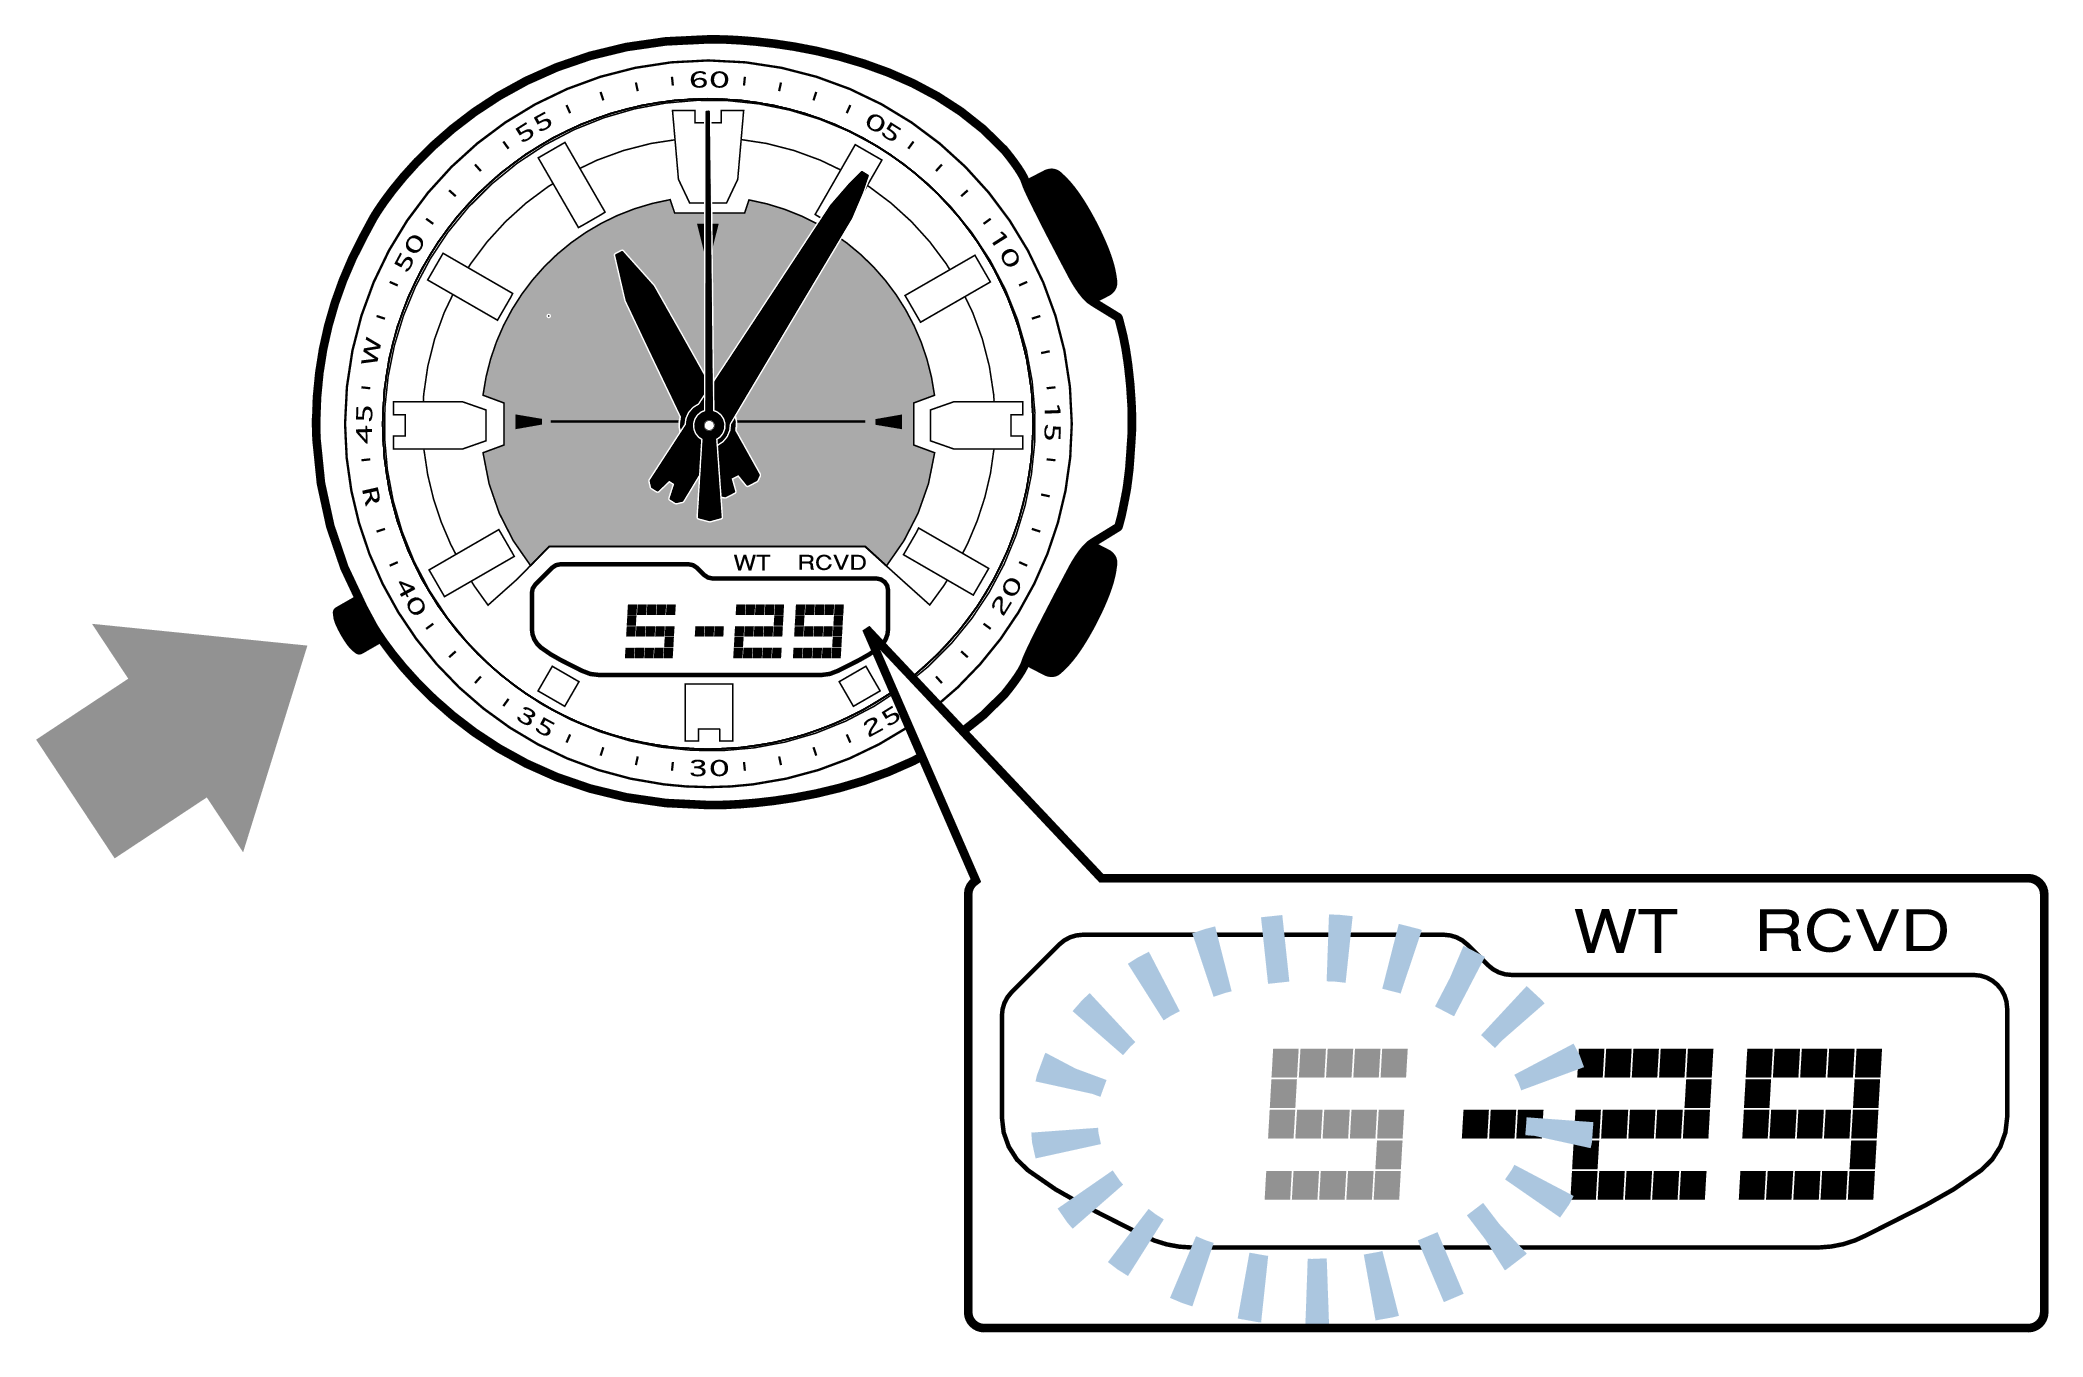
12.Pressing the lower left button will switch to the “day” setting.
-

-
13.Press the lower right button to set the correct “day”.
-
-
14.Press the upper right button to complete the configuration.
-
Are the hands correct?
Time Adjustment is completed
Correct the hand home position
-
1.Hold down the upper right button for approximately 6 seconds until “H.SET” is displayed on the digital display.
-
If the button is released when “H.SET” is displayed, “SEC 00” will flash on the digital display.
After holding down the button for approximately 3 seconds “ADJ” will appear, but continue to hold down the button.
“H.SET” will display, and if you continue to hold down the button it will return to Timekeeping Mode.
If you return to Timekeeping Mode, repeat this operation. -
2.If the second hand stops at any point other than 12 o’clock, press the lower right button to align it with 12 o’clock.
-
Pressing the button will advance the second hand by one second.
Holding down the button will quickly advance the hands, and pressing any button will make them stop.
-
3.Pressing the lower left button will switch to adjusting the hour and minute hands.
-
The hour and minute hands will move automatically, so please wait until the hands have stopped.
-
4.If the hour and minute hands stop at any point other than 12 o’clock, press the lower right button to align them with 12 o’clock.
-
Each press of the button will advance the hands.
The hour and minute hands will move at the same time.
Holding down the button will quickly advance the hands, and pressing any button will make them stop.
[Tip for adjusting the hands]
When advancing the hands, quickly pause them momentarily when they are near to 12 o’clock, and then set the hands to 12 o’clock using small increments.
-
5.Press the upper right button to complete the configuration.
-
Return to Timekeeping Mode, then the hands will advance to the current time and start to move.
When finished setting to the home position, check if the time shown by the hands in Timekeeping Mode and the time on the digital display match.
Time Adjustment is completed
-
2.Pressing the lower right button will switch the DST setting.
-
Each press of the button will switch between “AT” ⇒ “OFF” ⇒ “ON” ⇒ “AT”.
-
3.Press the upper right button to complete the configuration.
-
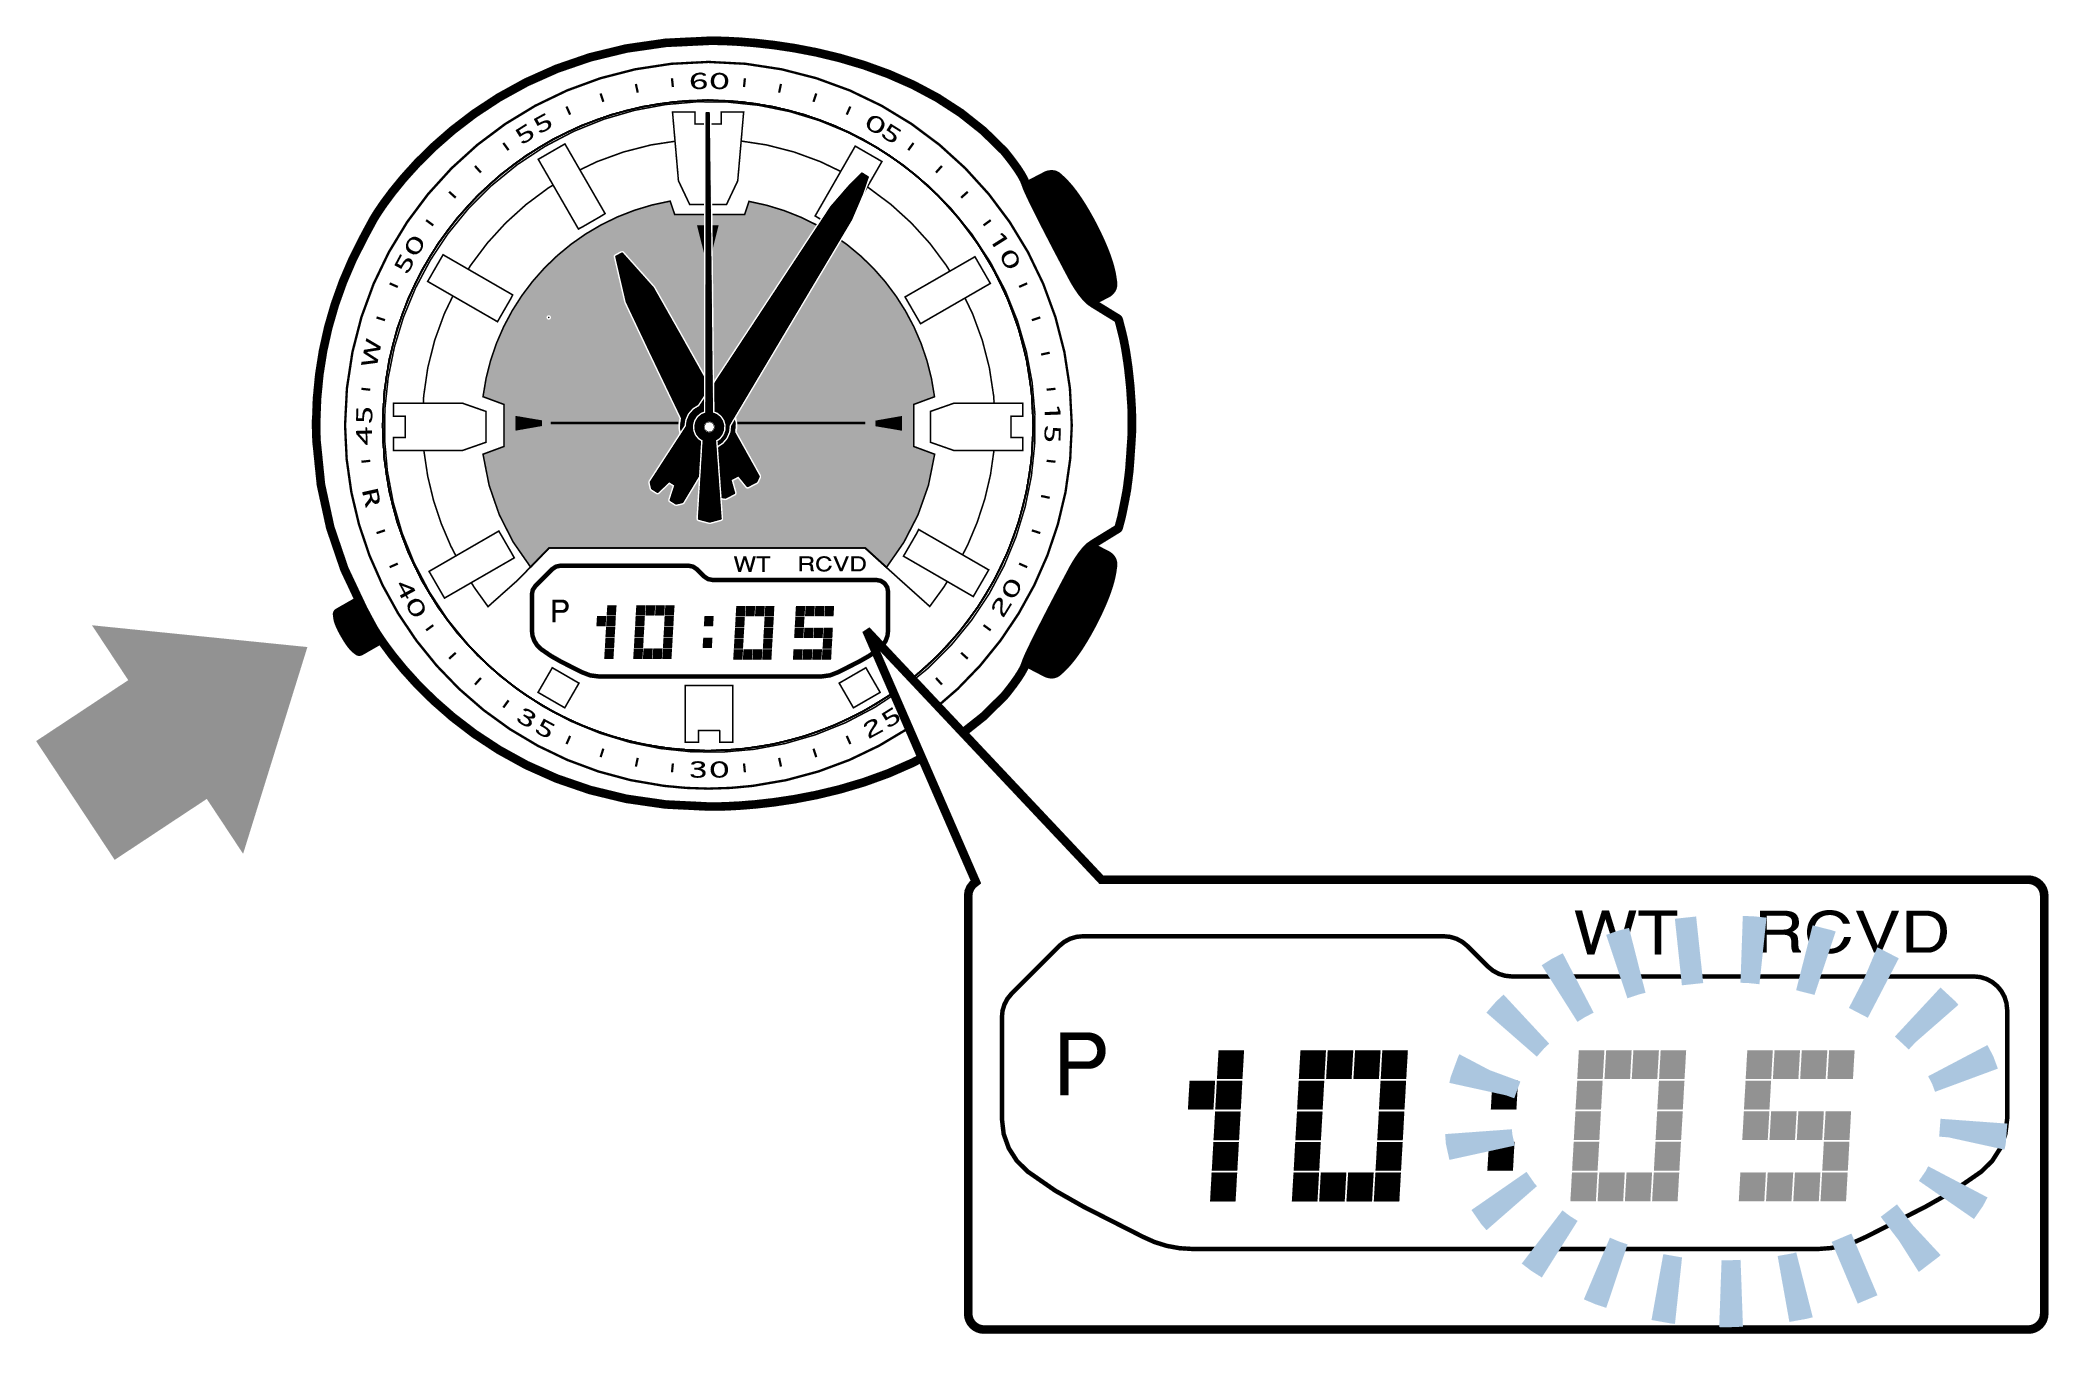
Is the digital display set to the correct time?
Are the hands correct?
Time Adjustment is completed
Correct the hand home position
-
1.Hold down the upper right button for approximately 6 seconds until “H.SET” is displayed on the digital display.
-
If the button is released when “H.SET” is displayed, “SEC 00” will flash on the digital display.
After holding down the button for approximately 3 seconds “ADJ” will appear, but continue to hold down the button.
“H.SET” will display, and if you continue to hold down the button it will return to Timekeeping Mode.
If you return to Timekeeping Mode, repeat this operation. -
2.If the second hand stops at any point other than 12 o’clock, press the lower right button to align it with 12 o’clock.
-
Pressing the button will advance the second hand by one second.
Holding down the button will quickly advance the hands, and pressing any button will make them stop.
-
3.Pressing the lower left button will switch to adjusting the hour and minute hands.
-
The hour and minute hands will move automatically, so please wait until the hands have stopped.
-
4.If the hour and minute hands stop at any point other than 12 o’clock, press the lower right button to align them with 12 o’clock.
-
Each press of the button will advance the hands.
The hour and minute hands will move at the same time.
Holding down the button will quickly advance the hands, and pressing any button will make them stop.
[Tip for adjusting the hands]
When advancing the hands, quickly pause them momentarily when they are near to 12 o’clock, and then set the hands to 12 o’clock using small increments.
-
5.Press the upper right button to complete the configuration.
-
Return to Timekeeping Mode, then the hands will advance to the current time and start to move.
When finished setting to the home position, check if the time shown by the hands in Timekeeping Mode and the time on the digital display match.
Time Adjustment is completed
Correct the time and date on the digital display
Set to the correct time (hours, minutes, seconds) and date (year, month, day).
-
1.Hold down the upper right button for approximately 3 seconds until “ADJ” is displayed on the digital display.
-
If you continue to hold it down “H.SET” will display, and if you continue further it will return to Timekeeping Mode.
If you return to Timekeeping Mode, repeat this operation.When you release the button after “ADJ” appears, “12H” or “24H” will flash.
-
2.Pressing the lower left button three times will switch to the “seconds” setting.
-
Each press of the lower left button will change the flashing part in the order of the chart above.
-
3.Press the lower right button and set the “seconds”.
-
Set the correct seconds based on a time signal service, etc.
-
4.Pressing the lower left button will switch to the “hour” setting.
-
With the 12-hour format selected, the “P” indicator will appear in the afternoon.
-
5.Press the lower right button and set the correct “hour”.
-
Each press of the button will advance it by one.
Holding down the button will quickly advance the hours, and releasing the button will make it stop.
-
6.Pressing the lower left button will switch to the “minute” setting.
-
-
7.Press the lower right button to set the correct “minutes”.
-
-
8.Pressing the lower left button will switch to the “year” setting.
-
-
9.Press the lower right button to set the correct “year”.
-
The “year” can be set between 2000 and 2099. When the “year, month and day” are set correctly, the day of the week will be automatically calculated.
The calendar is a fully automatic calendar that will automatically determine leap years along with the number of days in a month.
-
10.Pressing the lower left button will switch to the “month” setting.
-
-
11.Press the lower right button to set the correct “month”.
-
-
12.Pressing the lower left button will switch to the “day” setting.
-
-
13.Press the lower right button to set the correct “day”.
-
-
14.Press the upper right button to complete the configuration.
-
Are the hands correct?
Time Adjustment is completed
Correct the hand home position
-
1.Hold down the upper right button for approximately 6 seconds until “H.SET” is displayed on the digital display.
-
If the button is released when “H.SET” is displayed, “SEC 00” will flash on the digital display.
After holding down the button for approximately 3 seconds “ADJ” will appear, but continue to hold down the button.
“H.SET” will display, and if you continue to hold down the button it will return to Timekeeping Mode.
If you return to Timekeeping Mode, repeat this operation. -
2.If the second hand stops at any point other than 12 o’clock, press the lower right button to align it with 12 o’clock.
-
Pressing the button will advance the second hand by one second.
Holding down the button will quickly advance the hands, and pressing any button will make them stop.
-
3.Pressing the lower left button will switch to adjusting the hour and minute hands.
-
The hour and minute hands will move automatically, so please wait until the hands have stopped.
-
4.If the hour and minute hands stop at any point other than 12 o’clock, press the lower right button to align them with 12 o’clock.
-
Each press of the button will advance the hands.
The hour and minute hands will move at the same time.
Holding down the button will quickly advance the hands, and pressing any button will make them stop.
[Tip for adjusting the hands]
When advancing the hands, quickly pause them momentarily when they are near to 12 o’clock, and then set the hands to 12 o’clock using small increments.
-
5.Press the upper right button to complete the configuration.
-
Return to Timekeeping Mode, then the hands will advance to the current time and start to move.
When finished setting to the home position, check if the time shown by the hands in Timekeeping Mode and the time on the digital display match.
Time Adjustment is completed
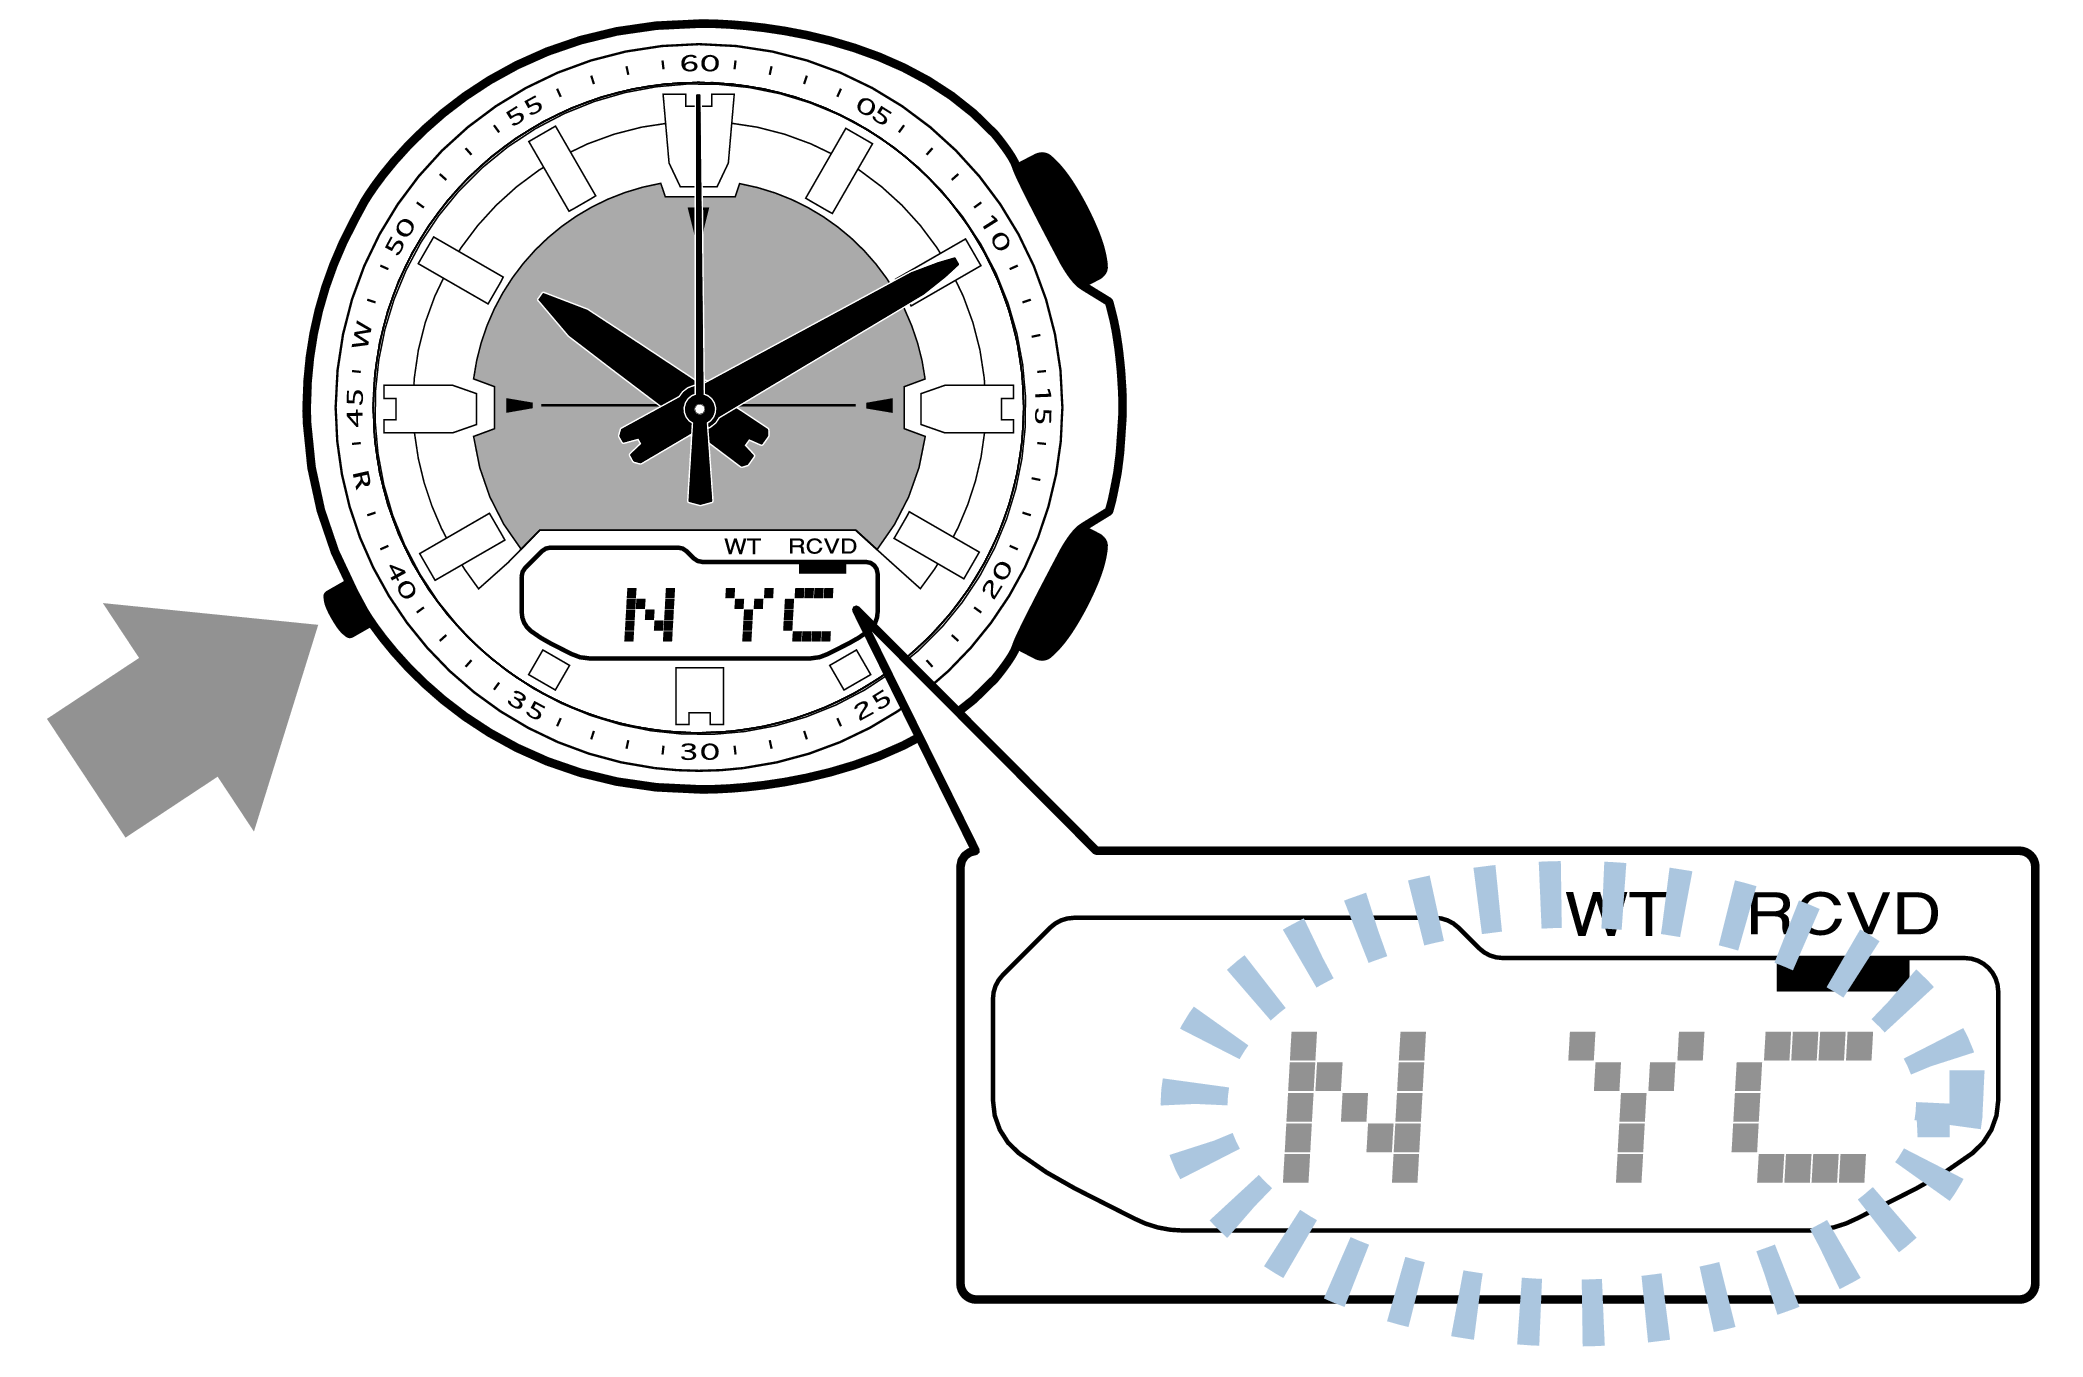
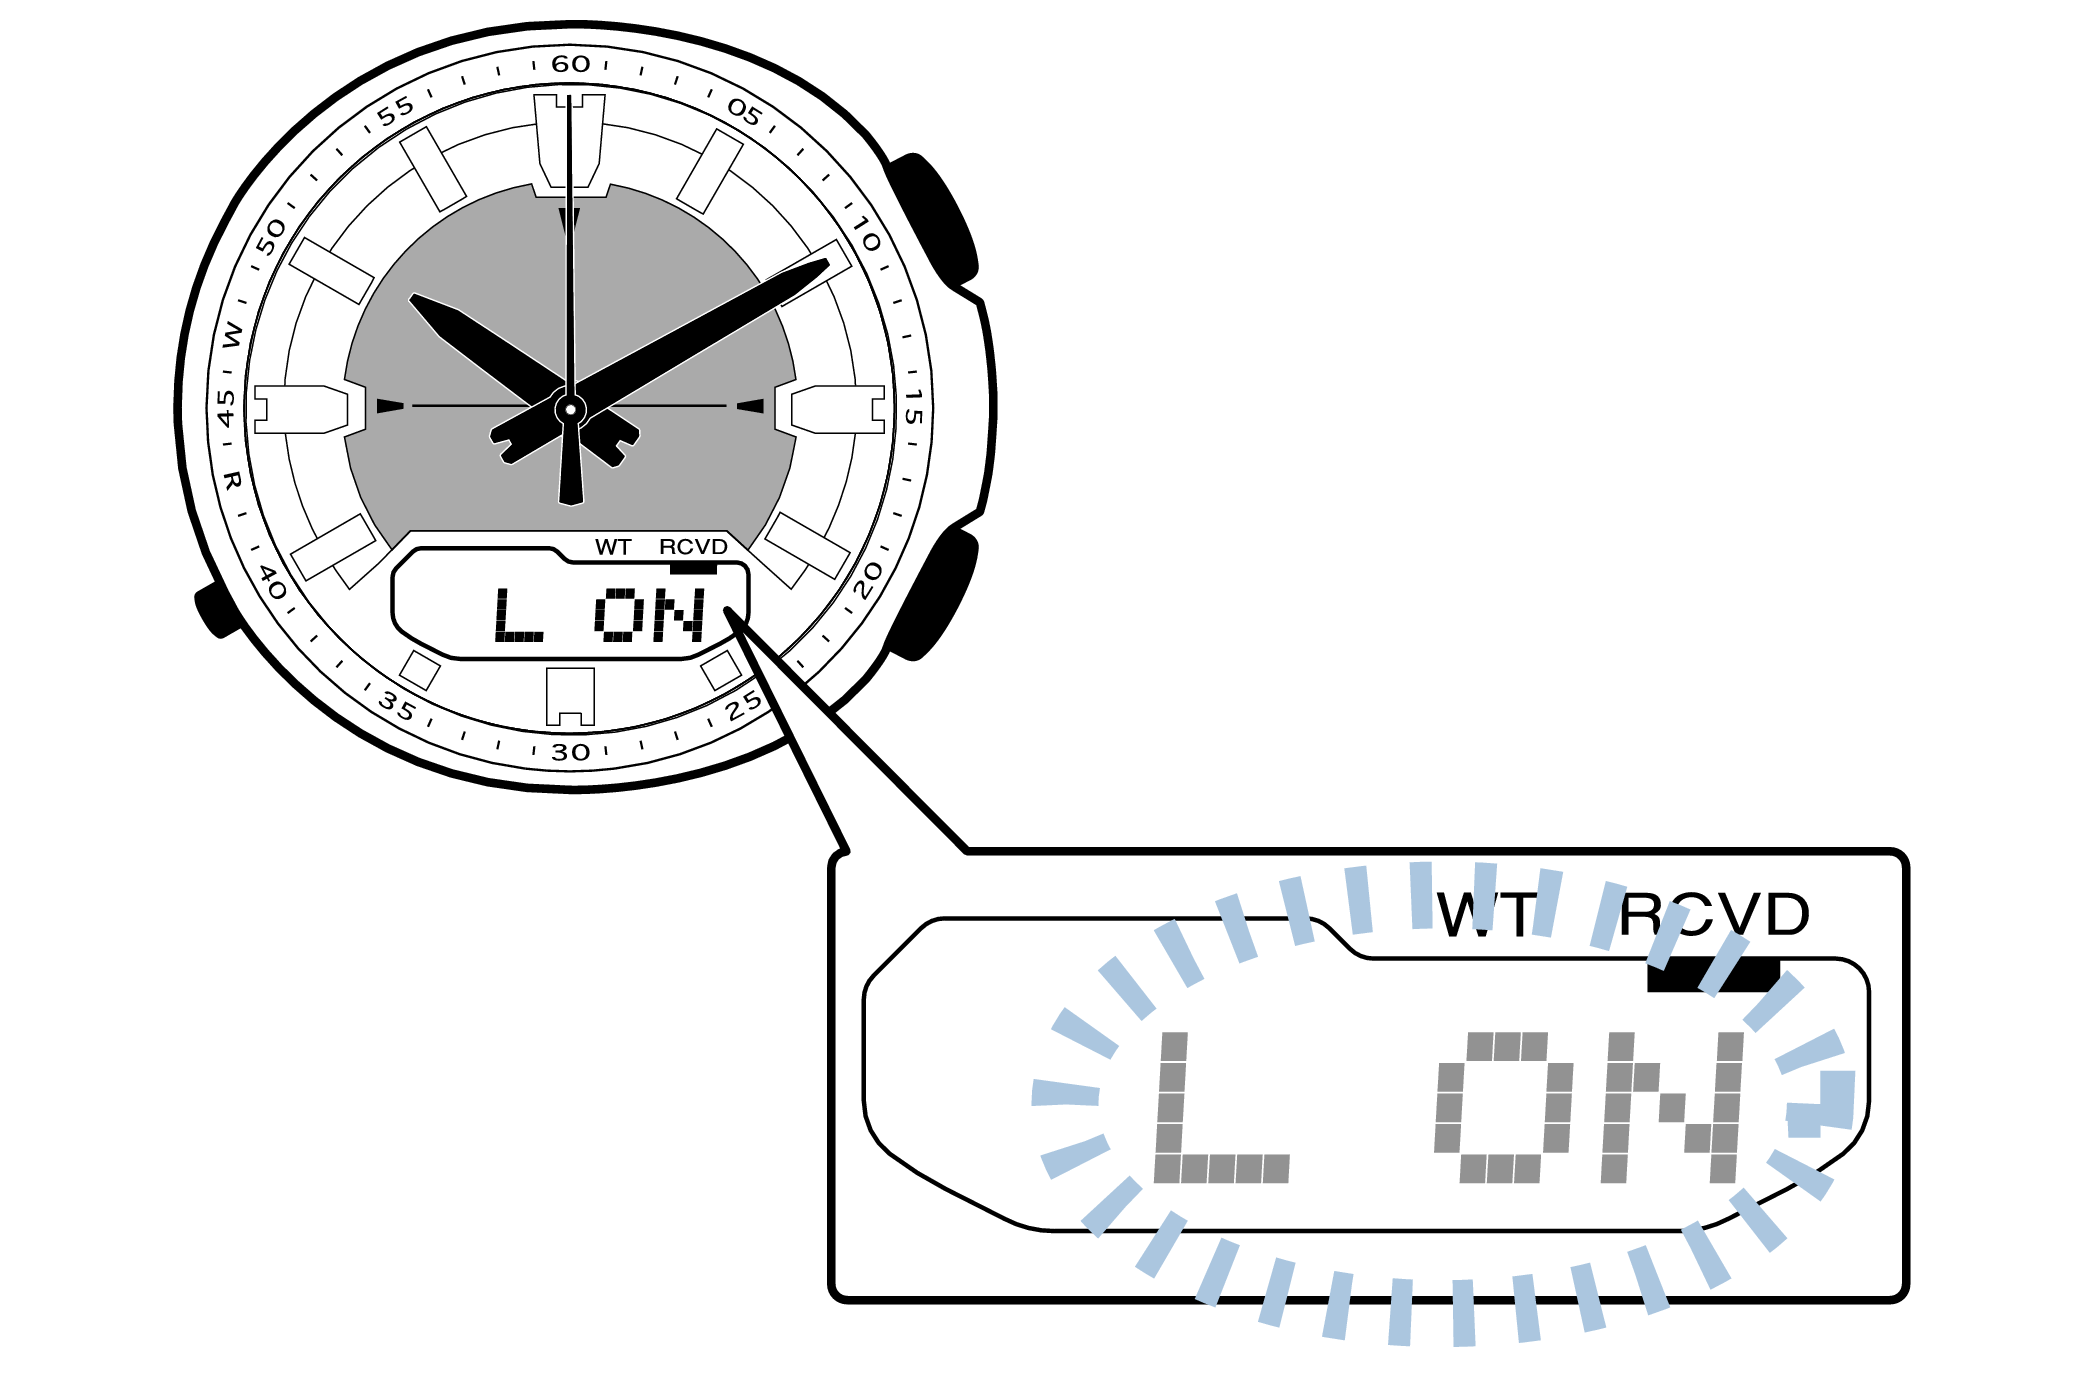
Example: Changing the city code from “LON” (London) to “NYC” (New York).
-
3.Press the lower right button until “NYC” is displayed on the digital display.
-
Each press of the button will change the city code.

City Code Table
|
City Code |
UTC Offset/GMT Differential |
City |
|---|---|---|
|
UTC |
0 |
|
|
LON |
0 |
London |
|
PAR |
+1 |
Paris |
|
ATH |
+2 |
Athens |
|
JED |
+3 |
Jeddah |
|
THR |
+3.5 |
Tehran |
|
DXB |
+4 |
Dubai |
|
KBL |
+4.5 |
Kabul |
|
KHI |
+5 |
Karachi |
|
DEL |
+5.5 |
Delhi |
|
KTM |
+5.75 |
Kathmandu |
|
DAC |
+6 |
Dhaka |
|
RGN |
+6.5 |
Yangon |
|
BKK |
+7 |
Bangkok |
|
HKG |
+8 |
Hong Kong |
|
City Code |
UTC Offset/GMT Differential |
City |
|---|---|---|
|
TYO |
+9 |
Tokyo |
|
ADL |
+9.5 |
Adelaide |
|
SYD |
+10 |
Sydney |
|
NOU |
+11 |
Nouméa |
|
WLG |
+12 |
Wellington |
|
PPG |
-11 |
Pago Pago |
|
HNL |
-10 |
Honolulu |
|
ANC |
-9 |
Anchorage |
|
LAX |
-8 |
Los Angeles |
|
DEN |
-7 |
Denver |
|
CHI |
-6 |
Chicago |
|
NYC |
-5 |
New York |
|
SCL |
-4 |
Santiago |
|
RIO |
-3 |
Rio De Janeiro |
|
RAI |
-1 |
Praia |
This table was created in December 2009.
Check the Summer Time (DST) setting
-
1.Pressing the lower left button will switch to the “Summer Time (DST) setting”.
-
Each press of the lower left button will change the flashing part in the order of the chart above.
Is the Summer Time (DST) setting displayed on the digital display correct?
When the summer time (DST) setting is ON, time will be one hour ahead of Standard Time.
When the summer time (DST) setting is set to AT, Summer Time will be automatically switched between ON and OFF using radio signals.
-
2.Press the upper right button to complete the configuration.
-
Is the digital display set to the correct time?
Are the hands correct?
Time Adjustment is completed
Correct the hand home position
-
1.Hold down the upper right button for approximately 6 seconds until “H.SET” is displayed on the digital display.
-
If the button is released when “H.SET” is displayed, “SEC 00” will flash on the digital display.
After holding down the button for approximately 3 seconds “ADJ” will appear, but continue to hold down the button.
“H.SET” will display, and if you continue to hold down the button it will return to Timekeeping Mode.
If you return to Timekeeping Mode, repeat this operation. -
2.If the second hand stops at any point other than 12 o’clock, press the lower right button to align it with 12 o’clock.
-
Pressing the button will advance the second hand by one second.
Holding down the button will quickly advance the hands, and pressing any button will make them stop.
-
3.Pressing the lower left button will switch to adjusting the hour and minute hands.
-
The hour and minute hands will move automatically, so please wait until the hands have stopped.
-
4.If the hour and minute hands stop at any point other than 12 o’clock, press the lower right button to align them with 12 o’clock.
-
Each press of the button will advance the hands.
The hour and minute hands will move at the same time.
Holding down the button will quickly advance the hands, and pressing any button will make them stop.
[Tip for adjusting the hands]
When advancing the hands, quickly pause them momentarily when they are near to 12 o’clock, and then set the hands to 12 o’clock using small increments.
-
5.Press the upper right button to complete the configuration.
-
Return to Timekeeping Mode, then the hands will advance to the current time and start to move.
When finished setting to the home position, check if the time shown by the hands in Timekeeping Mode and the time on the digital display match.
Time Adjustment is completed
Correct the time and date on the digital display
Set to the correct time (hours, minutes, seconds) and date (year, month, day).
-
1.Hold down the upper right button for approximately 3 seconds until “ADJ” is displayed on the digital display.
-
If you continue to hold it down “H.SET” will display, and if you continue further it will return to Timekeeping Mode.
If you return to Timekeeping Mode, repeat this operation.When you release the button after “ADJ” appears, “12H” or “24H” will flash.
-
2.Pressing the lower left button three times will switch to the “seconds” setting.
-
Each press of the lower left button will change the flashing part in the order of the chart above.
-
3.Press the lower right button and set the “seconds”.
-
Set the correct seconds based on a time signal service, etc.
-
4.Pressing the lower left button will switch to the “hour” setting.
-
With the 12-hour format selected, the “P” indicator will appear in the afternoon.
-
5.Press the lower right button and set the correct “hour”.
-
Each press of the button will advance it by one.
Holding down the button will quickly advance the hours, and releasing the button will make it stop.
-
6.Pressing the lower left button will switch to the “minute” setting.
-
-
7.Press the lower right button to set the correct “minutes”.
-
-
8.Pressing the lower left button will switch to the “year” setting.
-
-
9.Press the lower right button to set the correct “year”.
-
The “year” can be set between 2000 and 2099. When the “year, month and day” are set correctly, the day of the week will be automatically calculated.
The calendar is a fully automatic calendar that will automatically determine leap years along with the number of days in a month.
-
10.Pressing the lower left button will switch to the “month” setting.
-
-
11.Press the lower right button to set the correct “month”.
-
-
12.Pressing the lower left button will switch to the “day” setting.
-
-
13.Press the lower right button to set the correct “day”.
-
-
14.Press the upper right button to complete the configuration.
-
Are the hands correct?
Time Adjustment is completed
Correct the hand home position
-
1.Hold down the upper right button for approximately 6 seconds until “H.SET” is displayed on the digital display.
-
If the button is released when “H.SET” is displayed, “SEC 00” will flash on the digital display.
After holding down the button for approximately 3 seconds “ADJ” will appear, but continue to hold down the button.
“H.SET” will display, and if you continue to hold down the button it will return to Timekeeping Mode.
If you return to Timekeeping Mode, repeat this operation. -
2.If the second hand stops at any point other than 12 o’clock, press the lower right button to align it with 12 o’clock.
-
Pressing the button will advance the second hand by one second.
Holding down the button will quickly advance the hands, and pressing any button will make them stop.
-
3.Pressing the lower left button will switch to adjusting the hour and minute hands.
-
The hour and minute hands will move automatically, so please wait until the hands have stopped.
-
4.If the hour and minute hands stop at any point other than 12 o’clock, press the lower right button to align them with 12 o’clock.
-
Each press of the button will advance the hands.
The hour and minute hands will move at the same time.
Holding down the button will quickly advance the hands, and pressing any button will make them stop.
[Tip for adjusting the hands]
When advancing the hands, quickly pause them momentarily when they are near to 12 o’clock, and then set the hands to 12 o’clock using small increments.
-
5.Press the upper right button to complete the configuration.
-
Return to Timekeeping Mode, then the hands will advance to the current time and start to move.
When finished setting to the home position, check if the time shown by the hands in Timekeeping Mode and the time on the digital display match.
Time Adjustment is completed
-
2.Pressing the lower right button will switch the DST setting.
-
Each press of the button will switch between “AT” ⇒ “OFF” ⇒ “ON” ⇒ “AT”.
-
3.Press the upper right button to complete the configuration.
-
Is the digital display set to the correct time?
Are the hands correct?
Time Adjustment is completed
Correct the hand home position
-
1.Hold down the upper right button for approximately 6 seconds until “H.SET” is displayed on the digital display.
-
If the button is released when “H.SET” is displayed, “SEC 00” will flash on the digital display.
After holding down the button for approximately 3 seconds “ADJ” will appear, but continue to hold down the button.
“H.SET” will display, and if you continue to hold down the button it will return to Timekeeping Mode.
If you return to Timekeeping Mode, repeat this operation. -
2.If the second hand stops at any point other than 12 o’clock, press the lower right button to align it with 12 o’clock.
-
Pressing the button will advance the second hand by one second.
Holding down the button will quickly advance the hands, and pressing any button will make them stop.
-
3.Pressing the lower left button will switch to adjusting the hour and minute hands.
-
The hour and minute hands will move automatically, so please wait until the hands have stopped.
-
4.If the hour and minute hands stop at any point other than 12 o’clock, press the lower right button to align them with 12 o’clock.
-
Each press of the button will advance the hands.
The hour and minute hands will move at the same time.
Holding down the button will quickly advance the hands, and pressing any button will make them stop.
[Tip for adjusting the hands]
When advancing the hands, quickly pause them momentarily when they are near to 12 o’clock, and then set the hands to 12 o’clock using small increments.
-
5.Press the upper right button to complete the configuration.
-
Return to Timekeeping Mode, then the hands will advance to the current time and start to move.
When finished setting to the home position, check if the time shown by the hands in Timekeeping Mode and the time on the digital display match.
Time Adjustment is completed
Correct the time and date on the digital display
Set to the correct time (hours, minutes, seconds) and date (year, month, day).
-
1.Hold down the upper right button for approximately 3 seconds until “ADJ” is displayed on the digital display.
-
If you continue to hold it down “H.SET” will display, and if you continue further it will return to Timekeeping Mode.
If you return to Timekeeping Mode, repeat this operation.When you release the button after “ADJ” appears, “12H” or “24H” will flash.
-
2.Pressing the lower left button three times will switch to the “seconds” setting.
-
Each press of the lower left button will change the flashing part in the order of the chart above.
-
3.Press the lower right button and set the “seconds”.
-
Set the correct seconds based on a time signal service, etc.
-
4.Pressing the lower left button will switch to the “hour” setting.
-
With the 12-hour format selected, the “P” indicator will appear in the afternoon.
-
5.Press the lower right button and set the correct “hour”.
-
Each press of the button will advance it by one.
Holding down the button will quickly advance the hours, and releasing the button will make it stop.
-
6.Pressing the lower left button will switch to the “minute” setting.
-
-
7.Press the lower right button to set the correct “minutes”.
-
-
8.Pressing the lower left button will switch to the “year” setting.
-
-
9.Press the lower right button to set the correct “year”.
-
The “year” can be set between 2000 and 2099. When the “year, month and day” are set correctly, the day of the week will be automatically calculated.
The calendar is a fully automatic calendar that will automatically determine leap years along with the number of days in a month.
-
10.Pressing the lower left button will switch to the “month” setting.
-
-
11.Press the lower right button to set the correct “month”.
-
-
12.Pressing the lower left button will switch to the “day” setting.
-
-
13.Press the lower right button to set the correct “day”.
-
-
14.Press the upper right button to complete the configuration.
-
Are the hands correct?
Time Adjustment is completed
Correct the hand home position
-
1.Hold down the upper right button for approximately 6 seconds until “H.SET” is displayed on the digital display.
-
If the button is released when “H.SET” is displayed, “SEC 00” will flash on the digital display.
After holding down the button for approximately 3 seconds “ADJ” will appear, but continue to hold down the button.
“H.SET” will display, and if you continue to hold down the button it will return to Timekeeping Mode.
If you return to Timekeeping Mode, repeat this operation. -
2.If the second hand stops at any point other than 12 o’clock, press the lower right button to align it with 12 o’clock.
-
Pressing the button will advance the second hand by one second.
Holding down the button will quickly advance the hands, and pressing any button will make them stop.
-
3.Pressing the lower left button will switch to adjusting the hour and minute hands.
-
The hour and minute hands will move automatically, so please wait until the hands have stopped.
-
4.If the hour and minute hands stop at any point other than 12 o’clock, press the lower right button to align them with 12 o’clock.
-
Each press of the button will advance the hands.
The hour and minute hands will move at the same time.
Holding down the button will quickly advance the hands, and pressing any button will make them stop.
[Tip for adjusting the hands]
When advancing the hands, quickly pause them momentarily when they are near to 12 o’clock, and then set the hands to 12 o’clock using small increments.
-
5.Press the upper right button to complete the configuration.
-
Return to Timekeeping Mode, then the hands will advance to the current time and start to move.
When finished setting to the home position, check if the time shown by the hands in Timekeeping Mode and the time on the digital display match.
Time Adjustment is completed
Correct the hand home position
-
1.Hold down the upper right button for approximately 6 seconds until “H.SET” is displayed on the digital display.
-
If the button is released when “H.SET” is displayed, “SEC 00” will flash on the digital display.
After holding down the button for approximately 3 seconds “ADJ” will appear, but continue to hold down the button.
“H.SET” will display, and if you continue to hold down the button it will return to Timekeeping Mode.
If you return to Timekeeping Mode, repeat this operation. -
2.If the second hand stops at any point other than 12 o’clock, press the lower right button to align it with 12 o’clock.
-
Pressing the button will advance the second hand by one second.
Holding down the button will quickly advance the hands, and pressing any button will make them stop.
-
3.Pressing the lower left button will switch to adjusting the hour and minute hands.
-
The hour and minute hands will move automatically, so please wait until the hands have stopped.
-
4.If the hour and minute hands stop at any point other than 12 o’clock, press the lower right button to align them with 12 o’clock.
-
Each press of the button will advance the hands.
The hour and minute hands will move at the same time.
Holding down the button will quickly advance the hands, and pressing any button will make them stop.
[Tip for adjusting the hands]
When advancing the hands, quickly pause them momentarily when they are near to 12 o’clock, and then set the hands to 12 o’clock using small increments.
-
5.Press the upper right button to complete the configuration.
-
Return to Timekeeping Mode, then the hands will advance to the current time and start to move.
When finished setting to the home position, check if the time shown by the hands in Timekeeping Mode and the time on the digital display match.