Click the C3Ofs*033A**5.zip download file link above.
2)
On the file save dialog box that appears, specify the location where you want to save the download file and then click the [Save] button. This will download a self-extracting file to your computer.
3)
Next, use the same steps to download XJA033_kernel.zip.
To install the update software on your projector
•
Power failure or disconnecting the USB memory device being used for installation while installation is in progress will cause your projector to lose its USB function. Take care that your projector is operating in a stable environment during installation.
Getting Ready: USB Function (Application)
1)
Extract the file you downloaded.
*
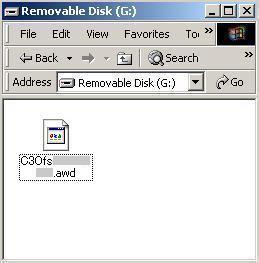
Extract the file you downloaded. C3Ofs*033A**5.zip extracts to C3Ofs*033A**5.awd.
2)
Copy the extracted file (O3Cfs*033A**5.awd) to the root directory of the USB device. Make sure that the copied file is the only file in the USB device's root directory.
Installation: USB Function (Application)
3)
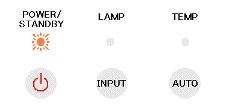
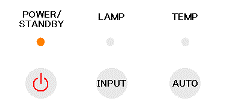
First put the projector into standby. Next, on the projector, hold down the [MENU], [ZOOM], and [AUTO] buttons at the same time for at least five seconds. This will cause the indicators to change as shown below.
Indicators:
Orange flashing / Unlit / Unlit
Projector status:
Preparing for installation
4)
You can release all of the buttons after the indicators appear as shown above. After a few moments, the indicators will change as shown below.
Indicators:
Orange flashing / Orange lit / Unlit
Projector status:
Preparing for installation (Standing by for USB connection.)
5)
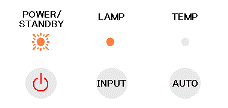
After the indicators appear as shown above, connect the memory device that contains the copied file (O3Cfs*033A**5.awd) to the projector. After a few moments, the indicators will change as shown below and installation will start. (Installation time: Approximately 7 minutes)
Indicators:
Orange flashing / Green lit / Green flashing
Projector status:
Installation in progress
6)
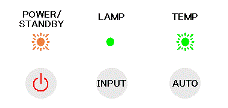
The indicators will change as shown below after installation is complete.
Indicators:
Orange flashing / Green lit / Green lit
Projector status:
Installation complete
7)
After installation is complete, unplug the power cord and the USB memory device from the projector.
Preparation: USB Function (Kernel)
8)
Extract the file you downloaded.
*
Extract the file you downloaded. XJA033_kernel.zip extracts to kernel.awd.
9)
Copy the extracted file (kernel.awd) to the root directory of the USB device. Make sure that the copied file is the only file in the USB device's root directory.
Installation: USB Function (Kernel)
10)
First put the projector into standby. Next, on the projector, hold down the [MENU], [ZOOM], and [AUTO] buttons at the same time for at least five seconds. This will cause the indicators to change as shown below.
Indicators:
Orange flashing / Unlit / Unlit
Projector status:
Preparing for installation
11)
You can release all of the buttons after the indicators appear as shown above. After a few moments, the indicators will change as shown below.
Indicators:
Orange flashing / Orange lit / Unlit
Projector status:
Preparing for installation (Standing by for USB connection.)
12)
After the indicators appear as shown above, connect the memory device that contains the copied file (kernel.awd) to the projector. After a few moments, the indicators will change as shown below and installation will start. (Installation time: Approximately 3 minutes)
Indicators:
Orange flashing / Green lit / Green flashing
Projector status:
Installation in progress
13)
The indicators will change as shown below after installation is complete.
Indicators:
Orange flashing / Green lit / Green lit
Projector status:
Installation complete
14)
After installation is complete, unplug the power cord and the USB memory device from the projector.
*
Delete the copied file (kernel.awd) from the USB memory device.
Checking the Version
15)
Use the supplied power cord to plug the projector into a power outlet. The projector will enter standby.
Indicators:
Orange lit / Unlit / Unlit
Projector status:
Standby
16)
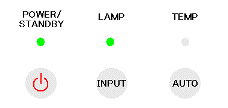
Press the [POWER] button to turn on the projector.
Indicators:
Green lit / Green lit / Unlit
Projector status:
Standing by for use
17)
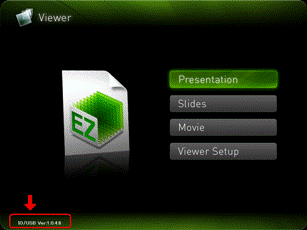
Plug the USB memory device into the projector. After a few moments, the Viewer window will be projected.
18)
Press the projector's [] and [] keys at the same time. This will cause your current USB version to appear in the lower left corner of the Viewer screen.
19)
Remove the USB memory device and then press the [POWER] button twice to turn the projector off. The projector will enter standby.
Important!
*
Power failure or disconnecting the USB memory device being used for installation while installation is in progress will cause your projector to lose its USB function. Take care that your projector is operating in a stable environment during installation.
*
Make sure that you use a power source with the same voltage as that specified for the projector.
*
Do not overload a power outlet with too many devices.
*
Do not share the outlet supplying power to the projector with other devices. If you are using an extension cord, make sure that the ampere rating of the extension cord is compatible with the power consumption value of this projector.
*
If you are unable to restart your projector after installing the update software, contact your local Authorized Service Center of Casio distributor or Casio Techno Technical Center. Tell them you need assistance because your projector will not restart after installing XJ-A135 / XJ-A145 / XJ-A235 / XJ-A245 / XJ-A135V / XJ-A145V / XJ-A155V / XJ-A245V / XJ-A245V / XJ-A255V firmware.
*
Note that installation of the update software cannot be undone. Once you install the update software, there is no way to restore your projector to its original firmware version.