Depending on the type of computer you are using, click one of the above links to download the update software. Windows users should click qv4000.exe, and Macintosh users should click qv4000.sit.
To install the update software on your camera
1)
The first steps you should take depend on whether you are using a Windows computer or a Macintosh.
Windows Users
*
Double-click the file you downloaded, and it will self-extract.
*
qv4000.exe extracts to qv-4000.bin.
Macintosh Users
*
Use Stuffit Expander or some other similar application to extract the file you downloaded. qv4000.sit extracts to qv-4000.bin.
2)
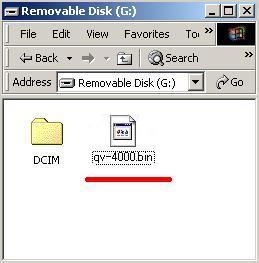
Copy the update software (qv4000.bin) to the root directory (directly under the drive name) of a CompactFlash card you formatted with your camera.
Windows
Macintosh
3)
Insert the CompactFlash card that has the copy of the update software into your camera. To prevent problems due to low battery power, you should be powering your camera using the AC adaptor or a fresh new set of batteries at this time.
4)
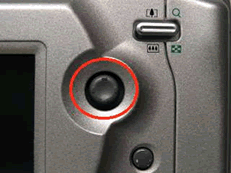
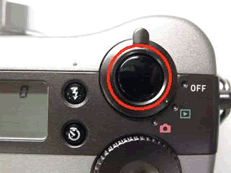
While holding down the center of the QV-4000's control button(Figure 1), rotate the power/function switch to "PLAY"(Figure 2).
(Figure 1)
(Figure 2)
5)
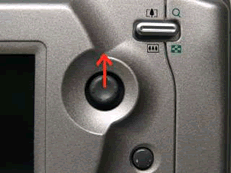
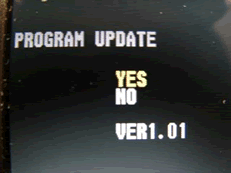
Keep the control button depressed until the message "PROGRAM UPDATE" appears on the monitor screen. On the PROGRAM UPDATE screen, move the highlighted box from [NO] to [YES] (Figure 4) by pressing (Figure 3).
Next, press the shutter release button (Figure 5).
(Figure 3)
(Figure 4)
(Figure 5)
6)
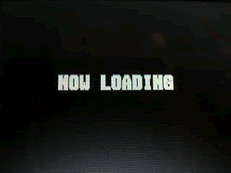
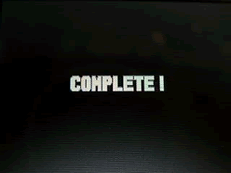
This starts the installation of the update software, which is indicated by the message "NOW LOADING" on the camera monitor screen (Figure 6). The message "Complete!" appears when the installation is complete (Figure 7). After a few moments, the power supply of the camera can be turned off.
(Figure 6)
(Figure 7)
7)
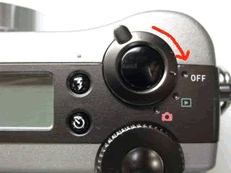
After installing the update software, rotate the power/function switch to "OFF" .
8)
While holding down the center of the QV-4000's control button, rotate the power/function switch to "PLAY".Keep the control button depressed until the message "PROGRAM UPDATE" appears on the monitor screen.
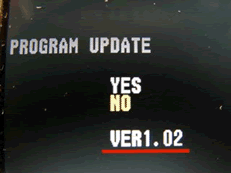
9)
Check to make sure that the monitor screen shows "VER.1.02" (Figure 8). This means that the update software has been installed correctly.
(Figure 8)
Important!
*
Before installing the update software, be sure you back up the photos in your camera to another CompactFlash card or your computer's hard disk.
*
Installing the update software can cause changes in the camera's image memory size, camera startup time, recording time, recording interval, user settings, etc.
*
If the update software installation process is interrupted due to low battery power, you may not be able to restart your camera. Be sure to use the specified AC adaptor or a fresh set of new batteries to power the camera during the update software installation procedure.
*
If you are unable to restart your camera after installing the update software, contact your local Authorized Service Center of Casio distributor or Casio Techno Technical Center (or Casio Techno Tokyo). Tell them you need assistance because your camera will not restart after installing QV-4000 firmware.
*
Note that installation of the update software cannot be undone. Once you install the update software, there is no way to restore your camera to its original firmware version.