 |
EX-S1/EX-M1 Firmware Update Software.....Version 1.12+W
|
|
The firmware of the EX-S1 is different from the firmware of the EX-M1. The firmware updates are designed so they cannot be installed into the wrong camera models. Make sure you know your camera's model number and download the proper firmware for it. |
|
| EX-S1 Owners |
| |
|
|
|
|
|
| EX-M1 Owners |
| |
|
|
|
|
|
|
Downloading the Update Software
|
|
Click the download file name for your camera model and computer operating system. |
|
|
|
|
To install the update software on your camera
|
|
|
|
|
• |
If firmware update installation is interrupted due to low battery power, your camera will no longer be able to operate. Be sure to load a fresh set of new batteries into the camera before starting the firmware update installation procedure. |
|
• |
After copying the EX-S1.BIN or EX-M1.BIN software to camera built-in memory or memory card, remove the camera from its USB cradle before installing the firmware onto the camera. This firmware update cannot be installed while the camera is on the USB cradle. |
|
|
|
|
| 1) |
Extract the file you downloaded. |
|
Windows Users |
|
* |
Double-click the file you downloaded, and it will self-extract.
EX-S1_W.exe extracts to EX-S1_W, while EX-M1_W.exe extracts to EX-M1_W. |
|
Macintosh Users |
|
* |
Use Stuffit Expander or some other similar application to extract the file you downloaded. EX-S1_W.sit extracts to EX-S1_W, while EX-M1_W.sit extracts to EX-M1_W. |
|
| 2) |
Open the EX-S1_W (or EX-M1_W) folder. Inside you will find two folders named EX-S1_W1 (or EX-M1_W1) and EX-S1_W2 (or EX-M1_W2). |
|
|
|
|
| 3) |
Open the EX-S1_W1 (or EX-M1_W1) folder. Inside you will find a file named EX-S1.BIN (or EX-M1.BIN). |
|
| 4) |
Place the camera onto its USB cable and establish a USB connection with your computer. |
|
|
| 5) |
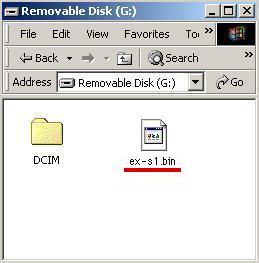
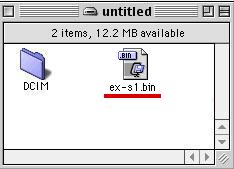
Copy the extracted file (EX-S1.BIN or EX-M1.BIN) to the root directory (the top directory on the drive) in camera built-in memory or on a memory card. |
|
| |
 Windows
 |
 Macintosh
 |
|
|
|
|
|
|
| |
| 6) |
Remove the camera from its USB cradle. |
|
|
|
|
| |
| 7) |
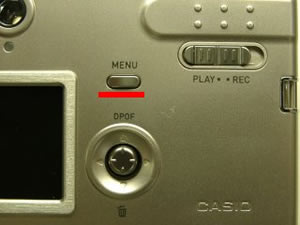
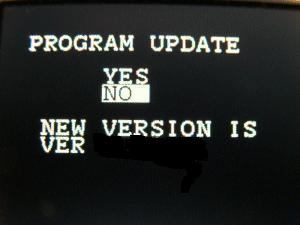
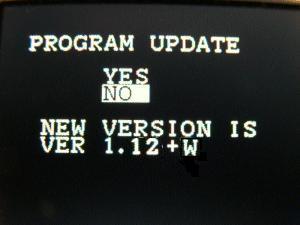
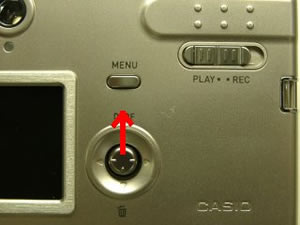
On your camera, hold down the [MENU] button (Figure 1) as you press the [POWER ON/OFF]switch (Figure 2) to turn on the camera. Keep the [MENU] key depressed until the message "PROGRAM UPDATE" (Figure 3) appears on the monitor screen. |
|
|
 (Figure 1)
 |
|
| |
 (Figure 2)
 |
|
| |
 (Figure 3)
 |
|
|
|
|
|
| |
| 8) |
On the "PROGRAM UPDATE" screen, move the highlighting from [NO] to [YES] by pressing (Figure 4). Next, press the controller (Figure 5). |
|
|
 (Figure 4)
 |
|
|
 (Figure 5)
 |
|
|
|
|
| |
|
|
| 9) |
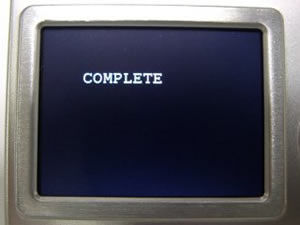
This starts installation of the update firmware, which is indicated by the message "NOW LOADING" on the camera monitor screen. The message "COMPLETE" (Figure 6) appears when installation is complete. |
|
| |
 (Figure 6)
 |
|
| 10) |
After installation is complete, turn off the camera. |
|
| 11) |
Place the camera onto its USB cable and establish a USB connection with your computer. |
|
| 12) |
In the camera's built-in memory or on its memory card, delete the default EX-S1.BIN (or EX-M1.BIN) file. |
|
| 13) |
Next, open the EX-S1_W2 (or EX-M1_W2) folder. Inside you will find a file named EX-S1.BIN (or EX-M1.BIN). |
| |
|
|
| * |
Note that the EX-S1.BIN (or EX-M1.BIN) file inside of the EX-S1_W1 (or EX-M1_W1) folder is completely different from the EX-S1.BIN (or EX-M1.BIN) file inside of the EX-S1_W2 (or EX-M1_W2) folder. |
|
|
| 14) |
Copy the extracted file (EX-S1.BIN or EX-M1.BIN) to the root directory (the top directory on the drive) in camera built-in memory or on a memory card. |
| |
Windows
|
Macintosh
|
|
|
|
|
|
|
|
| |
| 15) |
Remove the camera from its USB cradle. |
|
|
|
|
| |
| 16) |
On your camera, hold down the [MENU] button (Figure 7) as you press the [POWER ON/OFF] switch (Figure 8) to turn on the camera. Keep the [MENU] key depressed until the message "PROGRAM UPDATE" (Figure 9) appears on the monitor screen. |
|
|
 (Figure 7)
 |
|
| |
 (Figure 8)
 |
|
| |
 (Figure 9)
 |
|
|
|
|
|
| |
| 17) |
On the "PROGRAM UPDATE" screen, move the highlighting from [NO] to [YES] by pressing (Figure 10). Next, press the controller (Figure 11). |
|
|
 (Figure 10)
 |
|
| |
 (Figure 11)
 |
|
|
|
|
|
| |
| 18) |
This starts installation of the update firmware, which is indicated by the message "NOW LOADING" on the camera monitor screen. The message "COMPLETE" (Figure 12) appears when installation is complete. |
|
|
 (Figure 12)
 |
|
|
|
|
|
| |
| 19) |
After installation is complete, turn off the camera. |
|
|
|
|
| |
| 20) |
Check your camera's current firmware version to make sure that is back to the previous version. |
| |
|
|
| * |
If you copied the firmware update file (EX-S1.BIN or EX-M1.BIN) directly into camera memory, delete the copied file from camera memory. Next, hold down the camera's [MENU]button as you press the [POWER ON/OFF] switch to turn on the camera. Keep [MENU]depressed until the version of your camera's firmware appears on the monitor screen. If "Ver.1.12+W" appears, it means that firmware installation was successful. |
|
| |
|
|
| * |
If you copied the firmware update file (EX-S1.BIN or EX-M1.BIN) to a memory card, remove the memory card from the camera. Next, hold down the camera's [MENU] button as you press the [POWER ON/OFF] switch to turn on the camera. Keep [MENU] depressed until the version of your camera's firmware appears on the monitor screen. If "Ver.1.12+W" appears, it means that firmware installation was successful. |
|
|
|
|
|