| Mar.2003 |
Download File
|
 |
When the file save dialog box appears, specify the folder on your computer where you want to save the downloaded file, and then click the [Save] button. |
| |
|
Downloading the File
|
|
Click the download file name "usb_gv10_win.exe" to download it to your computer. |
Installation Precautions and Procedures
|
|
Installation notes |
|
|
|
|
* |
If you already have the USB driver on the CD-ROM that comes bundled with the GV-10/GV-20 installed on your computer, you do not need to uninstall it before installing this driver. Simply install this USB driver over the driver from the CD-ROM. |
|
* |
Be sure not to connect your digital camera to your computer before you install the downloaded USB driver.If the digital camera is connected to a computer before installing the driver, the Plug & Play function may register it as an unidentified device. |
|
|
1. |
Double-click the compressed USB driver file (usb_gv10_win.exe) that you downloaded. This will automatically extract it. |
|
|
|
2. |
On the dialog box that appears, specify the location where you want to extract the files, and then click "OK" |
| |
• |
This will create a folder named "usb_gv10_win" at the location you specified. The folder will contain the files listed below. |
|
|
|
3. |
Open the extracted "usb_gv10_win" folder, and then double click "Setup.exe" to start the installer (Figure 1). |
|
|
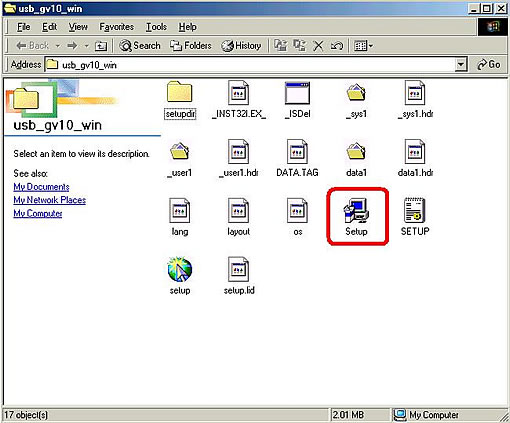 |
| Figure 1 |
|
|
|
|
|
4. |
On the "Choose Setup Language" dialog box that appears, select "English", and then click "OK" (Figure 2). |
|
|
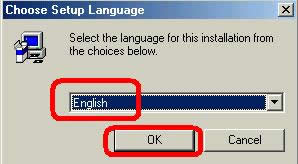 |
| Figure 2 |
|
|
|
|
|
5. |
In response to the "Warning" dialog box with the message "Please disconnect your camera from PC now before running this installer." (Figure 3), click "OK" |
|
|
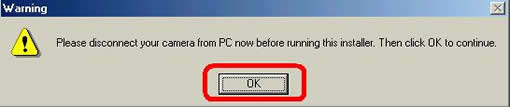 |
| Figure 3 |
|
|
|
|
|
6 |
On the "welcome" dialog box that appears (Figure 4), click [Next]. |
| |
• |
This starts installation. |
|
|
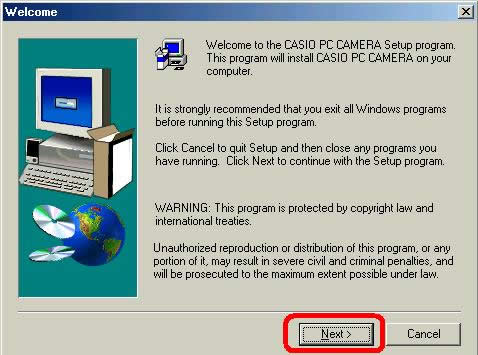 |
| Figure 4 |
|
|
|
|
7 |
When the "Setup Complete" dialog box appears (Figure 5), select the "Yes, I want to restart my computer now" check box, and then click [Finish]. |
|
|
 |
| Figure 5 |
|
|
|
|
|
8. |
After your computer restarts, turn on the camera. |
|
|
|
9. |
Check the "SET UP" menu. If its setting shows "USB" - "PC CAMERA", change the "SET UP" menu to "PC". |
|
|
|
10. |
Use the special USB cable to connect the camera to your computer. |
|
|
This completes installation of the USB driver. Start up Windows Movie Maker or Net Meeting, and confirm that the camera is working correctly as a video camera. |
|
|
Important! |
|
|
* |
Never disconnect the USB cable while data communication is in progress. Doing so can cause data to become corrupted. |
|
|
* |
The specifications and performance of the USB driver are subject to change without notice. |
|
|
* |
This upgrade offer may be terminated without notice. |
|
| |
File List
|
|
Extracting the downloaded file creates the files listed below. |
|
|
usb_gv10_win[Folder] |
|
|
 |
 setupdir[Folder] setupdir[Folder] |
|
| 0009[Folder] |
|
 _Setup.dll _Setup.dll |
|
| 0011[Folder] |
|
| _Setup.dll |
|
| _INS32I.EX_ |
| _ISDel.exe |
| _sys1.hdr |
| _sys1.hdr |
| _user1.cab |
| _user1.hdr |
| DATA.TAG |
| data1.cab |
| data1.hdr |
| lang.dat |
| layout.bin |
| os.dat |
| Setup.exe |
| SETUP.INI |
| setup.ins |
 setup.lid setup.lid |
|